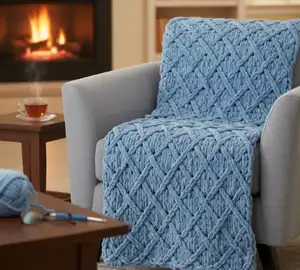
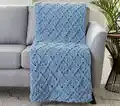
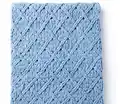
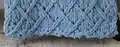
Create a stunning textured blanket with this unique diamond lattice design using Bernat Alize Blanket-EZ yarn. This innovative pattern features a beautiful interwoven look that's achieved through strategic loop crossing techniques, creating raised diamond shapes across the entire blanket. Perfect for adding warmth and visual interest to any room, this 56" x 60" blanket works up surprisingly fast despite its intricate appearance. The pattern uses a special no-turn technique where you work back and forth without turning your work, making it a fascinating project for those looking to expand their crochet skills.
Progress Tracker
0% Complete
— Foundation Row:
Setup:
Count 68 loops for foundation row
— 1st Row:
Direction:
Working from right to left
Step 1:
Pull the 69th loop (from working yarn) up through 68th loop (last loop of foundation row) from behind to create a knit stitch
Step 2:
Pull next loop from working yarn up through next loop of foundation row
Step 3:
*Cross second loop of foundation row in front of first loop of foundation row (to the right). Pull next loop from working yarn up from behind next loop. Pull next loop from working yarn up from behind next loop. Cross next loop of foundation row in front of 2nd loop of foundation row (to the left). Pull next loop from working yarn up from behind through next loop. Pull next loop from working yarn up from behind through next loop. (Pull next loop from working yarn up through next loop of foundation row) twice. Repeat from * to end of row. Do not turn work. 68 stitches in row
— 2nd Row:
Direction:
Working from left to right
Step 1:
Pull next loop from working yarn up from behind through last stitch worked on previous row
Step 2:
*Cross 2nd stitch over next stitch (to the left). Pull loop from working yarn up from behind through 2nd stitch. Pull next loop from working yarn up from behind 1st stitch. (Pull next loop from working yarn up from behind next loop) twice. Cross next stitch in front of 2nd stitch (to the right). Pull next loop from working yarn up from behind 1st stitch. Pull next loop from working yarn up from behind 2nd stitch. Rep from * to last stitch. Pull loop from working yarn up from behind next loop. Do not turn
— 3rd Row:
Direction:
Working from right to left
Step 1:
Cross 2nd stitch of previous row over 1st stitch (to the right). Pull loop from working yarn up from behind 2nd stitch. Pull next loop from working yarn up from behind 1st stitch
Step 2:
*(Pull next loop from working yarn up from behind next loop) over next 4 stitches. Cross 2nd stitch in front of next stitch (to the right). Pull next loop from working yarn up from behind 2nd stitch. Pull next loop from working yarn up from behind 1st stitch. Rep from * to last 6 stitches
Step 3:
*(Pull next loop from working yarn up from behind next loop) over next 4 stitches. Cross next stitch in front of 2nd stitch (to the left). Pull next loop from working yarn up from behind 2nd loop. Pull next loop from working yarn up from behind 1st loop. Do not turn
— 4th Row:
Direction:
Working from left to right
Step 1:
Pull next loop from working yarn up from behind through last stitch worked on previous row
Step 2:
*Cross next stitch in front of 2nd stitch (to the right). Pull next loop from working yarn up from behind 2nd loop. Pull next loop from working yarn up from behind 1st loop. (Pull next loop from working yarn up from behind next loop) twice. Cross 2nd stitch in front of next stitch (to the left). Pull next loop from working yarn up from behind 2nd loop, Pull next loop from working yarn up from behind 1st loop. Rep from * to last stitch. Pull next loop from working yarn up from behind next stitch. Do not turn
— 5th Row:
Direction:
Working from right to left
Step 1:
(Pull next loop from working yarn up from behind last stitch worked on previous row) twice
Step 2:
*Cross next stitch in front of 2nd stitch (to the left). Pull next loop from working yarn up from behind 2nd stitch. Pull next loop from working yarn up from behind 1st stitch. Cross 2nd stitch in front of next stitch (to the right). Pull next loop from working yarn up from behind 2nd stitch. Pull next loop from working yarn up from behind 1st stitch. (Pull next loop from working yarn up from behind next loop) twice. Rep from * to end of row. Do not turn
— 6th Row:
Direction:
Working from left to right
Step 1:
(Pull next loop from working yarn up from behind last stitch worked on previous row) three times
Step 2:
*Cross 2nd stitch in front of 1st stitch (to the left). Pull next loop from working yarn up from behind 2nd stitch. Pull next loop from working yarn up from behind 1st stitch. (Pull next loop from working yarn up from behind next loop) over next 4 stitches. Rep from * to last 5 stitches
Step 3:
Cross 2nd stitch in front of 1st stitch (to the left). Pull next loop from working yarn up from behind 2nd stitch. Pull next loop from working yarn up from behind 1st stitch. (Pull next loop from working yarn up from behind last stitch worked on previous row) three times. Do not turn
— 7th Row:
Direction:
Working from right to left
Step 1:
(Pull next loop from working yarn up from behind last stitch worked on previous row) twice
Step 2:
*Cross 2nd stitch in front of next stitch (to the right). Pull next loop from working yarn up from behind 2nd stitch. Pull next loop from working yarn up from behind 1st stitch. Cross next stitch in front of 2nd stitch (to the left). Pull next loop from working yarn up from behind 2nd stitch. Pull next loop from working yarn up from behind 1st stitch. (Pull next loop from working yarn up from behind next loop) twice. Rep from * to end of row. Do not turn
— 8th Row:
Direction:
Working from left to right
Step 1:
Pull next loop from working yarn up from behind through last stitch worked on previous row
Step 2:
*Cross 2nd stitch in front of next stitch (to the left). Pull next loop from working yarn up from behind 2nd stitch. Pull next loop from working yarn up from behind 1st stitch. (Pull next loop from working yarn up from behind next loop) twice. Cross next stitch in front of 2nd stitch (to the right). Pull next loop from working yarn up from behind 2nd loop. Pull next loop from working yarn up from behind 1st loop. Rep from * to last stitch. Pull next loop from working yarn up from behind next loop. Do not turn
— 9th Row:
Direction:
Working from right to left
Step 1:
Cross 1st stitch over 2nd stitch (to the left). Pull next loop from working yarn up from behind 2nd loop
Step 2:
*Pull next loop from working yarn up from behind 1st loop. (Pull next loop from working yarn up from behind next loop) over next 4 stitches. Cross 2nd stitch in front of next stitch (to the right). Pull next loop from working yarn up from behind 2nd stitch. Pull next loop from working yarn up from behind 1st stitch. Rep from * to last 6 stitches
Step 3:
(Pull next loop from working yarn up from behind next loop) over next 4 stitches. Cross 2nd stitch in front of next stitch (to the right). Pull next loop from working yarn up from behind 2nd stitch. Pull next loop from working yarn up from behind 1st stitch. Do not turn
— 10th Row:
Direction:
Working from left to right
Step 1:
Pull next loop from working yarn up from behind last stitch worked on previous row. Cross next stitch in front of 2nd stitch (to the right). Pull next loop from working yarn up from behind 2nd stitch. Pull next loop from working yarn up from behind 1st stitch
Step 2:
*(Pull next loop from working yarn up from behind next loop) twice. Cross 2nd stitch over next stitch (to the left). Pull next loop from working yarn up from behind 2nd stitch. Pull next loop from working yarn up from behind 1st stitch. Cross next stitch over 2nd stitch (to the right). Pull next loop from working yarn up from behind 2nd loop. Pull next loop from working yarn up from behind 1st loop. Rep from * to last 5 stitches
Step 3:
(Pull next loop from working yarn up from behind next loop) twice. Cross next stitch in front of 2nd stitch (to the left). Pull next loop from working yarn up from behind 2nd stitch. Pull next loop from working yarn up from behind 1st stitch. Pull next loop from working yarn up from behind last stitch. Do not turn
— Pattern Repeat:
Info:
Repeat 5th to 10th rows for pattern. Work in pattern until Blanket measures approximately 60 inches (152.5 cm), ending on a 5th row
— Bind Off Row:
Step 1:
Working in same direction as last row, pull 2nd stitch through 1st stitch. Pull 3rd stitch through 2nd stitch. Pull 4th stitch through 3rd stitch
Step 2:
Continue in this manner to end of row. Cut thread at base of loop (thread used to create the loop) to create a yarn tail. Tie to secure and weave in end
This stunning EZ Diamond Lattice Blanket pattern brings textured elegance to your home with its intricate interwoven design. Using the innovative Bernat Alize Blanket-EZ yarn with pre-made loops, you'll create a luxurious blanket that looks incredibly complex but follows a logical repeat pattern. The raised diamond shapes add beautiful dimension and make this blanket a true statement piece. Perfect for experienced crocheters ready to tackle advanced techniques! 🧶✨