🧶 Beautiful ✨ Detailed 💝 Adorable

Patchwork Sweater Crochet Pattern

Patchwork Sweater Crochet Pattern
4.6★ Rating
25-30 Hours Time Needed
3.0K Made This
✂️

Intermediate Level

Ideal for those with basic knitting experience, featuring slightly more advanced stitches and techniques to expand your skills.

⏱️

Slow & Steady

A 10-12 hour project—great for savoring the process over several sessions.

🧥

Layered Comfort

Perfect for cozy, stylish layering through changing seasons with versatile, mix-and-match potential.

About This Patchwork Sweater Crochet Pattern

This Patchwork Sweater pattern brings together the timeless beauty of granny squares with modern design sensibility. You'll create 72 individual Sunburst Granny Squares that are then connected to form panels for the body and sleeves. The pattern includes detailed instructions for specialty stitches like puff stitches and cluster stitches, making each square a mini masterpiece. The contrasting ribbing at the bottom, collar, and sleeves adds a professional finish that elevates this sweater from simple to stunning.

Patchwork Sweater Crochet Pattern crochet pattern - detailed view of completed project

What makes this pattern special is its flexibility—you can customize the size by changing hook sizes or adding more squares, and the color possibilities are endless. The oversized fit and cropped length make it perfect for modern styling, while the ribbed details ensure a comfortable, flattering fit.

Why You'll Love This Patchwork Sweater Crochet Pattern

I absolutely love this pattern because it's the perfect balance of repetitive and engaging work. Each granny square is small enough to feel like a quick win, but the specialty stitches keep things interesting. I love that you can work on squares while watching TV or traveling, then assemble them into something truly impressive. The customization options mean you can make this sweater uniquely yours—whether you go for a rainbow explosion or sophisticated monochrome. Plus, there's something so satisfying about seeing all those individual squares come together into a wearable piece of art. The ribbing adds such a polished touch that people will think you bought it from a boutique!

Patchwork Sweater Crochet Pattern step 1 - construction progress Patchwork Sweater Crochet Pattern step 2 - assembly progress Patchwork Sweater Crochet Pattern step 3 - details and accessories Patchwork Sweater Crochet Pattern step 4 - final assembly and finishing

Switch Things Up

I love experimenting with color combinations for this patchwork sweater! Instead of using one solid color for all the squares, try creating an ombre effect by gradually transitioning from light to dark shades as you move from the bottom to the top of the sweater. You could also make each square a different color for a vibrant rainbow effect, or work with a sophisticated two-color palette for a more subtle look.

For a truly unique twist, I sometimes use variegated or self-striping yarn for the squares—this creates an automatic color-changing effect that looks complex but requires no extra effort. You could also experiment with the contrasting color by using metallic yarn for the seaming and ribbing to add a touch of glamour, or try a fuzzy mohair blend for a softer, cozier texture.

Another fun variation is playing with square placement—instead of a uniform grid, try arranging squares in a diagonal pattern or creating a color-blocked design with intentional color placement. You could even make some squares in a different granny square pattern entirely, mixing the Sunburst pattern with traditional or African flower squares for added visual interest. The ribbing sections can also be customized—try making them wider for a more dramatic look, or skip the bottom ribbing and add fringe instead for a bohemian vibe!

Common Mistakes & How to Fix Them

✗ Not blocking squares before assembly can lead to uneven sizing and a misshapen final sweater that doesn't hang properly ✗ Skipping gauge swatches means your squares might not match the pattern dimensions resulting in incorrect sizing for the finished garment ✗ Working puff stitches too loosely creates gaps in the fabric while working them too tightly makes the squares pucker and distort ✗ Forgetting to chain one to lock puff stitches makes it difficult to work into those stitches in subsequent rounds ✗ Not working horizontal seams first in one direction leads to bulky intersections where four squares meet creating an uneven surface ✗ Cinching sleeves too tightly restricts arm movement while cinching too loosely results in sleeves that are baggy and unflattering

Patchwork Sweater Crochet Pattern

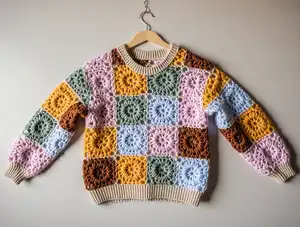
Create your own stunning patchwork sweater with this beautiful Sunburst Granny Square design! This oversized, slightly cropped sweater features colorful granny squares connected with contrasting yarn and finished with ribbed edging for a polished look. Perfect for showcasing your favorite yarn colors or using up your stash, this customizable pattern allows you to adjust the size by simply changing your hook size or adding more squares. Whether you're looking for a cozy layering piece or a statement garment, this patchwork sweater combines classic crochet techniques with modern style to create a truly unique handmade wardrobe essential.

Intermediate 25-30 Hours

Materials Needed for Patchwork Sweater Crochet Pattern

— Main Fabric

  • 01
    DK/Light Worsted Weight Acrylic Yarn - 1850 yards for body in main color
  • 02
    DK/Light Worsted Weight Acrylic Yarn - 400 yards in contrasting color for ribbing and seaming
  • 03
    Hobbii Kind Feather Yarn Weight 3 Medium (100% premium acrylic, 257yd/235m, 3.5oz/100g) recommended

— Tools Required

  • 01
    4mm crochet hook for default squares
  • 02
    3.5mm crochet hook for ribbing (4-inch square version)
  • 03
    5mm crochet hook for larger sizes
  • 04
    4.5mm crochet hook for ribbing (5-inch square version)
  • 05
    Yarn needle
  • 06
    Scissors
  • 07
    Measuring tape

Progress Tracker

0% Complete

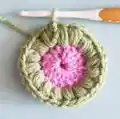
— Sunburst Granny Square :

Begin :

Using larger hook, form a Magic Loop (Alternative: ch 4, sl st into first ch to make a loop)

Round 1 :

Ch 3 (counts as a dc), work 15 more dc in the ring; join with a sl st to the top of the beginning ch-3 (16 dc)

Round 2 :

Ch 1, puff st in the same st and in each dc around; join with a sl st to the first puff st (16 puff sts)

Round 3 :

Ch 2, (cluster st, ch 2) in the first ch-1 sp and in each ch-1 sp around; join with a sl st to the first cluster st of the round (16 cluster sts)

Round 4 :

Entire round is worked into ch-2 sps between clusters. Ch 3, 2 dc in the same sp, *(3 tr, ch 2, 3 tr), 3 dc, 3 hdc, 3 dc; rep from * around omitting last 3 dc at the end, join to top of beg ch-3. 15sts on each side between each ch-2 sp. Fasten off.

Info :

If using natural fibers, block squares before assembly

Info :

Make 40 squares for the body and 32 squares for sleeves (or quantity required for size adjustments)

— Assembly :

Info :

Switch to contrast color yarn

Front & Back panel :

Lay out 20 (wider: 35) squares in a grid. 5 (wider: 7) squares across by 4 (longer: 5) squares long

Seaming :

Work horizontal seams first in one direction. Insert hook into 2 corners, sl st corners together, ch 1, 2 sc in corner. Cont 1 sc in each st to next corner. 2 sc at each of the corners to end.
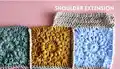
— Shoulder :

Info :

Switch to contrast color yarn

Front & Back panel :

In the 2nd square inside the body, sl st in between the 2nd and 3 cluster, ch 1, sc in the same sp

Row 1 :

Working towards corner, Sc 24 sts. Ch 1 turn. Repeat for 3 more rows.

Info :

Repeat for the opposite shoulder

— Ribbing for Bottom :

Info :

Switch to smaller hook & contrast color yarn

Row 1 :

Sl st into bottom corner of front panel, ch 1. Sc into each st around the whole body opening sl st into first sc. Ch 16.

Ribbing Row 1 :

Sc in the second ch from hook and each ch to body, sc in the next 2 sts of body, turn

Row 2 :

Sk 2 sts in the body, sc blo each st across ribbing, ch 1, turn

Row 3 :

Sc blo in each st to body, sc in next 2 sts of body, turn (15 sts)

Info :

Repeat Rows 2-3 until all body sts are used around bottom of sweater

— Ribbing for Collar :

Info :

Switch to smaller hook & contrast color yarn

Row 1 :

Sl st into the color sp, ch 1. Sc into each st around the whole body opening sl st into first sc. Ch 8

Ribbing Row 1 :

Sc in the second ch from hook and each ch to body, sc in the next 2 sts of body, turn

Row 2 :

Sk 2 sts in the body, sc blo each st across ribbing, ch 1, turn

Row 3 :

Sc blo in each st to body, sc in next 2 sts of body, turn (7 sts)

Info :

Repeat Rows 2-3 until all body sts are used around the neck opening

— Ribbing for Sleeves :

Info :

Switch to smaller hook

Sleeve Cinching Round 1 :

Insert hook into bottom of sleeve. Ch 1, sc in each st and each ch-sp, sl st to first sc

Round 2 :

Ch 1, sc2tog around, sl st in first st

Making the Cuff - Ch 11 :

Ch 11

Row 1 :

Sc in the second ch from hook and each ch to body, sc in the next 2 sts of body, turn (10 sts)

Row 2 :

Sk 2 sts in the body, sc blo each st across ribbing, ch 1, turn

Row 3 :

Sc blo in each st to body, sc st in next 2 sts of body, turn

Info :

Repeat Rib Rows 2-3 as for other sections until all sleeve sts are used

Info :

Fasten off leaving a tail to sew edges of ribbing together (through blo of last row)

— Finishing :

Info :

Fasten off, sew in ends

Assembly Instructions

  • Create front and back panels by laying out 20 squares in a 5x4 grid (or 35 squares in 7x5 for wider version)
  • Work horizontal seams first using contrast color, slip stitching corners together and single crocheting across each side
  • Create sleeves by connecting 16 squares each in your desired configuration for sleeve panels
  • Attach shoulder sections by working in the second square from the edge, creating 4 rows of 24 single crochet stitches
  • Join all body panels together using single crochet seaming with contrast yarn to complete the whole body assembly
  • Add bottom ribbing by working around the entire bottom opening with back loop only single crochet in a perpendicular direction
  • Complete collar ribbing around the neck opening and sleeve cuffs, cinching sleeves first before adding ribbed cuffs

Important Notes

  • 💡Specialty stitches are defined at the beginning—puff stitch requires pulling up long loops 3 times before closing
  • 💡Cluster stitch is worked by yarning over and pulling through 2 loops 4 times before closing all remaining loops
  • 💡Hook size directly affects square size: 4mm creates 4-inch squares while 5mm creates 4.5-inch squares
  • 💡Size adjustments are made by adding squares—5 more per side for width, 7 more for length
  • 💡Always work horizontal seams first in one direction to ensure clean intersections where squares meet
  • 💡Use smaller hook for all ribbing sections to create the proper tension and stretch
  • 💡Natural fiber yarns should be blocked after completing squares but before assembly for best results

This gorgeous Patchwork Sweater pattern combines the beloved granny square technique with contemporary design for a truly show-stopping garment! With its customizable sizing, endless color possibilities, and detailed instructions for specialty stitches, this pattern lets you create a one-of-a-kind sweater that's both cozy and stylish. The oversized fit and ribbed finishing touches make this piece perfect for everyday wear or special occasions. Whether you're a granny square enthusiast or looking to try something new, this pattern will become a treasured addition to your handmade wardrobe. 🧶 Happy crocheting! ✨

You ask,

we answer.

FAQs

How much yarn do I need for this sweater?

You'll need approximately 1850 yards of DK/Light Worsted Weight yarn in your main color for the body squares, plus 400 yards of contrasting color for seaming and ribbing. The pattern recommends Hobbii Kind Feather Yarn.

Can I adjust the size of this sweater?

Yes! You can change the hook size (4mm for smaller, 5mm for larger), add 5 squares per side for width, add 7 squares at the bottom for length, or add 4 squares per sleeve for wider sleeves.

What's the difference between puff stitch and cluster stitch?

Puff stitch involves pulling up long loops 3 times then closing all loops with a chain to lock. Cluster stitch involves yarning over, pulling through 2 loops 4 times, then closing all remaining loops—no locking chain needed.

Do I need to block the squares before assembly?

If you're using natural fiber yarn, blocking is recommended before assembly to ensure even sizing. For acrylic yarn, blocking is optional but can help achieve more uniform squares.

How do I connect the granny squares together?

Use the contrast yarn to work horizontal seams first. Insert your hook into two corners, slip stitch them together, chain 1, work 2 single crochet in the corner, then continue with 1 single crochet in each stitch across.

What does working in back loop only (blo) mean for the ribbing?

Back loop only means you insert your hook through only the back loop of each stitch rather than under both loops. This creates the ridged texture characteristic of ribbing and gives it stretch.