๐Ÿงถ Beautiful โœจ Detailed ๐Ÿ’ Adorable

Erebus the Angler Fish Crochet Pattern

Erebus the Angler Fish Crochet Pattern
4.0โ˜… Rating
4-5 Hours Time Needed
3.3K Made This
โœ‚๏ธ

Intermediate Level

Ideal for those with basic knitting experience, featuring slightly more advanced stitches and techniques to expand your skills.

โฑ๏ธ

Weekend Treat

Takes 5-7 hours, making it an enjoyable project to finish over a couple of days.

๐ŸŸ

Charming Critter

Delightful animal designs with sweet details that capture the essence of your favorite woodland and farmyard friends.

About This Erebus the Angler Fish Crochet Pattern

Erebus the Angler Fish Crochet Pattern crochet pattern - detailed view of completed project

The pattern includes two different top fin versions to choose from, allowing you to customize your creation. The light feature uses pipe cleaners for posability, adding an interactive element to your finished piece.

Why You'll Love This Erebus the Angler Fish Crochet Pattern

I absolutely love this pattern because it's unlike any typical cute amigurumi you'll find! The angler fish is such a unique and fascinating creature, and bringing one to life with yarn feels like creating a little piece of the ocean's mystery. I'm especially fond of the eye-sculpting technique that gives Erebus that authentic deep-sea look, and the way the fins and tail come together to create such dynamic movement. Plus, there's something wonderfully quirky about having a toothy predator fish sitting on your shelf that makes people smile. The posable light feature adds a playful touch that lets you adjust Erebus's personality, and I find the whole assembly process really satisfying as you watch this creature take shape piece by piece.

Erebus the Angler Fish Crochet Pattern step 1 - construction progress Erebus the Angler Fish Crochet Pattern step 2 - assembly progress Erebus the Angler Fish Crochet Pattern step 3 - details and accessories Erebus the Angler Fish Crochet Pattern step 4 - final assembly and finishing

Switch Things Up

I love experimenting with this pattern to create different deep-sea personalities! One of my favorite modifications is using glow-in-the-dark yarn for the light bulb section - it adds such a magical touch when you turn off the lights. You could also try making the angler fish in different color schemes: an all-black version looks super mysterious and dramatic, while pastel colors create an adorable "kawaii" interpretation of this typically scary creature.

For the teeth, I sometimes add extra front teeth or make them longer for a more exaggerated, cartoonish look that appeals to kids. You could also embroider small details like scales on the body or add extra small fins along the sides. If you're feeling adventurous, try making multiple angler fish in different sizes by changing your hook size - a family of them displayed together looks amazing!

The tail section is particularly fun to customize - you can make the fin points longer or shorter, add more or fewer points, or even create a completely different tail shape. I've also seen crafters add small beads or sequins to the body for a sparkly, bioluminescent effect that mimics how real angler fish glow in the deep ocean. Don't be afraid to make Erebus your own!

Common Mistakes & How to Fix Them

โœ— Not stuffing the head firmly enough before creating the sunken eye effect can result in uneven or poorly defined eye sockets โœ— Placing safety eyes too close together or at the wrong rounds will throw off the entire facial structure and proportions โœ— Skipping the eye removal and threading process will prevent achieving the characteristic sunken angler fish eye appearance โœ— Failing to use stitch markers consistently leads to miscounting rounds and misshapen body parts that don't align properly โœ— Over-stuffing the light appendage makes it difficult to position and can prevent the pipe cleaner from creating the desired pose โœ— Not pinning pieces before sewing causes misalignment of fins and mouth, resulting in an asymmetrical or awkward final appearance

Erebus the Angler Fish Crochet Pattern

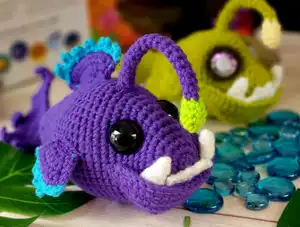
Create your own mesmerizing deep-sea creature with this enchanting angler fish crochet pattern! This unique design features a plump body with distinctive sunken eyes, sharp teeth details, and that iconic glowing lure that makes angler fish so fascinating. Perfect for ocean lovers and those who appreciate quirky amigurumi, this pattern guides you through creating fins, a dramatic tail, and assembly techniques that bring Erebus to life. The finished piece measures approximately 6 inches and makes a wonderful display item or gift for marine life enthusiasts.

Intermediate 4-5 Hours

Materials Needed for Erebus the Angler Fish Crochet Pattern

โ€” Main Fabric

  • 01
    Worsted Weight #4 yarn in purple (approximately 75g for main color)
  • 02
    Worsted Weight #4 yarn in green, white, and blue (less than 25g total for accent colors)
  • 03
    Red Heart Purple for main body
  • 04
    I Love This Yarn Key Lime for light feature
  • 05
    Big Twist White for teeth details
  • 06
    Red Heart Aqua for fin accents

โ€” Tools Required

  • 01
    Crochet hook size D or 3.25mm
  • 02
    27mm safety eyes
  • 03
    Scissors
  • 04
    Yarn needle for sewing
  • 05
    Stitch markers
  • 06
    Fiberfill stuffing (Polyfil recommended)
  • 07
    Pipe cleaner for posable light feature
  • 08
    Pins for assembly
  • 09
    Optional: Black eye shadow or black crayon for eye detailing

Progress Tracker

0% Complete

โ€” Fish Head and Body :

Info :

Crocheted from front to back with Color A (Purple)

Round 1 :

Make 6 sc into a magic ring (6)

Round 2 :

Increase in each st around (12)

Round 3 :

(sc, inc) x 6 (18)

Round 4 :

(2 sc, inc) x 6 (24)

Round 5 :

(3 sc, inc) x 6 (30)

Round 6 :

sc in each st around (30)

Round 7 :

(inc, sc) x 3, 24 sc (33)

Round 8 :

sc in each st around (33)

Round 9 :

(inc, 2 sc) x 3, 24 sc (36)

Round 10 :

sc in each st around (36)

Round 11 :

(inc, 3 sc) x 3, 24 sc (39)

Info :

Place eyes between rounds 10 and 11, leaving 10 holes between them. 1st eye is placed 1 hole before the 1st increase. Count 11 holes after the first eye and place the 2nd eye. If you want the sunken eye look, do not place the backs of the eyes on until round 21

Round 12 :

sc in each st around (39)

Round 13 :

(inc, 4 sc) x 3, 24 sc (42)

Round 14-18 :

sc in each st around (42)

Round 19 :

(dec, 12 sc) x 3 (39)

Round 20 :

(dec, 11 sc) x 3 (36)

Round 21 :

sc in each st around (36)

Info :

Stuff the head well. Cut a long piece of yarn and remove the eyes. Place the needle in the hole where the first eye was and thread the needle into a hole next to the eye hole. Go back and forth between each eye hole repeating the process from the first eye. Pull slightly on the yarn after going through each hole. Do this about 3 times on each side until you reach the look you want. To place the backs of the eyes you will need to remove most of the stuffing to place the washers on the eyes then re-stuff it

Round 22 :

(dec, 10 sc) x 3 (33)

Round 23 :

(dec, 9 sc) x 3 (30)

Round 24-26 :

sc in each st around (30)

Round 27 :

(3 sc, dec) x 6 (24)

Round 28-30 :

sc in each st around (24)

Round 31 :

(2 sc, dec) x 6 (18)

Round 32-33 :

sc in each st around (18)

Round 34 :

(sc, dec) x 6 (12)

Round 35 :

sc in each st around (12)

โ€” Tail :

Info :

Fold the opening in half and sc the opening closed

Row 1 :

Ch 1, turn, sc across (6)

Row 2 :

Ch 1, turn, inc, 4 sc, inc (8)

Row 3 :

Ch 1, turn, inc, 6 sc, inc (10)

Row 4 :

Ch 1, turn, sc across (10)

Row 5 :

Ch 1, turn, inc, 8 sc, inc (12)

Row 6 :

Ch 1, turn, inc, 10 sc, inc (14)

Row 7 :

Ch 1, turn, inc, 12 sc, inc (16)

Row 8 :

Ch 5, sc in 2nd ch from hook, hdc in next ch, dc in next ch, tr in last ch, sl st in same st, 4 sc, ch 3, sc in 2nd ch from hook, hdc in next ch, sl st in same st, 4 sc, ch 5, sc in 2nd ch from hook, hdc in next ch, dc in next ch, tr in last ch, sl st in same st, 4 sc, ch 4, sc in 2nd ch from hook, hdc in next ch, dc in last ch, sl st in same st, 3 sc

Info :

F/O and weave in the tail end

โ€” Teeth (Make 2) :

Info :

With Color C (White)

Round 1 :

Make 3 sc into a magic ring (3)

Round 2 :

Inc, 2 sc (4)

Round 3 :

sc in each st around (4)

Round 4 :

(inc, sc) x 2 (6)

Round 5-6 :

sc in each st around (6)

Info :

Do not stuff the teeth. Sc the opening closed. F/O and leave a long tail for sewing

โ€” Front Teeth :

Info :

With Color C (White)

Row 1 :

Ch 8, sc in 2nd ch from hook and across (7)

Row 2 :

*Ch 3, turn, sl st in same st, sc in next 2 st* Repeat from * to * across

Info :

F/O and leave a long tail for sewing

โ€” Mouth :

Info :

With Color A (Purple)

Row 1 :

Ch 11, sc in 2nd ch from hook and across (10)

Row 2 :

Ch 1, turn, inc, 8 sc, inc (12)

Row 3 :

Ch 1, turn, inc, 10 sc, inc (14)

Row 4 :

Ch 1, turn, inc, 12 sc, inc (16)

Row 5 :

Ch 1, turn, inc, 14 sc, inc (18)

Row 6 :

Ch 1, turn, inc, 16 sc, inc (20)

Row 7 :

Ch 1, turn, inc, 18 sc, inc (22)

Row 8 :

Ch 1, turn, inc, 20 sc, inc (24)

Row 9 :

Ch 1, turn, inc, 22 sc, inc (26)

Row 10 :

Ch 1, turn, BLO sc in each st across, sc around the rest of the edges of the mouth (26)

Info :

F/O and leave an extra long tail for sewing

โ€” Side Fins (Make 2) :

Info :

Starting with Color A (Purple). Leave a long tail at the beginning for sewing

Row 1 :

Ch 5, sc in 2nd ch from hook and across (4)

Row 2 :

Ch 1, turn, inc, 2 sc, inc (6)

Row 3 :

Ch 1, turn, sc in each st across (6)

Row 4 :

Ch 1, turn, inc, 4 sc, inc (8)

Row 5 :

Ch 1, turn, sc in each st across (8)

Info :

Sc around all the edges to give a cleaner look. Change to Color D (Blue)

Row 6 :

*Ch 3, sl st in same st, sc in next 2 st* repeat from * to * across

Info :

F/O and weave in the tail ends

โ€” Top Fin Version #1 :

Info :

Starting with Color A (Purple). Leave a long tail at the beginning for sewing

Row 1 :

Ch 9, sc in 2nd ch from hook and across (8)

Row 2 :

Ch 1, turn, inc, 6 sc, inc (10)

Row 3 :

Ch 1, turn, inc, 8 sc, inc (12)

Row 4 :

Ch 1, turn, sc in each st across (12)

Info :

Sc around the side edge, bottom of the fin, and opposite side of the fin. Change to Color D (Blue)

Row 5 :

*Ch 5, sl st in same st, sc in next 2 st* Repeat from * to * across

Info :

F/O and weave in the tail end

โ€” Top Fin Version #2 :

Info :

With Black or color of choice

Row 1 :

Ch 9, sl st in 2nd ch from hook and across (8)

Row 2 :

BLO Ch 1, turn, 5 sc (5)

Row 3 :

BLO Ch 1, turn, 5 sc (5)

Row 4 :

BLO Ch 1, turn, 5 sc, ch 4, sl st in 2nd ch from hook and next 2 chains (5)

Row 5 :

BLO Ch 1, turn, 4 sc (4)

Row 6 :

BLO Ch 1, turn, 4 sc (4)

Row 7 :

BLO Ch 1, turn, 4 sc, ch 2, sl st in 2nd ch from hook (4)

Row 8 :

BLO Ch 1, turn, 3 sc (3)

Row 9 :

BLO Ch 1, turn, 3 sc (3)

Row 10 :

BLO Ch 1, turn, dec, sc (2)

Row 11 :

BLO Ch 1, turn, dec (1)

Info :

F/O and leave a long tail for sewing

โ€” Light :

Info :

Starting with Color B (Green)

Round 1 :

Make 4 sc into a magic ring (4)

Round 2 :

Increase in each st around (8)

Round 3 :

sc in each st around (8)

Round 4 :

(2 sc, dec) x 2 (6)

Round 5 :

(sc, dec) x 2 (4)

Info :

Use pipe cleaner to stuff the light piece for posability. Change to Color A (Purple)

Round 6-21 :

sc in each st around (4)

Info :

F/O and leave a long tail for sewing

Assembly Instructions

  • Pin the top fin (whichever version you chose) onto the top of the body and sew securely in place
  • Pin the mouth onto the front of the face, positioning it to stop at rounds 2 and 3 of the head
  • Pull the mouth down slightly and pin all teeth pieces onto the face in their desired positions
  • Sew the teeth onto the face first, then sew the mouth onto the face except for the top edge of the mouth
  • Pin the side fins onto the sides of the body at an appropriate location and sew them securely
  • If using pipe cleaner for the light, insert it into the light appendage before attaching
  • Pin the light onto the head above the eyes and sew it securely in place

Important Notes

  • ๐Ÿ’กUse a stitch marker consistently to track the beginning of each round and avoid miscounting
  • ๐Ÿ’กThe sunken eye technique requires patience - practice the threading method before doing it on your final piece
  • ๐Ÿ’กEye placement is critical to the final look - pin them in place first and view from multiple angles before securing
  • ๐Ÿ’กStuff the head very firmly to achieve the best shape and to support the eye sculpting technique
  • ๐Ÿ’กThe type and quality of stuffing you use significantly affects the final appearance of your angler fish
  • ๐Ÿ’กPin all pieces before sewing to ensure proper positioning and symmetry of your finished creature
  • ๐Ÿ’กDifferent yarn brands may require slight adjustments to eye placement and assembly positioning

This captivating Erebus the Angler Fish pattern brings the mysterious depths of the ocean into your hands! With its distinctive sunken eyes, dramatic fins, and that iconic glowing lure, this pattern combines intermediate techniques with creative assembly to create a truly unique piece. The detailed instructions guide you through special eye-sculpting methods and multiple customization options, making each angler fish one-of-a-kind. Perfect for marine enthusiasts and those looking to expand their amigurumi skills beyond the typical cute creatures! ๐ŸŸโœจ๐ŸŒŠ

You ask,

we answer.

FAQs

What makes the eyes look sunken and how difficult is this technique?

The sunken eye effect is achieved by threading yarn through the eye holes after stuffing and gently pulling to create indentations. The pattern includes detailed instructions and links to a video tutorial. While it requires patience and precision, it's achievable for intermediate crocheters who follow the steps carefully.

Can I use different sized safety eyes for this pattern?

Yes, you can use different eye sizes, but you'll need to adjust the placement accordingly. The pattern specifies 27mm eyes with specific placement between rounds 10 and 11. Larger or smaller eyes may require moving the placement up or down a round or two for the best proportions.

Is the pipe cleaner for the light necessary or can I use regular stuffing?

The pipe cleaner is optional but recommended because it makes the light appendage posable, allowing you to bend and adjust it. If you prefer, you can use regular fiberfill stuffing, but the light will be stationary in whatever position you sew it.

Which top fin version should I choose?

Version #1 creates a decorative fin with purple base and blue accent edges, matching the side fins. Version #2 creates a more dramatic black fin with protruding spikes. Choose based on your preferred aesthetic - the colorful version is more cohesive while the black version adds dramatic contrast.

How important is the yarn weight and hook size for this pattern?

Using worsted weight yarn with a 3.25mm hook will give you the specified 6-inch size. You can use different weights and hooks, but this will change your finished size and may require adjusting eye placement and proportions for the best results.

Do I need to stuff the teeth pieces?

No, the pattern specifically states not to stuff the teeth. Leaving them unstuffed allows them to lay flatter against the face and creates a more realistic appearance when attached to the mouth area.