🧶 Beautiful ✨ Detailed 💝 Adorable

Hammerhead Shark Friend Amigurumi Pattern

Hammerhead Shark Friend Amigurumi Pattern
4.1★ Rating
2-3 Hours Time Needed
4.1K Made This
✂️

Beginner Friendly Level

Perfect for those just starting their sewing journey, with clear instructions and simple techniques

⏱️

Bite-Sized Project

Complete in under 2 hours—quick, fun, and perfect for a little creative escape.

🧸

Cute Companion

An adorable friend to cherish, handcrafted with love to bring comfort and joy for years to come.

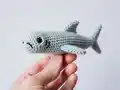
About This Hammerhead Shark Friend Amigurumi Pattern

This Hammerhead Shark Friend pattern brings together simple crochet techniques to create an absolutely charming ocean companion. The pattern features a unique construction method where you work the distinctive hammer-shaped head in rows before seamlessly transitioning to rounds for the body. With its sweet safety eyes and friendly smile, this little shark captures the perfect balance of realistic anatomy and kawaii cuteness. The designer thoughtfully notes that while real hammerheads have many fins, this smaller version uses a minimalist approach that keeps the design clean and adorable without overwhelming the piece.

Hammerhead Shark Friend Amigurumi Pattern crochet pattern - detailed view of completed project

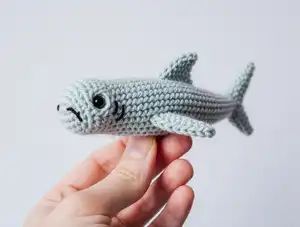
Perfect for using up yarn scraps or trying out different yarn weights, this versatile pattern encourages experimentation. The designer's tip about sizing down your hook ensures tight, professional-looking stitches that keep your stuffing secure and your shark looking polished.

Why You'll Love This Hammerhead Shark Friend Amigurumi Pattern

I absolutely love how this pattern takes an often-intimidating sea creature and transforms it into the cutest little buddy you could imagine! The unique hammer-shaped head construction is surprisingly straightforward, and watching it take shape as you work in rows before switching to rounds feels almost magical. I appreciate how the designer gives you flexibility with fin placement and quantity, respecting that sometimes less really is more for these small amigurumi projects. The fact that you can make it in different yarn weights means you can create an entire family of shark friends, from tiny pocket-sized pals to chunky huggable companions. Plus, there's something so satisfying about that final step of sewing on the smile and seeing your shark's personality come to life!

Hammerhead Shark Friend Amigurumi Pattern step 1 - construction progress Hammerhead Shark Friend Amigurumi Pattern step 2 - assembly progress Hammerhead Shark Friend Amigurumi Pattern step 3 - details and accessories Hammerhead Shark Friend Amigurumi Pattern step 4 - final assembly and finishing

Switch Things Up

While this pattern calls for classic grey yarn to create a realistic hammerhead shark, I love experimenting with unexpected color choices to make truly unique ocean friends! Try making a pastel pink or baby blue shark for a kawaii aesthetic that's absolutely adorable in nurseries. You could even create a rainbow shark using color changes throughout the body for a whimsical, fantasy-inspired version.

For the fins, consider making them in a contrasting color rather than matching the body—maybe white-tipped fins or even glittery metallic yarn for a magical touch. If you're feeling adventurous, add stripes or spots to the body by carrying a second color through certain rounds.

The smile is another great place to customize! Instead of a simple curved line, try embroidering a toothy grin with white French knots, or add rosy cheeks with pink yarn or embroidery thread for extra cuteness. You could even embroider closed, happy eyes instead of using safety eyes for a sleepy, content expression.

Yarn weight experimentation opens up even more possibilities—imagine a tiny keychain-sized shark in fingering weight yarn, or a giant cuddle buddy in super bulky yarn! Each size has its own charm and purpose, from bag charms to statement décor pieces.

Common Mistakes & How to Fix Them

✗ Not working tight enough stitches when starting the head, which can leave gaps where stuffing shows through the fabric ✗ Forgetting to insert safety eyes at the correct position before closing up the head completely during assembly ✗ Losing track of where to decrease on the body edges, resulting in an asymmetrical shark shape and uneven body ✗ Overstuffing the head and body too firmly, which distorts the hammer shape and makes the shark look lumpy instead of smooth

Hammerhead Shark Friend Amigurumi Pattern

Create your own adorable hammerhead shark companion with this delightful amigurumi pattern! This cute and happy design is perfect for keeping the blues away and bringing a smile to anyone's face. Whether you're using DK cotton yarn for a classic finish or chunky yarn for an extra squishy friend, this versatile pattern adapts beautifully to your preferred materials. The pattern includes detailed instructions for creating the distinctive hammer-shaped head, streamlined body, and charming fins that make this little shark so special. With customizable fin options and a sweet embroidered smile, you'll craft a unique ocean buddy that's sure to become a treasured keepsake or the perfect handmade gift for shark lovers of all ages.

Beginner Friendly 2-3 Hours

Materials Needed for Hammerhead Shark Friend Amigurumi Pattern

— Main Fabric

  • 01
    Grey DK weight cotton yarn
  • 02
    Grey chunky yarn (optional for larger version)
  • 03
    Black yarn for embroidering smile

— Tools Required

  • 01
    4mm crochet hook (for DK yarn)
  • 02
    3mm crochet hook (for smaller DK version)
  • 03
    5mm crochet hook (for chunky yarn version)
  • 04
    2 safety eyes
  • 05
    Polyester stuffing
  • 06
    Yarn needle for sewing
  • 07
    Scissors
  • 08
    Stitch markers (optional)
  • 09
    Craft glue (optional for smile)

Progress Tracker

0% Complete

— Head :

Starting :

Chain 2, 6 sc into second chain from hook

Round 1 :

*inc* x 6 (12)

Round 2 :

*BLO sc* (12)

Round 3-5 :

*sc* (12)

Info :

Begin working in rows, Ch1 & turn

Row 6-14 :

sc x 10, ch1, turn

Row 15 :

sc x 10, ch 2, do not turn, continue working in first st of row 15

Round 16 :

sc x 10 and in both ch spaces (12)

Round 17-18 :

*sc* (12)

Round 19 :

*BLO dec* x 6 (6)

Info :

Fasten off. Insert safety eyes in beginning/end spaces

— Body :

Info :

Join in fifth st from corner as shown in the photo

Round 1 :

Sc in each row edge, corner and ch sp around (28)

Round 2 :

*sc* (28)

Round 3 :

8sc, dec, 12sc, dec, 4sc (26)

Round 4 :

8sc, dec, 11sc, dec, 3sc (24)

Round 5 :

7sc, dec, 10sc, dec, 3sc (22)

Round 6 :

7sc, dec, 9sc, dec, 2sc (20)

Round 7 :

7sc, dec, 8sc, dec, 1sc (18)

Info :

Start stuffing as you go

Round 8 :

*sc* (18)

Round 9 :

6sc, dec, 8sc, dec (16)

Round 10 :

*sc* (16)

Round 11 :

6sc, dec, 6sc, dec (14)

Round 12-15 :

*sc* (14)

Round 16 :

Dec, 5sc, dec, 5sc (12)

Round 17-18 :

*sc* (12)

Round 19 :

Dec, 4sc, dec, 4sc (10)

Round 20 :

*sc* (10)

Info :

Stuff firmly

Round 21 :

Sc closed (5), Ch1, turn

Tail :

(Sc, hdc, dc, dc, tr, tr) in next st. Ch4, sc in next 2 stitches. (Sc, hdc, dc, dc) in next st, ch 2, sc in last st

— Big Fin :

Info :

Make 1

Starting :

Chain 2, 6 sc in second chain from hook

Round 1-2 :

*sc* (6)

Round 3 :

*sc, inc* x 3 (9)

Round 4 :

*sc* (9)

Round 5 :

*2 x sc, inc* x 3 (12)

Round 6 :

*sc* (12)

Info :

Sc closed and fasten off

— Small Fin :

Info :

Make 2-5 depending on preference

Starting :

Chain 2, 6 sc in second chain from hook

Round 1-2 :

*sc* (6)

Round 3 :

*sc, inc* x 3 (9)

Round 4-5 :

*sc* (9)

Info :

Sc closed and fasten off

Assembly Instructions

  • Position and insert safety eyes in the beginning and end spaces of the head where indicated before closing
  • Stuff the head firmly but evenly, ensuring the hammer shape maintains its distinctive flat appearance
  • Join yarn to begin the body at the fifth stitch from corner as shown in the reference photo
  • Continue stuffing the body as you work through rounds 8-20, maintaining firm but not overly tight stuffing
  • Attach the big fin to the top center of the shark's body using yarn needle and matching yarn
  • Position and sew 2-5 small fins along the body and tail area according to your preference using the photo as reference
  • Use black yarn to embroider a smile on the face, optionally securing with a small dollop of craft glue

Important Notes

  • 💡Size down your hook 0.5mm-1.0mm from yarn's recommended size to ensure tight stitches that won't show stuffing
  • 💡The head is worked in a unique combination of rounds and rows to create the distinctive hammer shape
  • 💡Keep decreases positioned at the edges of the body for proper shaping as shown in the reference photos
  • 💡You can customize the number of fins from 2-5 based on your preference for minimalist or anatomically detailed look
  • 💡Different yarn weights create different sized sharks: DK with 3mm hook makes small, DK with 4mm makes medium, chunky with 5mm makes large
  • 💡Insert safety eyes before completely closing the head, as they cannot be added after assembly is complete

This charming Hammerhead Shark Friend pattern was lovingly designed by @manatee_squares to bring ocean magic into your home and keep the blues away! The clever construction technique creates that iconic hammer-shaped head while keeping the pattern accessible for crocheters of all skill levels. With its customizable fin options and adaptability to different yarn weights, you can create a whole school of sharks in various sizes. The sweet smile and friendly face make this pattern perfect for gifts, nursery décor, or your own collection of ocean-inspired amigurumi. Remember, all sharks are beautiful! 🦈💙 Happy crocheting! 🧶✨

You ask,

we answer.

FAQs

Can I use different yarn weights for this pattern?

Absolutely! The designer specifically mentions this pattern works beautifully with DK cotton yarn and a 4mm hook for the standard size, but you can also use chunky yarn with a 5mm hook for an extra squishy larger version, or DK with a 3mm hook for a smaller shark. Just remember to size down your hook 0.5-1mm from the yarn's recommended size to keep stitches tight.

How many fins should I make for my hammerhead shark?

The pattern gives you creative freedom here! The designer notes that real hammerheads have many fins, but for this small amigurumi, less is more. You can make 2-5 small fins depending on whether you prefer a minimalist look or want to be more anatomically accurate. The pattern includes one big fin and instructions for multiple small fins.

When do I insert the safety eyes?

Insert the safety eyes in the beginning and end spaces of the head after you've completed the head section and before you stuff and close it completely. This timing is crucial because safety eyes cannot be added once the head is fully closed and stuffed.

Why is my hammer shape not flat enough?

The distinctive hammer shape comes from working rows 6-14 flat, then continuing in rounds. Make sure you're turning your work as instructed and maintaining the correct stitch count. Also, avoid overstuffing the head, which can distort the flat hammer profile. Stuff firmly but allow the shape to maintain its characteristic flatness.

How do I keep the smile in place?

Use black yarn to embroider the smile using a yarn needle and basic embroidery stitches. The designer suggests using a small dollop of craft glue to help keep the smile secure and prevent the yarn from shifting over time, especially if the shark will be handled frequently or given to a child.