๐Ÿงถ Beautiful โœจ Detailed ๐Ÿ’ Adorable

Dreamy Donkey Amigurumi Pattern

Dreamy Donkey Amigurumi Pattern
4.7โ˜… Rating
6-8 Hours Time Needed
2.3K Made This
โœ‚๏ธ

Intermediate Level

Ideal for those with basic knitting experience, featuring slightly more advanced stitches and techniques to expand your skills.

โฑ๏ธ

Weekend Treat

Takes 5-7 hours, making it an enjoyable project to finish over a couple of days.

๐Ÿงธ

Cute Companion

An adorable friend to cherish, handcrafted with love to bring comfort and joy for years to come.

About This Dreamy Donkey Amigurumi Pattern

This Dreamy Donkey pattern brings together classic amigurumi techniques with charming details that give your creation personality and character. From the smiling muzzle to the brushed mane and thread-jointed limbs, every element is designed to create a huggable companion. The pattern offers flexibility with yarn choices, allowing you to make a petite 13cm friend or a larger 22cm cuddle buddy, and includes bonus instructions for adorable accessories.

Dreamy Donkey Amigurumi Pattern crochet pattern - detailed view of completed project

With step-by-step guidance for embroidered facial features, thread mounting for posable legs, and optional decorative stitching, this pattern helps you craft a truly special keepsake that will be treasured for years to come.

Why You'll Love This Dreamy Donkey Amigurumi Pattern

I absolutely love how this pattern combines technical skill-building with pure creative joy! The thread-jointed legs teach you a valuable technique while making your donkey posable and full of personality. I'm particularly fond of the detailed facial featuresโ€”those embroidered eyelids and sweet smile bring so much character to the finished piece. The bonus basket with carrots adds an extra layer of charm that makes this project feel complete. What really makes my heart sing is seeing the transformation from simple stitches to a lovable companion with expressive eyes and a brushable mane that you can style. It's a pattern that rewards patience and attention to detail with a truly magical result.

Dreamy Donkey Amigurumi Pattern step 1 - construction progress Dreamy Donkey Amigurumi Pattern step 2 - assembly progress Dreamy Donkey Amigurumi Pattern step 3 - details and accessories Dreamy Donkey Amigurumi Pattern step 4 - final assembly and finishing

Switch Things Up

I absolutely love how versatile this Dreamy Donkey pattern can be when you switch up the details! If you're feeling adventurous, try changing the color scheme entirelyโ€”imagine a gray donkey with white accents, or even a whimsical purple version with rainbow mane pieces for a fantasy twist. You could also experiment with different facial expressions by adjusting the placement of the eyes and the tightness of the smile stitching.

For added personality, I sometimes create themed accessories beyond the basic bowโ€”tiny crochet flowers for the mane, a miniature saddle blanket, or even a small hat perched between the ears. The basket bonus is perfect for customization too; fill it with crocheted apples, flowers, or whatever treats suit your donkey's personality.

If you want to make the donkey extra special for a child, consider adding a jingling bell inside the body (secured safely) or using safety-tested squeakers in the tummy area. You could also embroider the recipient's name on the belly patch using contrasting thread. The thread-jointed legs open up posing possibilities, so your donkey can sit, stand, or even appear to be runningโ€”perfect for imaginative play or dynamic display arrangements.

Common Mistakes & How to Fix Them

โœ— Forgetting to stuff the head firmly before closing can result in a floppy, misshapen donkey face that lacks definition and structure โœ— Not monitoring stitch marker placement during body decreases causes the shaping line to shift sideways creating an uneven asymmetrical appearance โœ— Skipping the smile tightening step in round thirteen leaves the muzzle flat without the characteristic sweet expression this pattern requires โœ— Pulling thread mounting too loosely prevents legs from staying positioned properly making the donkey unable to sit or stand correctly

Dreamy Donkey Amigurumi Pattern

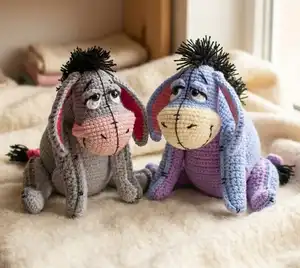
Create your own adorable Dreamy Donkey with this charming crochet pattern! This lovable plush friend features sweet embroidered details, a playful mane, and optional accessories like a basket with carrots. Perfect for both display and cuddles, this donkey stands at 13cm (5.1") when made with semi-cotton yarn or 22cm (8.7") with plush yarn. The pattern includes detailed instructions for creating expressive eyes, floppy ears, movable legs with thread mounting, and a cute bow-adorned tail that will melt your heart.

Intermediate 6-8 Hours

Materials Needed for Dreamy Donkey Amigurumi Pattern

โ€” Main Fabric

  • 01
    Cotton or semi-cotton yarn approximately 330m/100g (361 yds/3.53 oz) in blue, ivory/beige/light-pink, black, lilac, pink, crimson, and white colors
  • 02
    Alize Cotton Gold (colors: 40, 166, 01, 33) or YarnArt Jeans for small donkey version
  • 03
    Himalaya Dolphin Fine 170m/100g (190 yds/3.5 oz) in colors 26, 05, 08, 14 for larger donkey version
  • 04
    Thin black thread like Iris for embroidering body stitches

โ€” Tools Required

  • 01
    Crochet hook 2mm for main toy construction
  • 02
    Crochet hook 3mm for bow creation
  • 03
    Safety eyes 5mm (or 8-10mm for larger donkey)
  • 04
    Synthetic or tooth thread for thread mounting
  • 05
    Button approximately 5mm for tail attachment
  • 06
    Yarn sewing needles
  • 07
    Stitch markers
  • 08
    Pins with large heads
  • 09
    Scissors
  • 10
    Fiber filling/stuffing

Progress Tracker

0% Complete

โ€” Eye-white (2 details) :

Round 0 :

Chain 4

Round 1 :

(start in 2nd chain from hook) 2 SC, 4 SC into last chain from hook, on other side: SC, SS (8)

Info :

Join oval with SS in first St of round, fix thread, leave long ending for sewing and withdraw to wrong side, insert eyes offset to centre

โ€” Eyelid (2 details) :

Round 1 :

6 SC in MR

Info :

Tighten ring not to end so stitches are located along semicircle, fix thread and leave long ending for sewing

โ€” Head :

Round 0 :

Chain 6

Round 1 :

(start in 2nd chain from hook) 4 SC, 3 SC into last chain from hook; on other side of chain: 3 SC, INC (12)

Round 2 :

INC, 3 SC, 3 INC, 3 SC, 2 INC (18)

Round 3 :

SC, INC, 3 SC, (SC, INC) x 3, 3 SC, (SC, INC) x 2 (24)

Round 4 :

2 SC, INC, 3 SC, (2 SC, INC) x 3, 3 SC, (2 SC, INC) x 2 (30)

Round 5 :

3 SC, INC, 3 SC, (3 SC, INC) x 3, 3 SC, (3 SC, INC) x 2 (36)

Round 6 :

4 SC, INC, 3 SC, (4 SC, INC) x 3, 3 SC, (4 SC, INC) x 2 (42)

Round 7 :

42 SC

Info :

Align crocheting with initial round if required so round begins exactly on side of oval, move stitch marker one St above line of initial chain

Round 8 :

(20 SC, 3 SC in one front loop) x 2 (46)

Info :

Attach additional stitch marker to back loops to make smile tightening in Round 13

Round 9-10 :

2 rounds 46 SC

Round 11 :

(21 SC, DEC) x 2 (44)

Round 12 :

(20 SC, DEC) x 2 (42)

Info :

Change color to blue

Round 13 :

2 SC, DEC, 13 SC, DEC, SC, SC together with back loop from Round 8, 20 SC, SC together with back loop from Round 8 (40)

Round 14 :

2 SC, DEC, 11 SC, DEC, 23 SC (38)

Round 15 :

2 SC, DEC, 9 SC, DEC, 23 SC (36)

Round 16 :

2 SC, DEC, 7 SC, DEC, 23 SC (34)

Round 17 :

2 SC, DEC, 5 SC, DEC, 23 SC (32)

Round 18 :

5 SC, INC, 26 SC (33)

Info :

Insert plastic eyes with caps at this stage between Rounds 18 and 19 at distance of 4-6 SC if using

Round 19-23 :

5 rounds 33 SC

Round 24 :

(9 SC, DEC) x 3 (30)

Round 25 :

(3 SC, DEC) x 6 (24)

Round 26 :

(2 SC, DEC) x 6 (18)

Round 27 :

(SC, DEC) x 6 (12)

Round 28 :

6 DEC (6)

Info :

Tighten hole, fix thread and hide end inside head

โ€” Ear (2 details, 4 pieces total) :

Round 0 :

Chain 3

Round 1 :

(start in 2nd chain from hook) 2 SC

Round 2-3 :

2 rows 2 SC

Round 4 :

INC, SC (3)

Round 5-7 :

3 rows 3 SC

Round 8 :

INC, 2 SC (4)

Round 9-11 :

3 rows 4 SC

Round 12 :

INC, 3 SC (5)

Round 13 :

INC, 4 SC (6)

Round 14-17 :

4 rows 6 SC

Round 18 :

Skip a St, 5 SC (5)

Round 19 :

Skip a St, 4 SC (4)

Round 20 :

Skip a St, 3 SC (3)

Round 21 :

Skip a St, 2 SC (2)

Round 22 :

Skip a St, SC (1)

Info :

Fix thread and hide ends between loops on one side of detail

Ear Assembly :

Attach blue and pink parts together with pink part at front, crochet two details together with SC using blue thread, begin with upper side part where Round 0 was, work 3 SC in bottom and two upper back loops, fix with SS, leave long ending to sew

โ€” Body :

Round 1 :

6 SC in MR

Round 2 :

6 INC (12)

Round 3 :

(SC, INC) x 6 (18)

Round 4 :

(2 SC, INC) x 6 (24)

Round 5 :

(3 SC, INC) x 6 (30)

Round 6 :

(4 SC, INC) x 6 (36)

Round 7 :

(5 SC, INC) x 6 (42)

Round 8 :

(6 SC, INC) x 6 (48)

Round 9 :

(7 SC, INC) x 6 (54)

Round 10 :

(8 SC, INC) x 6 (60)

Round 11 :

(9 SC, INC) x 6 (66)

Round 12-21 :

10 rounds 66 SC

Info :

Monitor stitch marker position in rounds with decreases, keep it straight in middle on back to prevent shifting

Round 22 :

15 SC, (4 SC, DEC) x 6, 15 SC (60)

Round 23 :

60 SC

Round 24 :

15 SC, (3 SC, DEC) x 6, 15 SC (54)

Round 25 :

54 SC

Round 26 :

15 SC, (2 SC, DEC) x 6, 15 SC (48)

Round 27 :

48 SC

Round 28 :

15 SC, (SC, DEC) x 6, 15 SC (42)

Round 29 :

42 SC

Round 30 :

15 SC, 6 DEC, 15 SC (36)

Round 31-34 :

4 rounds 36 SC

Round 35 :

12 SC, 6 DEC, 12 SC (30)

Round 36-38 :

3 rounds 30 SC

Round 39 :

9 SC, 6 DEC, 9 SC (24)

Info :

Count 7 SC from middle of neck on back left and right, place stitch markers symmetrically on sides, continue working until left marker: 6 SC, SS, work turning CH, turn, skip SS from previous row, work 12 SC, SS until next marker, fix thread, leave long ending for sewing head

โ€” Front Leg (2 details, 4 pieces total) :

Round 0 :

Chain 3

Round 1 :

(start in 2nd chain from hook) 2 SC

Round 2 :

INC, SC (3)

Round 3-5 :

3 rows 3 SC

Round 6 :

INC, 2 SC (4)

Round 7-20 :

14 rows 4 SC

Round 21 :

Skip a St, 3 SC (3)

Round 22 :

Skip a St, 2 SC (2)

Info :

Work CH, turn detail to side and crochet around with SC, work 3 SC in two upper loops on sides and 2 SC in two lower loops, fix thread with SS for lilac details only

Leg Assembly :

Don't cut thread of blue detail, attach lilac detail at back, crochet around two details together with SC, stuff at end, fix with SS in first St, hide inside, optionally embroider stitches along leg with black thin thread

โ€” Back Leg (2 details, 4 pieces total) :

Round 0 :

Chain 6

Round 1 :

(start in 2nd chain from hook) 4 SC, INC (6)

Round 2 :

INC, SC, 2 DEC (5)

Round 3 :

Skip a St, 4 SC (4)

Round 4 :

2 SC, DEC (3)

Round 5 :

Skip a St, 2 SC (2)

Round 6 :

2 SC

Round 7 :

INC, SC (3)

Round 8 :

3 SC

Round 9 :

INC, 2 SC (4)

Round 10 :

3 SC, INC (5)

Round 11 :

INC, 4 SC (6)

Round 12 :

5 SC, INC (7)

Round 13 :

INC, 6 SC (8)

Round 14 :

8 SC

Round 15 :

INC, 7 SC (9)

Round 16-18 :

3 rows 9 SC

Round 19 :

Skip a St, 6 SC, DEC (7)

Round 20 :

Skip a St, 4 SC, DEC (5)

Round 21 :

Skip a St, 2 SC, DEC (3)

Info :

Work CH, turn detail to side, crochet around with SC, work 3 SC in two upper loops on sides, 3 SC in one loop on toe, don't work increases on heel, fix thread with SS for lilac details, turn and crochet around in opposite direction for second detail of each color

Leg Assembly :

Don't cut thread of blue detail, attach lilac detail at back, crochet around two details together with SC, work 3 SC in one loop on toe, stuff at end, fix with SS in first St, hide inside, optionally embroider stitches along leg

โ€” Belly :

Round 0 :

Chain 5

Round 1 :

(start in 2nd chain from hook) 4 SC

Round 2 :

INC, 3 SC (5)

Round 3 :

INC, 4 SC (6)

Round 4 :

INC, 4 SC, INC (8)

Round 5 :

INC, 6 SC, INC (10)

Round 6 :

INC, 8 SC, INC (12)

Round 7 :

INC, 10 SC, INC (14)

Round 8 :

INC, 12 SC, INC (16)

Round 9 :

INC, 14 SC, INC (18)

Round 10 :

INC, 16 SC, INC (20)

Round 11 :

INC, 18 SC, INC (22)

Round 12-17 :

6 rows 22 SC

Round 18 :

Skip a St, 19, DEC (20)

Round 19 :

Skip a St, 17, DEC (18)

Round 20 :

Skip a St, 15, DEC (16)

Round 21 :

Skip a St, 13, DEC (14)

Round 22 :

Skip a St, 11, DEC (12)

Round 23 :

Skip a St, 9, DEC (10)

Round 24 :

Skip a St, 7, DEC (8)

Round 25 :

Skip a St, 5, DEC (6)

Round 26 :

Skip a St, 3, DEC (4)

Info :

Work CH, crochet detail around with SC, work 3 SC in two loops on sides from above and below, work SS in first loop, leave long ending to sew
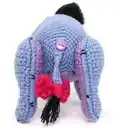
โ€” Tail :

Round 0 :

Chain 3

Round 1 :

(start in 2nd chain from hook) 2 SC

Round 2-16 :

15 rows 2 SC

Info :

Adjust length as needed by trying on, fix thread, leave long ending for sewing, attach thread on edge of tail

โ€” Bow :

Round 0 :

Chain 16 + 3 turning CH (19)

Round 1 :

(start in 4th chain from hook) 16 DC

Round 2 :

16 DC

Info :

Fold in half, crochet two sides together with 4 SS, fix thread, leave long ending for sewing, place seam in middle and wrap with thread, fix with knot, sew to edge of tail, sew button

โ€” Bonus Basket :

Round 0 :

Chain 6

Round 1 :

(start in 2nd chain from hook) 4 SC, 3 SC into last chain from hook, on other side: 3 SC, INC (12)

Round 2 :

INC, 3 SC, 3 INC, 3 SC, 2 INC (18)

Round 3 :

SC, INC, 3 SC, (SC, INC) x 3, 3 SC, (SC, INC) x 2 (24)

Round 4 :

2 SC, INC, 3 SC, (2 SC, INC) x 3, 3 SC, (2 SC, INC) x 2 (30)

Round 5 :

3 SC, INC, 3 SC, (3 SC, INC) x 3, 3 SC, (3 SC, INC) x 2 (36)

Round 6 :

36 BPSC

Round 7 :

4 SC, INC, 3 SC, (4 SC, INC) x 3, 3 SC, (4 SC, INC) x 2 (42)

Round 8 :

5 SC, INC, 3 SC, (5 SC, INC) x 3, 3 SC, (5 SC, INC) x 2 (48)

Round 9 :

(SC, CH, skip a St) x 24 (24)

Round 10 :

In reverse direction (crab stitch): turning CH, (CH, SC in CH of previous round, skip a St) x 24 (24)

Round 11 :

Turning CH, (SC in CH of previous round, CH, skip a St) x 24 (24)

Round 12 :

In reverse direction (crab stitch): turning CH, (CH, SC in CH of previous round, skip a St) x 24 (24)

Info :

Fix thread and hide ending from wrong side

โ€” Bonus Carrot :

Round 1 :

3 SC in MR

Round 2 :

3 INC (6)

Round 3 :

(2 SC, INC) x 2 (8)

Round 4-8 :

5 rounds 8 SC

Round 9 :

(2 SC, DEC) x 2 (6)

Round 10 :

3 DEC (3)

Info :

Tighten hole, fix thread, hide end inside

Green Bundle :

Chain 9, (start in 2nd chain from hook) 7 SC, SS; Chain 8, (start in 2nd chain from hook) 7 SC, SS in last loop of first chain; Chain 8, (start in 2nd chain from hook) 7 SC, SS in last loop of first chain; sew green bundle on top of carrot; embroider black stitches on carrot

Assembly Instructions

  • Sew eye-whites in position on head, then sew eyelids so inner parts are higher than outer ones, embroider eyelid line with black thread
  • Embroider smile line on muzzle, then embroider stitch line down middle of head with thin black thread, adding horizontal stitches to secure
  • Embroider eyebrows and nostrils with black thread, then sew ears between Rounds 24 and 26 of head
  • Sew belly piece to body, optionally embroider decorative stitches along belly with black thin thread
  • Sew head to body using pins to position correctly, stuff neck area firmly while sewing for proper support
  • Create thread mount for front legs first, insert long needle through body, thread through 2-3 SC of each leg, pull tight and tie, hide knot inside body
  • Create thread mount for back legs using same technique, position so donkey can sit and stand on all four legs properly
  • Cut black thread pieces and insert with knots to create mane in spiral on head and two rows along back, brush and straighten mane with iron, sew tail and button to back

Important Notes

  • ๐Ÿ’กToy size varies based on yarn type: 13cm with semi-cotton yarn or 22cm with plush yarn, hook size must match yarn weight
  • ๐Ÿ’กAdjust hook size based on your personal tension and crocheting style (tick, mixed, or cross method) for proper gauge
  • ๐Ÿ’กUse stitch markers consistently throughout, especially during body decreases to keep shaping symmetrical and centered on back
  • ๐Ÿ’กWhen making back legs, crochet second detail of each color in opposite direction to create mirror image left and right legs
  • ๐Ÿ’กThread mounting requires strong thread, use both semi-cotton and synthetic thread together for extra durability and stability
  • ๐Ÿ’กFor larger donkey version using Dolphin Fine yarn, use two threads together in one knot when adding mane for fuller appearance
  • ๐Ÿ’กPin all pieces in place before final sewing to ensure proper positioning and symmetrical appearance of finished donkey

This enchanting Dreamy Donkey pattern captures all the sweetness and charm of a beloved plush companion! With its gentle smile, expressive embroidered features, and posable thread-jointed legs, your handmade donkey will become an instant favorite. The pattern's flexibility lets you create either a petite pocket friend or a larger cuddle buddy, while the bonus basket and carrots add delightful finishing touches. Perfect for gift-giving or keeping as your own creative treasure! ๐Ÿงถโœจ

You ask,

we answer.

FAQs

What yarn should I use for the Dreamy Donkey?

You can use cotton or semi-cotton yarn (approximately 330m/100g) such as YarnArt Jeans or Alize Cotton Gold for a 13cm donkey with a 2mm hook. For a larger 22cm version, use Himalaya Dolphin Fine (170m/100g) with a slightly larger hook. Main color requires about 50g, other colors need less than 50g each.

How do I create the thread mounting for posable legs?

Use a long needle threaded with both semi-cotton and synthetic thread for strength. Insert the needle through the body at the mounting point, thread it through 2-3 stitches and stuffing of the first leg (not all the way through), return through the same hole, thread the second leg, pull very tight, tie off, and hide the knot inside the body through the same initial hole.

What makes the donkey smile in the pattern?

The smile is created through a special technique in Rounds 8 and 13 of the head. In Round 8, you work increases while marking back loops. In Round 13, you crochet together with those marked back loops, which pulls the fabric to create the characteristic smile shape on the muzzle.

Do I need to make the ears in two colors?

Yes, each ear consists of two pieces: one blue (main color) and one pink (inner ear color). After crocheting both pieces separately, you attach them together with the pink piece facing forward and crochet around them with blue yarn to join them as one assembled ear.

Can I skip the optional decorative stitching?

Yes, the decorative black stitching along the body, belly, and legs is optional. However, these details add character and a handmade artisan quality to your finished donkey. If you choose to include them, use thin black thread like Iris for best results.

How do I attach and style the mane?

Cut pieces of black yarn and attach them by tying knots: on the head work in a spiral pattern, and on the back create two rows along the spine. For a larger donkey, use two threads together in each knot for fuller appearance. After attaching all pieces, brush the mane and carefully straighten it with an iron.