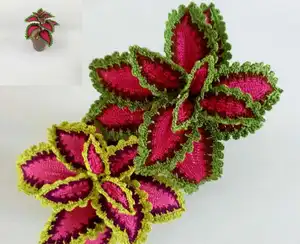
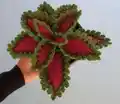
Create your own stunning realistic Watermelon Coleus plant with this detailed crochet pattern! This beautiful decorative piece features intricately crafted leaves in vibrant watermelon-inspired colors that will bring a touch of nature into your home. Perfect for plant lovers who want everlasting greenery, this pattern guides you through creating 12 gorgeous leaves in varying sizes that combine to form a full, lush plant. Display it in a decorative pot or vase for a charming handmade accent that never needs watering!
Progress Tracker
0% Complete
— Leaf A (Make 4) :
Round 1 :
Ch25, Skip1, 2sc, 1hdc, 1dc, (dc inc) x 2, 9dc, 4hdc, 3sc, (3sc) in the last chain, 3sc, 4hdc, 9dc, (dc inc) x 2, 1dc, 1hdc, 2sc, (3sc) in the skipped chain from the beginning
Round 2 :
2sc, 2hdc, 1dc, (dc inc), (1dc, 1tc), 1tc, (tc inc), repeat the last 2 steps 1 more time, 3tc, 4dc, 4hdc, 3sc, (3sc) center stitch, Going down the other side: 3sc, 4hdc, 4dc, 3tc, (tc inc), 1tc, repeat the last 2 steps 1 more time, (1tc, 1dc), (dc inc), 1dc, 2hdc, 3sc, slst base chain
Info :
Cut a piece of florist wire approximately 20 inches (50cm) and thread it through the stitch on your hook. Crochet this whole next round over the wire.
Round 3 :
ch1, 8sc, (sc inc), 1sc, repeat the last 2 steps 2 more times, 17sc, Work all the following stitches in to the center stitch at the tip of the leaf: (1hdc, ch4, skip1, 1sc, 1hdc down the chain, 1hdc), Pull the wire round and down equally, 17sc, 1sc, (sc inc), repeat the last 2 steps 2 more times, 8sc, Slst in 1st stitch on the opposite side, CHANGE COLOUR
Round 4 :
ch1, 4sc, 1hdc, (1hdc, 1Long hdc), Slst, Continue to work 1dc, (1dc, 1Long dc), Slst, 1dc, (1tc, 1Long tc), Slst, Repeat 3 more times, 1dc, (1dc, 1Long dc), Slst, Repeat 1 more time, 1hdc, (1hdc, 1Long hdc), Slst, Repeat 1 more time, 2sc, (3sc) center stitch
Round 4 continued :
Going down the other side: 2sc, slst, 1hdc, (1hdc, 1Long hdc), Repeat 1 more time, slst, 1dc, (1dc, 1Long dc), Repeat 1 more time, slst, 1dc, (1tc, 1Long tc), Repeat 3 more times, slst, (1dc, 1Long dc), 1dc, slst, (1hdc, 1Long hdc), 1hdc, 5sc, slst in 1st stitch on the opposite side
Round 5 :
ch1, 4sc, slst (in to the row below), 1sc, 1hdc, (hdc inc), slst (side of slst from the row below), Repeat 9 more times, 3sc, (1sc, ch3, skip1, 1sc, 1sc) Center stitch. Going down the other side: 3sc, slst (side of slst), (hdc inc), 1hdc, 1sc, Repeat 9 more times, slst (row below), 5sc, Change color
Round 6 :
ch1, 4sc, Now work 1dc next to the slip stitch from the previous round (push the hook in at the side of the slst, pull the yarn up and complete the dc), Continue to work: 1hdc, (sc dec), 1hdc, 1dc (side of slst), Repeat the last 4 steps 9 more times, 3hdc, 2sc
Round 6 continued :
Work (3sc) in to the unworked skipped chain at the tip of the petal. Going DOWN the other side: 2sc, 3hdc, 1dc (side of slst), 1hdc, (sc dec), 1hdc, 1dc (side of slst), Repeat 9 more times, 5sc, Slst in the 1st chain on the opposite side
Round 7 :
(ch1, 1sc), 7sc, (slst, ch2, 1dc, ch1), (1dc, ch2, slst), 2slst, Repeat the last 4 steps 10 more times, (1dc, 1tc, ch1, slst, 1dc) center, Going down the other side: 2slst, (slst, ch2, 1dc, ch1), (1dc, ch2, slst), Repeat the last 4 steps 10 more times, 8sc, Leave a long tail, Wrap tight around the wire to cover approx. 2 inches (5cm)
— Leaf B (Make 2) :
Round 1 :
Ch20, Skip1, 2sc, 1hdc, 1dc, (dc inc) x 2, 6dc, 3hdc, 2sc, (3sc) last chain, 2sc, 3hdc, 6dc, (dc inc) x 2, 1dc, 1hdc, 2sc, (3sc) in the skipped chain from the beginning
Round 2 :
2sc, 2hdc, 1dc, (dc inc) x 2, 1dc, (dc inc), 1dc, (dc inc), 3dc, 3hdc, 3sc, (3sc) center, 3sc, 3hdc, 3dc, (dc inc), 1dc, (dc inc), 1dc, (dc inc) x 2, 1dc, 2hdc, 3sc, slst in to base chain
Info :
Insert Wire approximately 20 inches (50cm)
Round 3 :
ch1, 5sc, Alternate (sc inc) and 1sc x 3, 15sc, (1hdc, ch4, skip1, 1sc, 1hdc, 1hdc) center stitch, 15sc, 1sc and (sc inc) x 3, 5sc, Slst in 1st on opposite side, Change Color
Round 4 :
ch1, 4sc, 1hdc, (1hdc, 1Long hdc), Slst, 1dc, (1dc, 1Long dc), Slst, 1dc, (1tc, 1Long tc), Slst, Repeat 2 more times, 1dc, (1dc, 1Long dc), Slst, Repeat 1 more time, 1hdc, (1hdc, 1Long hdc), Slst, 3sc, (3sc), Down the other side: 3sc, slst, 1hdc, (1hdc, 1Long hdc), slst, 1dc, (1dc, 1Long dc), Repeat 1 more time, Slst, 1dc, (1tc, 1Long tc), Repeat 2 more times, Slst, 1dc, (1dc, 1Long dc), Slst, (1hdc, 1Long hdc), 1hdc, 5sc, Slst in 1st stitch on the opposite side
Round 5 :
4sc, slst (in the row below), 1sc, 1hdc, (hdc inc), slst (side of slst), Repeat 7 more times, 4sc, (1sc, ch3, skip1, 1sc, 1sc) Center, Going down the other side: 4sc, slst (side of slst), (hdc inc), 1hdc, 1sc, Repeat 7 more times, slst (row below), 5sc, Slst in 1st on opposite side, Change color
Round 6 :
ch1, 4sc, 1dc (side of slst), 1hdc, (sc dec), 1hdc, 1dc (side of slst), Repeat 7 more times, 4hdc, 2sc, (3sc) in the skipped chain center stitch, Going down the other side: 2sc, 4hdc, 1dc (side of slst), 1hdc, (sc dec), 1hdc, 1dc (side of slst), Repeat 7 more times, 5sc, Slst in the 1st chain on the opposite side
Round 7 :
(ch1, 1sc), 7sc, (slst, ch2, 1dc, ch1), (1dc, ch2, slst), 2slst, Repeat the last 4 steps 8 more times, (1dc, 1tc, ch1, slst, 1dc) center, 2slst, (slst, ch2, 1dc, ch1), (1dc, ch2, slst), Repeat the last 4 steps 8 more times, 8sc, Slst in 1st on opposite side, Wrap some of the tail around the wire
— Leaf C (Make 2) :
Round 1 :
Ch15, Skip1, 2sc, (1hdc, 1dc), (1dc, 1tc), (1tc, 1dc), 2dc, 2hdc, 3sc, (3sc) last chain, 3sc, 2hdc, 2dc, (1dc, 1tc), (1tc, 1dc), (1dc, 1hdc), 2sc, (3sc) base chain
Round 2 :
2sc, 1hdc, (1hdc, 1dc), 1dc, (dc inc), 5dc, 2hdc, 3sc, (3sc) center, 3sc, 2hdc, 5dc, (dc inc), 1dc, (1dc, 1hdc), 1hdc, 3sc, Slst in base chain
Info :
Insert Wire approximately 15 inches (42cm)
Round 3 :
ch1, 5sc, Alternate (sc inc) and 1sc x 3, 9sc, (1hdc, ch4, skip1, 1sc, 1hdc) center stitch, 9sc, Alternate 1sc and (sc inc) x 3, 5sc, slst in 1st on opposite side, Change color
Round 4 :
ch1, 4sc, 1hdc, (1hdc, 1Long hdc), slst, 1dc, (1dc, 1Long dc), Slst, Repeat 3 more times, 1hdc, (1hdc, 1Long hdc), slst, 3sc, (3sc), Going down the other side: 3sc, slst, 1hdc, (1hdc, 1Long hdc), slst, 1dc, (1dc, 1Long dc), Repeat 3 more times, slst, 1hdc, (1hdc, 1Long hdc), 5sc, Slst in 1st stitch on the opposite side
Round 5 :
ch1, 4sc, slst (in the row below), 1sc, 1hdc, (hdc inc), slst (side of slst), Repeat 5 more times, 4sc, (1sc, ch3, skip1, 1sc, 1sc) center, Going down the other side: 4sc, slst (side of slst), (hdc inc), 1hdc, 1sc, Repeat 5 more times, slst (in the row below), 5sc, Change color
Round 6 :
ch1, 4sc, 1dc (side of slst), 1hdc, (sc dec), 1hdc, 1dc (side of slst), Repeat x 5 more times, 4hdc, 2sc, (3sc) in the skipped chain center stitch, Going down the other side: 2sc, 4hdc, 1dc (side of slst), 1hdc, (sc dec), 1hdc, 1dc (side of slst), Repeat 5 more times, 5sc, Slst in 1st on opposite side
Round 7 :
(ch1, 1sc), 7sc, (slst, ch2, 1dc, ch1), (1dc, ch2, slst), 2slst, Repeat 6 more times, (1dc, 1tc, ch1, slst, 1dc) center, 2slst, (slst, ch2, 1dc, ch1), (1dc, ch2, slst), Repeat 6 more times, 8sc, Slst in 1st on opposite side, Wrap some of the tail around the wire
— Leaf D (Make 2) :
Round 1 :
Ch12, Skip1, 1sc, (1hdc, 1dc), (dc inc), 2dc, 2hdc, 2sc, (3sc) last ch, 2sc, 2hdc, 2dc, (dc inc), (1dc, 1hdc), 1sc, slst base ch
Info :
Insert wire approximately 12 inches (25cm)
Round 2 :
Ch1, 2sc, (sc inc) x 3, 7sc, (1sc, ch3, skip1, 1sc, 1sc), 7sc, (sc inc) x 3, 2sc, Slst in 1st on opposite side, Change color
Round 3 :
ch1, 2sc, 1hdc, (1hdc, 1Long hdc), slst, 1dc, (1dc, 1Long dc), Slst, Repeat 1 more time, 1hdc, (1hdc, 1Long hdc), Slst, 2sc, (3sc) Center stitch, Down the other side: 2sc, 1slst, 1hdc, (1hdc, 1Long hdc), slst, 1dc, (1dc, 1Long dc), Repeat 1 more time, 1slst, 1hdc, (1hdc, 1Long hdc), 3sc, Slst in 1st stitch on the opposite side
Round 4 :
ch1, 2sc, slst (row below), 1sc, 1sc, (sc inc), slst (side of slst), Repeat 3 more times, 3sc, (1sc, ch3, skip1, 1sc, 1sc) center, Going down the other side: 3sc, slst (side of slst), (sc inc), 1sc, 1sc, Repeat 3 more times, slst (row below), 3sc, Change color
Round 5 :
ch1, 2sc, 1dc (side of slst), 1hdc, (sc dec), 1hdc, 1dc (side of slst), Repeat x 3 more times, 2hdc, 2sc, (3sc) in the skipped chain center stitch, Down the other side: 2sc, 2hdc, 1dc (side of slst), 1hdc, (sc dec), 1hdc, 1dc (side of slst), Repeat 3 more times, 3sc, Slst in 1st on opposite side
Round 6 :
(ch1, 1sc), 4sc, (slst, ch1, 1hdc, ch1), (1hdc, ch1, slst), 2slst, Repeat 4 more times, (1hdc, 1dc, ch1, slst, 1hdc) center, Going down the other side: 2slst, (slst, ch1, 1hdc, ch1), (1hdc, ch1, slst), Repeat 4 more times, 5sc, Slst in 1st on opposite side, Wrap some of the tail around the wire
— Leaf E (Make 2) :
Round 1 :
Ch10, Skip1, 1sc, 1hdc, (dc inc), 2hdc, 2sc, (3sc) center, Down the other side: 2sc, 2hdc, (dc inc), 1hdc, 1sc, Slst in skipped chain from the beginning
Info :
Insert wire approximately 12 inches (25cm)
Round 2 :
ch1, 2sc, (sc inc) x 2, 5sc, (1sc, ch3, skip1, 1sc, 1sc) Center, Down the other side: 5sc, (sc inc) x 2, 2sc, Slst in 1st on opposite side, Change color
Round 3 :
ch1, 2sc, 1sc, (1sc, 1Long sc), slst, Repeat 2 more times, 1sc, (1sc, ch3, skip1, 1sc, 1sc) center, Going down the other side: 1sc, slst, 1sc, (1sc, 1Long sc), Repeat 2 more times, 3sc, Slst in 1st on opposite side, Change color
Round 4 :
ch1, 2sc, (slst, ch3, 1sc), 2sc, Repeat 3 more times, (1sc, ch3, skip1, 1sc, 1sc) center, Going down the other side: 2sc, (slst, ch3, 1sc), Repeat 3 more times, 3sc, Slst in 1st on opposite side, Wrap some of the tail around the wire
— Preparing the Leaves :
Info :
Stretch the leaves into shape. Spray the green edges generously with hairspray. Place the leaves between two old place mats and put something heavy on top to flatten them properly. Leave them like this for 10 minutes or so. Once the leaves are flattened and dried, squeeze the wires at the base of each petal.
— Assembly :
Step 1 :
Cut a piece of garden wire approximately 12 inches (30cm). You can cut it down after all the leaves are attached to fit the size of your plant pot or vase.
Step 2 :
Start with the 2 smallest Petals (E leaves). Attach the 1st one by wrapping the florist tape around both stems several times. Leave approximately 2 inches (2.5cm) of the leave stem showing from the top of the garden wire.
Step 3 :
Place the 2nd E leave exactly opposite. Attach the D petals underneath and in between.
Step 4 :
Add the C Leaves underneath and in between the last 2 leaves. Continue to wrap the rest of the stem to cover the wires after each leaf you attach. This will make the stem thicker.
Step 5 :
Continue to attach the B and A leaves in the same way. Always 2 opposite from each other and below the last round.
Step 6 :
Continue to wrap the rest of the stem with the tape. Cut the wire to the size that will fit your chosen plant pot and cover with pebbles, soil, moss or even yarn or simply place it in a vase.
This stunning Watermelon Coleus pattern brings the beauty of botanical art into your crochet world! With its intricate Long stitch technique and gorgeous color palette, you'll create a realistic plant that never needs watering. Each of the 12 leaves is carefully crafted in graduated sizes to build a full, lush appearance that looks just like the real thing. Perfect for plant lovers who want everlasting greenery or anyone looking to master advanced crochet techniques while creating beautiful home decor. Display your finished coleus in a decorative pot or elegant vase for a handmade accent that will be admired for years to come! 🌿🧶✨