🧢 Beautiful ✨ Detailed πŸ’ Adorable

Dove Amigurumi Pattern

Dove Amigurumi Pattern
4.0β˜… Rating
3-4 Hours Time Needed
2.8K Made This
βœ‚οΈ

Intermediate Level

Ideal for those with basic knitting experience, featuring slightly more advanced stitches and techniques to expand your skills.

⏱️

Weekend Treat

Takes 5-7 hours, making it an enjoyable project to finish over a couple of days.

🐰

Whimsical Buddy

Playful characters full of personality, designed to spark imagination and become cherished playtime favorites.

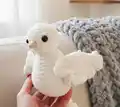
About This Dove Amigurumi Pattern

This beautiful dove pattern combines soft textures with graceful design elements to create a peaceful amigurumi that's perfect for any occasion. The pattern uses plush Dolphin Baby yarn for the main body, creating a wonderfully soft and cuddly texture, while Yarn Art Jeans adds fine details to the beak. The dove features a uniquely shaped body that flows seamlessly into an elegant tail, and wings with beautiful ruffled edges that add dimension and charm.

Dove Amigurumi Pattern crochet pattern - detailed view of completed project

The continuous round construction makes this project flow smoothly, with clear shaping instructions for the distinctive dove silhouette. Safety eyes and careful assembly create an adorable expression that brings this peaceful bird to life.

Why You'll Love This Dove Amigurumi Pattern

I absolutely love how this dove pattern creates such an elegant and peaceful presence with surprisingly simple techniques! The way the body flows naturally into the tail gives it such graceful movement, and those ruffled wing edges add such beautiful dimension without being complicated. I find the combination of the plush Dolphin Baby yarn with the finer Jeans yarn creates perfect contrast and texture. What really makes me smile is how quickly this comes together despite looking so detailed and refined. It's one of those patterns that looks impressive but feels relaxing to make, and the finished dove has such a serene quality that makes it perfect for gifts or home dΓ©cor.

Dove Amigurumi Pattern step 1 - construction progress Dove Amigurumi Pattern step 2 - assembly progress Dove Amigurumi Pattern step 3 - details and accessories Dove Amigurumi Pattern step 4 - final assembly and finishing

Switch Things Up

I love experimenting with this dove pattern to create different moods and styles! For a classic peaceful look, I stick with pure white or cream yarn, but sometimes I'll use soft gray or beige for a more natural dove appearance. If you want something whimsical, try pastel colors like baby blue, lavender, or mint green for a dreamy, nursery-perfect dove.

One of my favorite variations is adding small embroidered details - tiny french knots in white or gold thread on the wings create a sparkly, magical effect that's perfect for special occasions. You could also experiment with the wing positioning - angling them upward makes the dove look like it's taking flight, while positioning them lower creates a more resting, peaceful pose.

For a festive twist, I've made doves with tiny ribbon bows around their necks or small flower crowns for spring decorations. You can also scale the pattern up with super bulky yarn for a statement piece or down with finer yarn for delicate ornaments. The tail can be left longer by working additional rounds before closing, creating an even more dramatic silhouette. Don't be afraid to play with the safety eye placement too - positioning them slightly higher or lower changes the dove's entire expression and personality!

Common Mistakes & How to Fix Them

βœ— Not maintaining consistent tension when switching between body shaping and tail increases, which can create visible lumps in the silhouette transition βœ— Forgetting to stuff the body before closing the tail section, making it difficult to achieve proper shaping and firmness throughout βœ— Misaligning the wings when sewing them on, resulting in an asymmetrical appearance that detracts from the dove's graceful look βœ— Skipping the front loop only instructions in rounds 31 and working through both loops, which eliminates the distinctive fold detail

Dove Amigurumi Pattern

Create this charming dove amigurumi with soft, plush yarn that brings elegance and peace to your crochet collection. This delightful pattern features a gracefully shaped body with a distinctive tail and beautifully textured wings that capture the essence of a gentle dove. Perfect for home dΓ©cor, gifts, or as a symbol of peace and love, this dove is worked in continuous rounds with thoughtful shaping techniques. The combination of Himalaya Dolphin Baby yarn for the body and Yarn Art Jeans for details creates a lovely texture contrast that makes this dove truly special.

Intermediate 3-4 Hours

Materials Needed for Dove Amigurumi Pattern

β€” Main Fabric

  • 01
    Himalaya Dolphin Baby yarn (main body color)
  • 02
    Yarn Art Jeans yarn (for beak details)

β€” Tools Required

  • 01
    Crochet hook 3.0mm (for Dolphin Baby yarn)
  • 02
    Crochet hook 1.75mm (for Jeans yarn)
  • 03
    10mm safety eyes
  • 04
    Polyester fiberfill stuffing
  • 05
    Yarn needle
  • 06
    Thread for sewing
  • 07
    Scissors
  • 08
    Stitch markers (optional)

Progress Tracker

0% Complete

β€” Head, Body, Tail :

Round 1 :

6 sc in MR (6)

Round 2 :

(inc) x 6 (12)

Round 3 :

(1 sc, inc) x 6 (18)

Round 4 :

(2 sc, inc) x 6 (24)

Round 5 :

(3 sc, inc) x 6 (30)

Round 6 :

30 sc

Round 7 :

30 sc

Round 8 :

30 sc

Round 9 :

(3 sc, dec) x 6 (24)

Round 10 :

(2 sc, dec) x 6 (18)

Round 11 :

(1 sc, dec) x 6 (12)

Round 12 :

(1 sc, inc) x 6 (18)

Round 13 :

2 sc, inc, 4 sc, (inc) x 4, 4 sc, inc, 2 sc (24)

Round 14 :

3 sc, inc, 5 sc, inc, (1 sc, inc) x 3, 4 sc, inc, 3 sc (30)

Round 15 :

13 sc, (inc) x 4, 13 sc (34)

Info :

Start filling up

Round 16 :

15 sc, (inc) x 4, 15 sc (38)

Round 17 :

38 sc

Round 18 :

38 sc

Round 19 :

38 sc

Round 20 :

38 sc

Round 21 :

38 sc

Round 22 :

15 sc, (dec) x 4, 15 sc (34)

Round 23 :

34 sc

Round 24 :

13 sc, (dec) x 4, 13 sc (30)

Round 25 :

30 sc

Round 26 :

dec, 11 sc, (dec) x 2, 11 sc, dec (26)

Round 27 :

dec, 10 sc, dec, 12 sc (24)

Round 28 :

(2 sc, dec) x 6 (18)

Round 29 :

(1 sc, dec) x 6 (12)

Info :

Fill up

Round 30 :

3 sc, fold in half, connect front to back making 6 sc

Round 31 :

ch, turn the piece, for the front loops of 6 sc - work 6 sc, turn the piece, on the remaining six stitches work 6 sc (12)

Round 32 :

(inc, 5 sc) x 2 (14)

Round 33 :

(inc, 6 sc) x 2 (16)

Round 34 :

(inc, 7 sc) x 2 (18)

Round 35 :

(inc) x 2, 7 sc, (inc) x 2, 7 sc (22)

Round 36 :

2 sc, inc, 10 sc, inc, 8 sc (24)

Round 37 :

24 sc

Round 38 :

24 sc

Round 39 :

24 sc

Round 40 :

(2 sc, dec) x 6 (18)

Round 41 :

18 sc

Round 42 :

18 sc

Info :

Do not fill the tail

Round 43 :

(1 sc, dec) x 6 (12)

Round 44 :

12 sc

Round 45 :

3 sc, fold in half, connect front to back making 6 sc

Round 46 :

ch, piece rotation. In each of the 6 sc, work 3 dc in one stitch. Finish

β€” Wings :

Info :

Make 2 pieces

Round 1 :

6 sc in MR (6)

Round 2 :

(inc) x 6 (12)

Round 3 :

(1 sc, inc) x 6 (18)

Round 4 :

(2 sc, inc) x 6 (24)

Round 5 :

(3 sc, inc) x 6 (30)

Round 6 :

(4 sc, inc) x 6 (36)

Round 7 :

Fold in half, close front and back with 9 sc, a circle of 18 sc remains. Continue on it

Round 7.1 :

18 sc

Round 7.2 :

18 sc

Info :

Then fold in half, close front to back doing 4 sc, 5 dc

Info :

Next: ch, the rotation of the work. There are 18 sc in the closing row

Finishing :

In each of 18 sc, work 3 dc in one stitch. Finish

β€” Beak :

Info :

Use Yarn Art Jeans with 1.75mm crochet hook

Round 1 :

5 sc in MR (5)

Round 2 :

5 sc

Round 3 :

inc, 5 sc (6)

Round 4 :

inc, 6 sc (7) finish

Assembly Instructions

  • Insert and secure 10mm safety eyes into the head between rounds 9-11, ensuring they are symmetrically placed and properly positioned before stuffing
  • Sew the beak onto the face centered below the eyes using matching thread and a yarn needle for secure attachment
  • Position the wings symmetrically on both sides of the body, approximately between rounds 12-16, and sew them securely with needle and thread
  • Ensure the wings are angled slightly upward and outward for a natural dove appearance, pinning in place before final sewing
  • Weave in all yarn ends securely on the inside of the work to maintain a clean, professional finish

Important Notes

  • πŸ’‘Use stitch markers to keep track of round beginnings, especially during the body shaping sections with multiple increases and decreases
  • πŸ’‘The tail section should remain unstuffed to maintain its flat, fan-like appearance characteristic of dove tails
  • πŸ’‘Work the front loop only sections carefully in rounds 31 to create the distinctive fold that forms the tail base
  • πŸ’‘Maintain consistent tension throughout, particularly when working with the plush Dolphin Baby yarn which can be tricky to see stitches
  • πŸ’‘Pin wings in place before sewing to ensure perfect symmetry and proper positioning on both sides of the body
  • πŸ’‘The ruffled wing edges are created by working 3 dc into each stitch, so work loosely to allow proper spread
  • πŸ’‘Take your time with the assembly to ensure the dove has a balanced, graceful appearance with properly aligned features

This elegant Dove amigurumi pattern creates a symbol of peace and gentleness that's perfect for home dΓ©cor, gifts, or as a cherished keepsake. Designed by Ewelina Wieczorek for Cherry Tree Workshop, this pattern combines the ultra-soft texture of Himalaya Dolphin Baby yarn with precise shaping techniques to capture the graceful silhouette of a dove. The distinctive flowing tail and beautifully ruffled wings add special touches that make this pattern truly unique. Whether you're creating a peaceful addition to your nursery, a meaningful gift, or simply want to crochet something beautiful, this dove pattern delivers both elegance and charm. πŸ•ŠοΈ Happy crocheting! 🧢✨

You ask,

we answer.

FAQs

Can I use different yarn than Himalaya Dolphin Baby for this dove?

Yes, you can substitute with any bulky or super bulky plush yarn, but keep in mind your finished size will vary depending on yarn weight. Use the recommended 3.0mm hook for similar-weight yarns, and adjust hook size if needed to achieve proper fabric density.

Why shouldn't I stuff the tail section of the dove?

The tail is designed to remain flat and fan-like, mimicking a real dove's tail feathers. Stuffing it would make it bulky and lose the graceful, flowing appearance that's characteristic of this design.

What does it mean to work in 'front loops only' in round 31?

Front loop only (FLO) means you insert your hook only through the loop closest to you, not through both loops of the stitch. This creates a distinctive ridge and allows the piece to fold naturally, which is essential for shaping the tail base.

How do I make the ruffled edges on the wings?

The ruffled effect is created by working 3 double crochet stitches into each single crochet stitch in the final round. This triples the stitch count and creates that beautiful, dimensional ruffle edge that gives the wings their feathered appearance.

Can I make this dove larger or smaller?

Absolutely! To make it larger, use thicker yarn with a correspondingly larger hook. For a smaller dove, use DK or worsted weight yarn with a 2.0-2.5mm hook. The stitch counts remain the same, but the finished size will change significantly.

Where exactly should I position the wings on the body?

Position the wings symmetrically on both sides of the body approximately between rounds 12-16, angling them slightly upward and outward. Pin them in place first to ensure they're even before sewing permanently.