🧶 Beautiful ✨ Detailed 💝 Adorable

Baby Elephant Elf Amigurumi Pattern

Baby Elephant Elf Amigurumi Pattern
4.4★ Rating
8-10 Hours Time Needed
3.4K Made This
✂️

Advanced Level

Designed for experienced knitters, these patterns involve intricate designs and complex techniques to challenge and inspire.

⏱️

All-Day Adventure

Requires 8-10 hours, ideal for a full day of immersive knitting.

🧸

Cute Companion

An adorable friend to cherish, handcrafted with love to bring comfort and joy for years to come.

About This Baby Elephant Elf Amigurumi Pattern

This elephant amigurumi pattern tells the touching story of Elf, a lonely elephant who believes in love and carries a heart balloon as a gift for his future soulmate. The pattern includes intricate details like embroidered facial features, movable trunk with optional wire reinforcement, and a beautifully crafted heart balloon with wrapped rope. Every element is designed to capture Elf's gentle, hopeful personality through careful construction and thoughtful finishing touches.

Baby Elephant Elf Amigurumi Pattern crochet pattern - detailed view of completed project

The pattern features advanced techniques including joining multiple pieces seamlessly, creating dimensional ears with picot edges, and constructing a two-toned heart balloon. Optional wire elements add realism and poseability to both the trunk and balloon string.

Why You'll Love This Baby Elephant Elf Amigurumi Pattern

I absolutely love how this pattern transforms simple yarn into a character with genuine emotion and personality. The attention to detail in the embroidered features, from the loose-stitch eyelashes to the subtle eyebrow placement, creates an expression that truly captures Elf's hopeful nature. I'm especially fond of the engineering behind the movable trunk and the creative balloon attachment—these thoughtful touches elevate this from a simple toy to a genuine keepsake. The story behind Elf adds meaning to every stitch, making the crafting process feel like bringing a friend to life rather than just following instructions.

Baby Elephant Elf Amigurumi Pattern step 1 - construction progress Baby Elephant Elf Amigurumi Pattern step 2 - assembly progress Baby Elephant Elf Amigurumi Pattern step 3 - details and accessories Baby Elephant Elf Amigurumi Pattern step 4 - final assembly and finishing

Switch Things Up

I love experimenting with color combinations for this little elephant! While the pattern uses variegated yarn for the main body, I've found that solid pastels create an equally charming effect—soft lavender or dusty blue gives Elf a dreamy, vintage look.

For the heart balloon, I sometimes substitute the standard red or pink with unexpected colors like mint green or butter yellow, which adds a whimsical twist to the traditional love story.

If you want to make Elf more gender-neutral or masculine, try using gray tones for the body with a navy or forest green balloon—it completely transforms the character while maintaining the sweet personality.

I've also experimented with adding small embroidered flowers or stars on the ears for a more decorative touch, especially when making this as a nursery decoration rather than a toy.

The forelock can be styled differently too—instead of the triangular trim, try leaving it longer and shaggier for a more playful look, or even braid it for an elegant effect.

For the balloon rope, metallic embroidery floss wrapped around the wire instead of regular yarn creates a beautiful shimmery effect that catches the light.

Consider making Elf in miniature by using thread weight yarn and a smaller hook—the pattern scales down beautifully for a keychain-sized version.

Some makers add small accessories like a tiny crocheted bow tie or a miniature suitcase to enhance the storytelling aspect of Elf's journey to find love.

You could also create a companion elephant using the same pattern but with complementary colors, finally giving Elf the soul mate he's been dreaming of!

The embroidered details offer endless possibilities—experiment with different eyelash styles, eyebrow expressions, or even add small hearts embroidered on the cheeks for extra sweetness.

Common Mistakes & How to Fix Them

✗ Forgetting to mark the beginning of rounds can cause misalignment when attaching the face to the body—always use stitch markers consistently ✗ Stuffing the trunk too firmly before inserting wire makes it difficult to position correctly—add wire first then stuff gently around it ✗ Placing safety eyes without doing the embroidered details first means you can't adjust eye position for the best expression—always embroider before securing eyes ✗ Not pinning ears before sewing often results in asymmetrical placement that's hard to fix—take time to position and check symmetry from multiple angles

Baby Elephant Elf Amigurumi Pattern

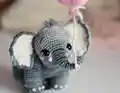
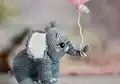
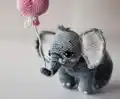
Create an enchanting little elephant named Elf who's searching for love! This adorable amigurumi stands 11cm tall and features a movable trunk, sweet embroidered details, and a charming heart-shaped balloon. Perfect for gifting or adding to your collection, this pattern combines delicate stitchwork with personality-filled design elements. The finished elephant has poseable features and comes complete with tusks, a decorative forelock, and carefully crafted ears that bring this lonely little friend to life.

Advanced 8-10 Hours

Materials Needed for Baby Elephant Elf Amigurumi Pattern

— Main Fabric

  • 01
    Alize Cotton Gold Batik 330m/100gr Sport weight yarn (Color A - variegated)
  • 02
    Yarnart Jeans 160m/50gr Sport weight yarn (Color B - for belly and details)
  • 03
    Yarnart Jeans 160m/50gr Sport weight yarn (Color C - for heart balloon)
  • 04
    Black, white, and pink embroidery floss (mouline)
  • 05
    Synthepus stuffing material

— Tools Required

  • 01
    Crochet hook 2.0mm (for elephant body)
  • 02
    Crochet hook 1.5mm (for cheeks)
  • 03
    10mm safety eyes
  • 04
    Stitch markers or pins (5 pieces)
  • 05
    Yarn needle with blunt end
  • 06
    Sewing needle with bead end for pinning parts
  • 07
    Scissors
  • 08
    Round-nose pliers
  • 09
    Floral wire 1.2mm diameter (optional for movable trunk)
  • 10
    Electrical tape
  • 11
    White felt pieces
  • 12
    Glossy glaze or transparent acrylic varnish
  • 13
    Small paint brush (size 1)
  • 14
    Super glue
  • 15
    Counterweight stone or metal object (2-3cm diameter)

Progress Tracker

0% Complete

— TRUNK & FACE (Yarn A) :

Round 1 :

2 loops, 6sc in 2nd loop from hook (amigurumi ring) (6l)

Round 2-6 :

6sc (6l)

Round 7 :

[2sc, inc]x2 (8l)

Round 8-10 :

8sc (8l)

Round 11 :

[3sc, inc]x2 (10l)

Round 12 :

10sc (10l)

Round 13 :

[4sc, inc]x2 (12l)

Round 14 :

12sc (12l)

Round 15 :

[5sc, inc]x2 (14l)

Round 16 :

[6sc, inc]x2 (16l)

Info :

Cut wire 2-3cm longer than trunk, twist one end into loop, other into ring matching trunk opening with pliers, wrap with electrical tape, insert into crochet trunk, fix wire before each increase

Round 17 :

[7sc, inc]x2 (18l)

Round 18 :

3sc, [sc, inc]x6, 3sc (24l)

Round 19 :

3sc, [2sc, inc]x6, 3sc (30l)

Round 20 :

3sc, [3sc, inc]x6, 3sc (36l)

Round 21 :

[5sc, inc]x6 (42l)

Info :

Fill trunk with synthepus, cut and fix thread

— LEGS (4 pieces, Yarn A) :

Round 1 :

2 loops, 8sc in 2nd loop from hook (amigurumi ring) (8l)

Round 2 :

[sc, 3sc in next loop]x4 (16l)

Round 3 :

2sc, inc, [3sc, inc]x3, sc (20l)

Round 4 :

20sc only through back loops (20l)

Round 5 :

[dec]x2, 4sc, [inc]x4, 4sc, [dec]x2 (20l)

Round 6-9 :

20sc (20l)

Info :

Cut and fix thread, keep beginning markers to note leg-belly connection points

— BELLY (Yarn B) :

Round 1 :

4 loops, turning, 3sc starting from 2nd loop from hook (3l)

Round 2-3 :

1 loop, turning, 3sc (3l)

Round 4 :

Crochet belly around perimeter counter-clockwise: 3sc in corner, 1sc down side, 3sc in corner, 3sc across, 3sc in corner, 1sc up side, 3sc in corner, 3sc across (20l)

Round 5 :

1sc, join 1st leg with sc, 19sc around leg; 3sc down; join 2nd leg with sc, 19sc around leg; 5sc across; join 3rd leg with sc, 19sc around leg; 3sc up; join 4th leg with sc, 19sc around leg; 4sc across (96l)

Info :

Don't cut thread, sew holes under thigh areas with extra thread, start crocheting body

— BODY & HEAD (Yarn A) :

Round 1-7 :

96sc (96l)

Info :

Mark with pin the face-body junction at 18th loop from beginning of face round

Round 8 :

45sc along body, crochet 6sc of face together with 6sc of body, then 45sc along body (96l)

Round 9 :

[13sc, dec]x3, [5sc, inc]x6, [13sc, dec]x3 (126l)

Round 10 :

[12sc, dec]x3, [2sc, dec]x3, [2sc, inc]x6, [2sc, dec]x3, [12sc, dec]x3 (120l)

Round 11 :

[11sc, dec]x3, 42sc, [11sc, dec]x3 (114l)

Info :

Place extra pin on 32nd loop clockwise from round beginning

Round 12 :

86sc, 6 loops, sc in loop marked with pin (last sc becomes beginning of new round, move pin) (93l)

Info :

After round 12, shape has two holes - head hole (left) and back hole (right), continue with left head hole

Round 13 :

60sc (60l)

Round 14 :

[sc, dec]x2, 42sc, [sc, dec]x4 (54l)

Round 15 :

[dec]x2, 42sc, [dec]x4 (48l)

Round 16-17 :

48sc (48l)

Round 18 :

[6sc, dec]x6 (42l)

Round 19 :

[5sc, dec]x6 (36l)

Infos :

Insert safety eyes between rounds 20-21 from trunk top, 14 stitches apart, don't fix yet. Do loose stitch around eye with white mouline, separate one thread and fasten. Add loose stitch with black mouline around upper eye half, separate thread and fasten. Embroider cilia, press eye to embroidered line and fasten. Embroider trunk stripes. Cut 1cm thread pieces, attach to forehead symmetrically, mark with pins, embroider eyebrows

Round 20 :

[4sc, dec]x6 (30l)

Info :

Start stuffing head with synthepus and continue crocheting

Round 21 :

[3sc, dec]x6 (24l)

Round 22 :

[2sc, dec]x6 (18l)

Round 23 :

[sc, dec]x6 (12l)

Info :

Completely fill head

Round 24 :

[dec]x6 (6l)

Info :

Cut white felt circle slightly larger than hole, insert to prevent stuffing catching on needle. Trim thread, pass through all loops with yarn needle, tighten and secure, sew holes between neck and head

— CHEEKS (2 pieces, Pink mouline, hook 1.5mm) :

Round 1 :

2 loops, 6sc in 2nd loop from hook (amigurumi ring), sl st in 1st sc (6l)

Info :

Cut and fix thread leaving long end for sewing, sew cheeks with wrong side outward

— TUSKS (2 pieces, Yarn B) :

Info :

Crochet as cord with two threads at once. Leave long thread end at beginning, put thread end on hook, grab working thread and pull through two loops on hook. Crochet 5 more loops same way. Trim and secure thread leaving long end for sewing. Sew tusks to head

— FORELOCK (Yarn A) :

Info :

Position at top of head. Insert needle and pull thread, insert in same place, leave 1cm loose stitch. Secure loose stitch from wrong side with knot. Make 4 more loops same way. Swipe scissors through all loops and cut in half. Trim forelock from both sides into triangular shape

— BACK (Yarn A) :

Info :

Attach new thread to large back hole and crochet in continuous rounds

Round 1 :

[9sc, dec]x6 (60l)

Round 2 :

[8sc, dec]x6 (54l)

Round 3 :

54sc (54l)

Round 4 :

[7sc, dec]x6 (48l)

Info :

Fill legs with synthepus

Round 5 :

[6sc, dec]x6 (42l)

Round 6 :

[5sc, dec]x6 (36l)

Round 7 :

[4sc, dec]x6 (30l)

Info :

Start stuffing body with synthepus, place counterweight in back hole so head doesn't outweigh and elephant stands steadily

Round 8 :

[3sc, dec]x6 (24l)

Round 9 :

[2sc, dec]x6 (18l)

Round 10 :

[sc, dec]x6 (12l)

Info :

Completely fill body

Round 11 :

[dec]x6 (6l)

Info :

Cut white felt circle slightly larger than hole, insert to prevent stuffing catching on needle. Trim thread, pass through all loops with yarn needle, tighten and secure, sew holes between neck and back

— TOES (3 per leg, Yarn B in two folds) :

Info :

Embroider 3 toes on each leg with French knot

— TAIL (Yarn A) :

Info :

Leave long thread end for sewing. Crochet 10 loops. Make brush at tail end: pull loop 1cm with hook, wrap thread around loop and tighten creating knot. Make 4 more loops same way. Swipe scissors through loops and cut in half one by one. Trim and fluff brush with needle. Sew tail to body, squeeze head to body with few stitches

— EARS (2 pieces) :

Info :

Inner ear with Yarn B, outer ear with Yarn A using same pattern

Round 1 :

9 loops, turning, 8sc starting from 2nd loop from hook (8l)

Round 2 :

inc, 6sc, inc (10l)

Round 3-5 :

10sc (10l)

Round 6 :

inc, 8sc, inc (12l)

Round 7-9 :

12sc (12l)

Round 10 :

dec, 8sc, dec (10l)

Round 11 :

10sc (10l)

Round 12 :

8sc, dec (9l)

Round 13 :

dec, 7sc (8l)

Round 14 :

6sc, dec (7l)

Round 15 :

dec, 5sc (6l)

Round 16 :

2dc, 2sc, dec (5l)

Info :

Cut and fasten thread on inner ear, don't cut on outer ear. Fold ears as shown, crochet around clockwise inserting hook into outer part first then inner part

RIGHT EAR Round 17 :

15sc up, 8sc straight, 15sc down, 5sc straight (43l)

RIGHT EAR Round 18 :

3 sl st, [Picot small]x2, [Picot big]x3

Info :

Picot small = 3 loops, dc in 1st loop, skip 1sc, sl st into next sc. Picot big = 5 loops, dc in 1st loop, skip 2sc, sl st into next sc. Cut and fix thread leaving long end for sewing

LEFT EAR Round 17 :

5sc straight, 15sc up, 8sc straight, 15sc down (43l)

LEFT EAR Round 18 :

1 loop, turning, 3 sl st, [Picot small]x2, [Picot big]x3

Info :

Cut and fix thread leaving long end, sew ears to head after pre-fixing with needles for perfect symmetry

— BALLOON HEART (Yarn C) :

Info :

Heart top crocheted in two identical pieces. First piece:

Round 1 :

2 loops, 6sc in 2nd loop from hook (amigurumi ring) (6l)

Round 2 :

[inc]x6 (12l)

Round 3 :

[sc, inc]x6 (18l)

Round 4 :

18sc (18l)

Round 5 :

[2sc, inc]x6 (24l)

Round 6 :

24sc (24l)

Info :

Cut and fix thread. Crochet second piece same way, don't cut thread. Connect pieces by inserting hook into first piece inside-to-outside then second piece outside-to-inside

Round 7 :

Crochet 6sc of first piece together with 6sc of second piece, then 18sc along second piece (24l)

Round 8 :

Crochet 18sc on first part, 18sc on second part (36l)

Round 9 :

[4sc, dec]x6 (30l)

Round 10 :

[3sc, dec]x6 (24l)

Round 11 :

[2sc, dec]x6 (18l)

Info :

Start stuffing heart with synthepus

Round 12 :

[sc, dec]x6 (12l)

Round 13 :

12sc (12l)

Info :

Completely fill heart

Round 14 :

[dec]x6 (6l)

Round 15 :

6sc (6l)

Round 16 :

[inc]x6, sl st in 1st sc (12l)

Info :

Cut and fix thread, push thread end into heart

— BALLOON ROPE (Yarn B) :

Info :

Cut wire approximately 20cm long. Wrap wire with thread: glue thread to wire leaving long free end, spread small wire section with glue and wrap tightly with thread in spiral, repeat until all wire wrapped. Cover wrapped wire with transparent glossy acrylic glaze using paint brush, leave to dry completely. Pull free thread end through bottom of heart with hook and pull wire inward. Wrap heart bottom with thread and make bow. Attach balloon rope to leg or trunk

Assembly Instructions

  • Attach the completed trunk and face piece to the body by crocheting them together at round 8 of the body section, aligning the marked junction point
  • Sew all four legs to the belly piece following the joining instructions in round 5, making sure to close any gaps under the thigh areas
  • Attach the cheeks to the face with the wrong side facing outward for a dimensional effect, positioning them symmetrically below the eyes
  • Sew tusks to the head just below the trunk attachment, angling them slightly downward for a natural appearance
  • Pin ears to the head before sewing to ensure perfect symmetry, positioning them at the sides of the head level with the eyes
  • Attach the tail to the lower back section, then secure the head firmly to the body with reinforcement stitches at the neck area
  • Thread the balloon rope through the heart bottom and attach the finished balloon to either the trunk or one of the front legs

Important Notes

  • 💡Wire is optional but adds poseability to the trunk and realism to the balloon rope—use with caution as it's not safe for small children
  • 💡Mark the beginning of each round consistently with stitch markers to maintain proper alignment throughout construction
  • 💡The counterweight placed in the back opening is essential for balance so the elephant stands steadily without tipping forward
  • 💡Complete all embroidery work on the face before securing the safety eyes permanently to allow for adjustment of positioning
  • 💡Stuff firmly but not too tightly, especially in the trunk and legs, to maintain the intended shape and allow for natural posing
  • 💡When joining the ears, always insert the hook into the outer layer first, then the inner layer, to ensure proper orientation
  • 💡Use needles with beads on the end when pinning parts before sewing to achieve perfect symmetry and prevent pieces from slipping

This enchanting Baby Elephant Elf pattern brings a touching story to life through intricate crochet techniques and thoughtful details. From the movable trunk to the embroidered facial features and charming heart balloon, every element adds personality to this lonely little elephant searching for love. The pattern challenges advanced crocheters with techniques like seamless body construction, dimensional ear shaping, and optional wire reinforcement, resulting in an 11cm treasure that's both adorable and deeply meaningful. Whether you're creating a companion for Elf or a heartfelt gift, this pattern rewards your effort with a character full of hope and charm. 🐘💕✨

You ask,

we answer.

FAQs

Can I make this elephant without using wire in the trunk?

Yes, the wire is completely optional. If you skip the wire, simply continue crocheting the trunk according to the pattern without the wire insertion steps. The trunk will still be adorable but won't be poseable.

What if I can't find the exact yarn brands mentioned in the pattern?

You can substitute with any sport weight yarn that has similar yardage. The key is maintaining the same hook size relative to your yarn weight to achieve a tight enough stitch that stuffing doesn't show through.

How do I prevent the elephant from tipping forward due to the heavy head?

The pattern includes instructions for adding a counterweight (small stone or metal object wrapped in electrical tape) in the back opening before closing. This weight balances the head and allows the elephant to stand steadily.

Is this pattern suitable for beginners?

This is an advanced pattern that requires experience with amigurumi techniques, joining multiple pieces, embroidery work, and careful assembly. Beginners should start with simpler projects before attempting this design.

Can I make the balloon in a different shape instead of a heart?

While the pattern specifically includes a heart balloon to match Elf's story, you could adapt any small amigurumi shape as a balloon. Just ensure it has an opening at the bottom to attach the wrapped wire rope.

How do I achieve symmetrical ear placement?

The pattern recommends using needles with beads on the end to pin both ears in place before sewing. This allows you to check symmetry from multiple angles and make adjustments before committing to permanent stitching.