🧶 Beautiful ✨ Detailed 💝 Adorable

Dino Water Bottle Holder Amigurumi Pattern

Dino Water Bottle Holder Amigurumi Pattern
4.6★Rating
3-5 HoursTime Needed
2.0KMade This
✂️

Intermediate Level

Ideal for those with basic crocheting experience, featuring slightly more advanced stitches and techniques to expand your skills.

⏱️

Quick Craft

Fits nicely into a free afternoon — 2 to 5 hours of focused, enjoyable crocheting.

🐰

Whimsical Buddy

Playful characters full of personality, designed to spark imagination and become cherished playtime favorites.

About This Dino Water Bottle Holder Amigurumi Pattern

Dino Water Bottle Holder Amigurumi Pattern crochet pattern - detailed view

This pattern makes a fantastic gift for the little explorers in your life or a fun conversation starter for your own gym bag—it’s practical, durable, and packed with personality.

Why You'll Love This Dino Water Bottle Holder Amigurumi Pattern

I honestly had so much fun seeing this dino take shape, especially when the little teeth and fins went on! The technique of pulling the loops level with your hook makes such a dense, professional-looking fabric that you'll feel like a pro when you see how clean the finish is. It’s one of those projects where you’ll want to make a whole rainbow of dinosaurs once you finish the first one.

Dino Water Bottle Holder Amigurumi Pattern step 1 Dino Water Bottle Holder Amigurumi Pattern step 2 Dino Water Bottle Holder Amigurumi Pattern step 3 Dino Water Bottle Holder Amigurumi Pattern step 4

Switch Things Up

I have to admit, I’ve always had a soft spot for functional amigurumi. There’s something so satisfying about making a 'toy' that actually does a job! When I first started working with 3mm polyester cord, I was a little worried about my hands getting tired, but the result is so worth it. The fabric is incredibly tough—perfect for kids who might drop their bottles or toss them around.

One little tip I discovered while making mine: when you get to the teeth, try to keep your tension consistent. If the teeth are too loose, they kind of flop over, but if they’re nice and tight, they stand up perfectly to give that 'scary' dino look. Also, don't be afraid to experiment with colors! I went with a classic forest green, but I’ve seen this look amazing in bright 'lava' orange or even a deep midnight blue for a 'space dino' vibe.

This project really reminded me why I love our crochet community—we take something as simple as a water bottle and turn it into a work of art. I can't wait to see your versions! Make sure you take a photo of your dino 'chomping' on a bottle; it’s the best part of the whole project.

Common Mistakes & How to Fix Them

✗ If you don't singe the ends of your polyester cord with a lighter immediately after cutting, it will unravel quickly and ruin your hard work.✗ When working the sc3tog decreases on the back, make sure you share the middle stitch as instructed or your dino's spine will lean to one side.✗ The front paws are worked directly into Round 16; if you miss the placement, your dino will look lopsided when viewed from the front.✗ Be careful not to crochet the I-cord handle too loosely, as the weight of a full water bottle will stretch the cord significantly over time.

Dino Water Bottle Holder Amigurumi Pattern

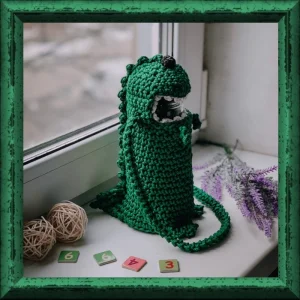
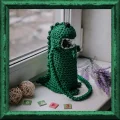
Keep your hydration game strong and your style even stronger with this adorable dinosaur water bottle carrier. You're going to love how this sturdy little guy turns a boring plastic bottle into a prehistoric companion that's perfect for hikes, school days, or just a walk in the park. It's designed specifically for polyester cord, meaning it's tough enough to handle daily adventures while keeping its shape perfectly. Plus, who doesn't want a dinosaur guarding their water?

Intermediate 3-5 Hours

Materials Needed for Dino Water Bottle Holder Amigurumi Pattern

— Main Fabric

  • 01
    Primary color: 3mm polyester cord (approximately 110 yards or 100 meters)
  • 02
    White accent: Small amount of 2mm polyester cord for the teeth
  • 03
    Black accent: Small amount of 2-3mm polyester cord for the eyes

— Tools Required

  • 01
    4mm crochet hook for the main body
  • 02
    3mm crochet hook for the details and teeth
  • 03
    2 stitch markers to track your tail and paw placement
  • 04
    Lighter for sealing the cord ends
  • 05
    Sharp scissors
  • 06
    Optional: Hot glue gun for extra eye security

Progress Tracker

0% Complete

— 1. The Bottom :

Info :

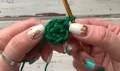
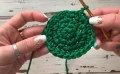
Using your 4mm hook and the main color cord, start with the base.

Round 1 :

ch 2, work 6 sc into the second ch from your hook. Join with a sl st and ch 1. (6)

Round 2 :

Work 6 inc. Join with a sl st and ch 1. For this and every following round, work into the second sc, skipping the ch and joining with a sl st in the first sc. (12)

Round 3 :

Repeat (1 sc, 1 inc) 6 times. Join with a sl st and ch 1. (18)

Round 4 :

Repeat (2 sc, 1 inc) 6 times. Join with a sl st and ch 1. (24)

Round 5 :

Repeat (3 sc, 1 inc) 6 times. Join with a sl st and ch 1. Do not break the yarn. (30)

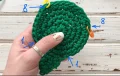
— 2. The Tail Extension :

Row 1 :

5 sc, ch 1, and turn your work.

Row 2 :

1 dec, 1 sc, 1 dec, ch 1, and turn.

Row 3 :

sc3tog, ch 1. Fasten off, pull the tail through, and hide the end. Singe the tip with your lighter to secure it.

— 3. Hind Paws (Make 2) :

Row 1 :

ch 4, work 3 sc starting from the second ch from the hook. ch 1 and turn.

Row 2 :

ch 2, sl st into the first sc of the row below. ch 4, sl st into the middle sc. ch 3, sl st into the last sc. Fasten off and singe the end.

— 4. The Body Base :

Info :

Place a marker in the 8th sc from the tail. You will be attaching the paws between these markers. Start 5 loops to the left of the tail, working only into the back loop and the horizontal bar (jumper) behind it.

Round 1 :

3 sc, join the first paw by crocheting through both the paw and body for 3 sc, 3 sc, join the second paw for 3 sc, 8 sc, 4 sc up the right side of the tail, 3 sc in the tip, 4 sc down the left side of the tail, 4 sc. Join with a sl st and ch 1. (35)

Round 2 :

22 sc, sc3tog, insert hook back into the last sc just used and work another sc3tog, 8 sc. Join with a sl st and ch 1. (32)

Round 3 :

20 sc, sc3tog, insert hook back into the last sc used and work another sc3tog, 7 sc. Join with a sl st and ch 1. (29)

Round 4 :

19 sc, sc3tog, 7 sc. Join with a sl st and ch 1. (27)

Round 5 :

27 sc. Join with a sl st and ch 1. (27)

Round 6-15 :

Work 27 sc in each round. Join with a sl st and ch 1 at the end of each. (27)

— 5. Front Paws & Upper Body :

Round 16 :

21 sc. To make the first paw: ch 5, sl st in the 4th ch from hook, ch 3, sl st in the same loop, sc in the first ch. Continue with 6 sc on the body, then repeat the paw instructions for the second paw. Join with a sl st and ch 1. (27)

Round 17 :

27 sc. Join with a sl st and ch 1. (27)

Round 18 :

27 sc. Join with a sl st. To shift the start of the next section, sl st into the second loop of the previous row and ch 1. (27)

— 6. The Mouth & Head :

Row 19-21 :

15 sc, ch 1, and turn. (15)

Row 22-23 :

15 sc, ch 1, and turn. (15)

Round 24 :

15 sc, then ch 15 and join with a sl st to the first loop of this row to form the mouth opening.

Round 25 :

Work 14 sc across the head, place a marker in the first sc to begin spiral rounds, then work 15 sc into the chain space. (29)

Round 26 :

Repeat (3 sc, 1 dec) 6 times. Note: The last decrease will overlap the first stitch of the row slightly to shift the marker. (24)

Round 27 :

Repeat (2 sc, 1 dec) 6 times. (18)

Round 28 :

Repeat (1 sc, 1 dec) 6 times. (12)

Round 29 :

Work 6 dec. Use the final decrease to pull the hole closed. Do not cut the cord yet.

— 7. The Fins :

Info :

Fold the holder in half to find the center line of the back.

Fins :

ch 3, sc in the 2nd ch from hook, sl st into the body one row down. Repeat this process all the way down the spine to the tip of the tail. You should end up with about 16 fins. Fasten off and singe the end.

— 8. Teeth :

Info :

Switch to the 3mm hook and white cord. Join in the back loop only on the right side of the mouth opening.

Teeth :

ch 3, sc in the 2nd ch from hook, sl st into the next loop of the mouth. Repeat this around the entire perimeter of the mouth. Join with a sl st at the start, knot the ends inside, and singe.

— 9. Eyes (Make 2) :

Round 1 :

Using the 3mm hook and black cord, ch 2. Work 6 sc into the 2nd ch from hook. Do not join; work in a spiral.

Round 2 :

6 sc. Fasten off, leaving a 4-inch tail for attaching.

— 10. The Handle :

Info :

Locate a spot 2 stitches away from the mouth between rows 17 and 18.

I-Cord :

Join cord, ch 1, 1 sc. Turn the work clockwise and insert hook under the two loops of the ch. Work 1 sc. Turn clockwise again, insert hook under the two loops on the side, and work 1 sc. Repeat this until the handle reaches about 25.5 inches (65 cm).

Finishing :

Attach the end of the I-cord to the opposite side of the holder. Secure firmly, hide the ends inside, and singe with your lighter.

Assembly Instructions

  • Position the black eyes at the very beginning of the dorsal fin on the head. Pull the yarn tails through to the inside, tie them securely, and singe the ends.
  • If the eyes feel a bit loose, you can use a small dab from a hot glue gun to keep them perfectly in place against the head.
  • Check the perimeter of the mouth to ensure the white teeth are evenly spaced; if they look too crowded, skip a stitch between every third tooth.
  • Attach the handle between Rounds 17 and 18, making sure it is centered on the sides so the dino hangs straight when the bottle is full.
  • Go over the entire piece with your lighter one last time, very carefully melting any stray cord fibers or securing hidden knots.
  • Insert your water bottle through the mouth opening to check the fit and ensure the tail and paws sit correctly at the base.

Important Notes

  • 💡Always pull your sc loops up to the level of the hook before finishing the stitch; this creates a dense fabric that won't show the bottle through the stitches.
  • 💡Since we are using polyester cord, a lighter is your best friend. Always melt the tips of the cord to prevent the inner core from slipping out.
  • 💡Use stitch markers religiously, especially when working the base and tail, as the textured cord can make it hard to see exactly where a round begins.
  • 💡The handle is an I-cord, which is very sturdy but will stretch. Crochet it slightly shorter than you think you need if you prefer a tighter fit.
  • 💡If your bottle is wider than a standard 16oz/500ml bottle, add an extra increase round to the base before starting the tail extension.

You've done it! Your very own prehistoric protector is ready to hit the trails. This Dino Water Bottle Holder is more than just a craft project—it's a durable, handmade accessory that brings a bit of joy to the everyday task of staying hydrated. Whether you made this for a dinosaur-obsessed kiddo or as a quirky gift for a hiking buddy, it's sure to be a hit. I hope you enjoyed the process of working with cord and seeing those little fins come to life! Don't forget to show off your finished chomper to your crafting friends. Happy trails and happy crocheting! 🧶 🦖 ✨

You ask,

we answer.

FAQs

Can I use cotton yarn instead of polyester cord?

You can, but I'd recommend using a sturdy 24/7 cotton or doubling up your yarn. The polyester cord is what gives this dino its structure and 'scaly' texture. Cotton will be much softer and might stretch more under the weight of the water.

How do I clean my dino holder if it gets dirty on a hike?

Since it's made of polyester cord, you can spot clean it with a damp cloth and mild soap. For a deeper clean, hand wash it in cool water and let it air dry. Avoid the dryer, as high heat can damage the melted cord ends.

What if my water bottle is much taller than the holder?

No problem at all! Simply add more repeat rounds of 27 sc between Rounds 6 and 15. This section is the 'body' of the dino, so you can make him as long as you need to fit your favorite bottle.

The I-cord handle seems really tricky, is there an easier version?

If the I-cord is giving you trouble, you can substitute it with a simple foundation sc strap or even a thick braid of the cord. Just make sure whatever you choose is strong enough to support a full bottle of water!