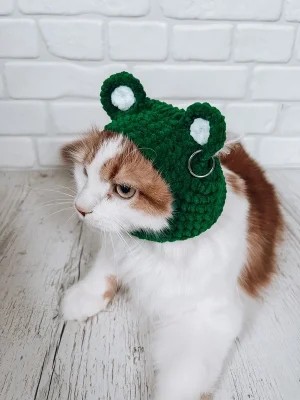
About This Cute Frog Pet Balaclava Crochet Pattern
This cozy pet accessory is the ultimate gift for pet owners who love taking adorable photos of their furry friends, bringing instant smiles and warmth.
Perfect for those just starting their crocheting journey, with clear instructions and simple techniques
Fits nicely into a free afternoon — 2 to 5 hours of focused, enjoyable crocheting.
An adorable friend to cherish, handcrafted with love to bring comfort and joy for years to come.
This cozy pet accessory is the ultimate gift for pet owners who love taking adorable photos of their furry friends, bringing instant smiles and warmth.
I absolutely adore how fast this project works up! Using plush yarn means you get instant gratification, and the clever construction creates perfect little ear holes without any fussy sewing. It is a wonderful way to use up leftover yarn scraps while making something that brings pure joy.

When I first made this little frog hood, my cat gave me the funniest look, but as soon as I slipped it on, she looked so incredibly sweet! I love using plush velvet yarn for pet items because it is unbelievably soft against their fur, and it works up so quickly. If you want to customize this piece, you can easily play around with different colors. How about a pastel pink bunny version or a bright yellow chick? You could even add a little flower applique near one of the ears to give it an extra touch of personality.
Another fun trick is to make a matching human-sized scarf or beanie using the same yarn so you and your pet can have coordinating outfits for your next photo shoot! When working with plush yarn, just remember to keep your tension relaxed so those stitches stay nice and fluffy. I hope this brings as much laughter and joy to your home as it did to mine. Have the best time crafting this little treasure!
Treat your favorite furry friend to the ultimate cozy accessory with this adorable frog-themed hood! Designed specifically for cats and small dogs, this project uses plush yarn to keep things incredibly soft and comfortable for your pet. You will love watching this whimsical piece come together in just a few quick steps, making it the perfect weekend project to show your pet some extra love.
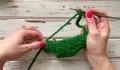
Start by using the green plush yarn. The main hat is worked in rows first, then transitions into a spiral. Turn your work after each row for the first five rows.
ch 8. Starting in the second loop from your hook, work 7 sc, then ch 1 and turn. (7)
Work 7 sc, then ch 1 and turn. (7)
Work 7 sc, then ch 1 and turn. (7)
Work 7 sc, then ch 1 and turn. (7)
Work 7 sc, then turn your work. (7)
ch 8, turn the piece over, work 7 sc along the starting chain edge on the opposite side, ch 8, then work 7 sc across the Row 5 stitches. (30)
From this point forward, you will be working in a continuous spiral. Place a stitch marker in the very first stitch of each round to keep track of your progress.
Work 7 sc, then work 8 sc directly over the chain space, work 7 sc, then work 8 sc directly over the second chain space. (30)
Work 9 sc, 1 inc, 1 sc, 1 inc, 1 sc, 1 inc, 10 sc, 1 inc, 1 sc, 1 inc, 1 sc, 1 inc, 1 sc. (36)
Work 9 sc, 1 inc, 2 sc, 1 inc, 2 sc, 1 inc, 11 sc, 1 inc, 2 sc, 1 inc, 2 sc, 1 inc, 2 sc. (42)
Work 1 sc in each of the 42 stitches around. (42)
Work 18 sc, ch 13, skip the next 13 stitches to create the face opening, then work 11 sc. (42)
Work 18 sc, then work 1 sc into each of the 13 chains, then work 11 sc. (42)
Work 1 sc in each of the 42 stitches around. (42)
Work 1 sc in each of the 42 stitches around. (42)
Work 1 final sc, then cut your yarn. Pull the tail through the loop, thread it under the first stitch of the round to create a seamless finish, pull it to the inside of the hat, secure, and weave in the end.
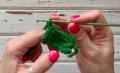
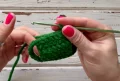
Use the green plush yarn to create the outer eye bases.
ch 2. Work 6 sc into the second chain from your hook. (6)
Work 6 inc around. (12)
Work (1 sc, 1 inc) 6 times. (18)
Work 1 sc, then cut your yarn, leaving a tail of about 16 inches (40 cm) for sewing. Fasten off and pull the tail to the back of the piece.
Use the white plush yarn to create the inner eye details.
ch 2. Work 6 sc into the second chain from your hook. (6)
Cut the yarn and pull the tail through. Thread the tail under the first stitch to make a clean circle, pull to the back, tie a secure knot, and hide the remaining ends.
I cannot wait to see your adorable pets rocking their new frog hats! This project is such a joy to make, and seeing it on a happy kitty or pup makes every single stitch completely worth it. Don't forget to take tons of photos and share them with your friends—they are guaranteed to brighten everyone's day! If you ever get stuck or have questions, just reach out. Happy crocheting, my lovely crafting friends! 🧶✨💚
This specific pattern is sized for cats and small dogs, but you can easily scale it up by using a larger hook size, thicker yarn, or by adding a few extra rows to the top band and increasing the chain counts for the ear and face openings.
Any super bulky acrylic or wool blend yarn will work, but plush chenille yarn is highly recommended because it is exceptionally soft and doesn't irritate a pet's sensitive fur and skin.
The custom ear holes and muzzle opening are designed to hold the hood naturally in place. Always supervise your pet while they are wearing any accessory to ensure they remain safe and happy.
Not at all! Using a plastic needle with a large eyelet makes it very easy to guide the thick plush yarn through the stitches. Pinning the eyes down first keeps them perfectly straight while you sew.
