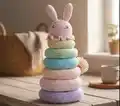
Create an enchanting Montessori-inspired toy that combines play and learning in one adorable package. This delightful bunny features a cone-shaped body with six colorful stacking rings in vibrant rainbow hues, perfect for helping little ones develop fine motor skills and color recognition. Standing approximately 27 cm tall, this sweet companion offers both educational value and cuddly comfort. The gradient rainbow design from purple to yellow creates a visually stimulating toy that encourages sensory exploration and imaginative play.
Progress Tracker
0% Complete
— CONE (Pink Color) :
Round 3 :
(sc, inc) x 5 (15)
Round 4-8 :
sc in each st (15)
Round 9 :
(2sc, inc) x 5 (20)
Round 10-18 :
sc in each st (20)
Round 19 :
(3sc, inc) x 5 (25)
Round 20-28 :
sc in each st (25) start to stuff the detail gradually and evenly
Round 29 :
(4sc, inc) x 5 (30)
Round 30-36 :
sc in each st (30)
Round 37 :
(5sc, inc) x 5 (35)
Round 38-43 :
sc in each st (35)
Round 44 :
(6sc, inc) x 5 (40)
Round 45-47 :
sc in each st (40)
Round 48 :
(7sc, inc) x 5 (45)
Round 49 :
(8sc, inc) x 5 (50)
Info :
Finish with a slip stitch. Cut the yarn leaving a long tail for sewing. The length of cone should not exceed 17-18 cm.
— Bottom of the Cone (Pink Color) :
Round 3 :
(sc, inc) x 7 (21)
Round 4 :
(2 sc, inc) x7 (28)
Round 5 :
(3 sc, inc) x 7 (35)
Round 6 :
(4 sc, inc) x 7 (42)
Round 7 :
(5 sc, inc) x 6, 4 sc, 2 inc (50)
Round 8 :
sc in each st (50)
Info :
Sew the bottom and the cone together.
— RING 1 (Purple Color) :
Setup :
ch 60. sl st the end to the first ch to make a ring
Round 1 :
sc into the same ch that you just did a sl st into, sc around (60)
Round 2 :
(sc, inc) x 30 (90)
Round 3-16 :
sc in each st (90)
Round 17 :
(sc, dec) x 30 (60)
Round 18 :
sc in each st (60)
Info :
Leave a long enough end to sew it together. Start to stuff the detail gradually and evenly. Preferably, the circumference of 1 and 2 rings should be 10 cm.
— RING 2 (Pink Color) :
Setup :
ch 54. sl st the end to the first ch to make a ring
Round 1 :
sc into the same ch that you just did a sl st into, sc around (54)
Round 2 :
(sc, inc) x 27 (81)
Round 3-16 :
sc in each st (81)
Round 17 :
(sc, dec) x 27 (54)
Round 18 :
sc in each st (54)
Info :
Leave a long enough end to sew it together. Start to stuff the detail gradually and evenly. Preferably, the circumference of 1 and 2 rings should be 10 cm.
— RING 3 (Peach Color) :
Setup :
ch 50. sl st the end to the first ch to make a ring
Round 1 :
sc into the same ch that you just did a sl st into, sc around (50)
Round 2 :
(sc, inc) x 25 (75)
Round 3-15 :
sc in each st (75)
Round 16 :
(sc, dec) x 25 (50)
Round 17 :
sc in each st (50)
Info :
Leave a long enough end to sew it together. Start to stuff the detail gradually and evenly. Preferably, the circumference of ring should be 9 cm.
— RING 4 (Blue Color) :
Setup :
ch 44. sl st the end to the first ch to make a ring
Round 1 :
sc into the same ch that you just did a sl st into, sc around (44)
Round 2 :
(sc, inc) x 22 (66)
Round 3-15 :
sc in each st (66)
Round 16 :
(sc, dec) x 22 (44)
Round 17 :
sc in each st (44)
Info :
Leave a long enough end to sew it together. Start to stuff the detail gradually and evenly. Preferably, the circumference of ring should be 9 cm.
— RING 5 (Green Color) :
Setup :
ch 38. sl st the end to the first ch to make a ring
Round 1 :
sc into the same ch that you just did a sl st into, sc around (38)
Round 2 :
(sc, inc) x 19 (57)
Round 3-14 :
sc in each st (57)
Round 15 :
(sc, dec) x 19 (38)
Round 16 :
sc in each st (38)
Info :
Leave a long enough end to sew it together. Start to stuff the detail gradually and evenly. Preferably, the circumference of ring should be 9 cm.
— RING 6 (Yellow Color) :
Setup :
ch 34. sl st the end to the first ch to make a ring
Round 1 :
sc into the same ch that you just did a sl st into, sc around (34)
Round 2 :
(sc, inc) x 17 (51)
Round 3-13 :
sc in each st (51)
Round 14 :
(sc, dec) x 17 (34)
Round 15 :
sc in each st (34)
Info :
Leave a long enough end to sew it together. Start to stuff the detail gradually and evenly. Sew the obtained cone to the first ring with a needle.
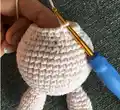
— BUNNY'S HEAD (Pink Color) :
Round 3 :
(sc, inc) x 6 (18)
Round 4 :
(2 sc, inc) x 6 (24)
Round 5 :
(3 sc, inc) x 6 (30)
Round 6 :
(4 sc, inc) x 6 (36)
Round 7 :
(5 sc, inc) x 6 (42)
Round 8-16 :
sc in each st (42)
Round 17 :
(5sc, dec) x 6 (36)
Round 18 :
(4sc, dec) x 6 (30)
Round 19 :
(3sc, dec) x 6 (24)
Info :
Stuff the head with fiberfill lightly. Preferably, the circumference of the head should be 18 cm.
Round 20-28 :
sc in each st (24)
Round 29 :
(2sc, dec) x 6 (18)
Info :
Do not fill top of the head
Info :
Close the crocheting off in any convenient way. Hide the thread. Put the tunnel inside the head. Sew the eyes with a thread between 8 and 9 Rounds. Distance between the eyes 8 stitches.
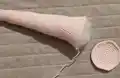
— EARS (Pink Color - Make 2) :
Round 2 :
(sc, inc) x 3 (9)
Round 3 :
sc in each st (9)
Round 4 :
(2 sc, inc) x 3 (12)
Round 5-10 :
sc in each st (12)
Round 11 :
(2sc, dec) x 3 (9)
Round 12 :
sc in each st (9)
Round 13 :
2sc, dec, 2sc, dec, 1sc (7)
Round 14 :
sc in each st (7)
Info :
Do not stuff the ears. Finish with a slip stitch. Cut the yarn leaving a long tail for sewing. Attach the ears to the head between 3 and 5 rounds. Distance between the ears 5 stitches.
— RUFF (Pink Color) :
Info :
In the 20th row we attach the thread.
Round 1 :
2 ch, 2dc in each st (48)
Info :
2 ch and turn, Finish with a slip stitch, cut the yarn
Round 2 :
2dc in each st (96)
Info :
Finish with a slip stitch, cut the yarn
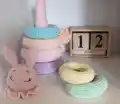
— Pom Pom :
Info :
Make Pom Pom like in the picture and attach it to the behind of the third ring
This adorable Rainbow Stacking Rings Bunny pattern was designed to create a truly special Montessori-inspired toy that combines developmental benefits with irresistible cuteness. The rainbow gradient of stacking rings provides endless opportunities for learning and play, while the sweet bunny design makes it a cherished companion. Each carefully crafted element works together to create a sturdy, safe, and beautiful toy that will be loved for years to come. 🧶 Happy crocheting! 🌈✨