🧢 Beautiful ✨ Detailed πŸ’ Adorable

Little Frog Amigurumi Pattern

Little Frog Amigurumi Pattern
4.0β˜… Rating
2-3 Hours Time Needed
3.9K Made This
βœ‚οΈ

Beginner Friendly Level

Perfect for those just starting their sewing journey, with clear instructions and simple techniques

⏱️

Bite-Sized Project

Complete in under 2 hoursβ€”quick, fun, and perfect for a little creative escape.

🐸

Pocket Pal

A mini friend to carry anywhere, providing comfort and companionship in a perfectly portable size.

About This Little Frog Amigurumi Pattern

Little Frog Amigurumi Pattern crochet pattern - detailed view of completed project

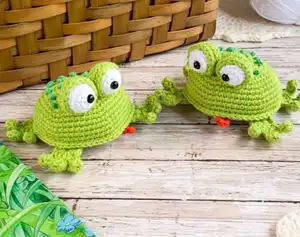
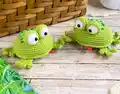
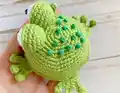
At approximately 7 cm tall, this little frog fits perfectly in the palm of your hand. The pattern uses basic stitches and techniques, making it an ideal project for practicing your amigurumi skills while creating something absolutely adorable.

Why You'll Love This Little Frog Amigurumi Pattern

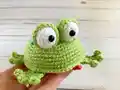
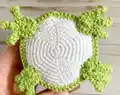
I absolutely love this pattern because it's so quick and satisfying to complete! There's something incredibly charming about working with the contrast between the bright green body and crisp white belly. I find the little details like the webbed toes and French knot spots add so much personality to this tiny friend. The pattern is straightforward enough that you can finish it in one sitting, which makes it perfect for when I want that instant gratification of a completed project. Plus, these little frogs make wonderful gifts and are so cute sitting on a desk or shelf, bringing a smile every time you see them!

Little Frog Amigurumi Pattern step 1 - construction progress Little Frog Amigurumi Pattern step 2 - assembly progress Little Frog Amigurumi Pattern step 3 - details and accessories Little Frog Amigurumi Pattern step 4 - final assembly and finishing

Switch Things Up

I love experimenting with this little frog pattern to create unique variations! One of my favorite modifications is changing up the color scheme - I've made frogs in bright blues, sunny yellows, and even rainbow gradients that look absolutely magical. Sometimes I skip the French knots on the back and instead add tiny felt spots or even small buttons for texture.

For a more whimsical look, I've embroidered little flowers or hearts on the white belly, or added a tiny crocheted bow between the eyes. You could also make the tongue longer for a silly effect, or create multiple small tongues sticking out at different angles. I've experimented with different eye placements too - positioning them closer together creates a sweet, innocent expression, while placing them further apart gives a more playful, cartoon-like appearance.

Another fun variation is creating seasonal frogs by adding small accessories. A tiny Santa hat transforms this into a Christmas ornament, while a small flower crown makes it perfect for spring. I've even made a whole family of frogs in graduated sizes by using different yarn weights. The possibilities are truly endless, and each little modification adds so much personality to these adorable amphibian friends!

Common Mistakes & How to Fix Them

βœ— Not crocheting tight enough stitches, which allows stuffing to show through the fabric holes βœ— Forgetting to stuff the body parts as you go, making it difficult to add filling later βœ— Placing the eyes too high or low on the head, affecting the frog's cute expression significantly βœ— Not leaving long enough yarn tails for sewing, which makes assembly frustrating and time-consuming βœ— Skipping the slip stitch connection between belly and back, resulting in gaps in the body seam

Little Frog Amigurumi Pattern

Create an adorable little frog friend with this charming amigurumi pattern! This delightful design features a cute round body with a white belly, expressive eyes with green eyelids, and four tiny paws with sweet webbed toes. The pattern includes fun details like a tiny red tongue and decorative French knots on the back. Perfect for frog lovers and anyone who enjoys making small, cheerful companions, this pattern will guide you through crafting a miniature frog that measures approximately 7 cm (2.7 inches) when complete. The result is an irresistibly cute creature that makes a wonderful gift or desk companion.

Beginner Friendly 2-3 Hours

Materials Needed for Little Frog Amigurumi Pattern

β€” Main Fabric

  • 01
    100% cotton yarn for crocheting - PaintBox Yarns Cotton DK (125m, 50g)
  • 02
    Lime Green yarn (PaintBox 629)
  • 03
    Paper White yarn (PaintBox 601)
  • 04
    Small amount of Pillar Red yarn (PaintBox 615)
  • 05
    Small amount of Spearmint Green yarn (PaintBox 626)

β€” Tools Required

  • 01
    Crochet hook 2.0 mm (Clover recommended)
  • 02
    Stuffing (hollow fiber)
  • 03
    Safety eyes or black beads 6 mm diameter
  • 04
    Needle with big eye
  • 05
    Sewing pins
  • 06
    Scissors

Progress Tracker

0% Complete

β€” Back :

Row 1 :

6 sc in magic ring (6)

Row 2 :

2 sc in each sc (12)

Row 3 :

(1 sc, sc inc) x 6 (18)

Row 4 :

(2 sc, sc inc) x 6 (24)

Row 5 :

(3 sc, sc inc) x 6 (30)

Row 6 :

(4 sc, sc inc) x 6 (36)

Row 7 :

(5 sc, sc inc) x 6 (42)

Row 8 :

(6 sc, sc inc) x 6 (48)

Row 9 :

48 sc (48)

Row 10 :

(7 sc, sc inc) x 6 (54)

Row 11 :

54 sc (54)

Row 12 :

(8 sc, sc inc) x 6 (60)

Rows 13-14 :

2 rows - 60 sc (60)

Info :

Don't cut the work thread

β€” Belly :

Row 1 :

6 sc in magic ring (6)

Row 2 :

2 sc in each sc (12)

Row 3 :

(1 sc, sc inc) x 6 (18)

Row 4 :

(2 sc, sc inc) x 6 (24)

Row 5 :

(3 sc, sc inc) x 6 (30)

Row 6 :

(4 sc, sc inc) x 6 (36)

Row 7 :

(5 sc, sc inc) x 6 (42)

Row 8 :

(6 sc, sc inc) x 6 (48)

Row 9 :

(7 sc, sc inc) x 6 (54)

Row 10 :

(8 sc, sc inc) x 6, sl.st (60)

Info :

Tie off the thread and cut it

β€” Assembly of Body :

Info :

Join the belly and the back together: put the wrong sides of the pieces to each other, insert the crochet hook through the loops of both pieces and crochet sc. Work sc around the edge. Stuff the body as you go round. Finish with sl.st. Tie off the thread and hide it inside.

β€” Eyes (Make 2) :

Row 1 :

6 sc in magic ring (6)

Info :

Close the magic ring, but not too tight that you can insert the safety eyes easily

Row 2 :

2 sc in each sc (12)

Row 3 :

(3 sc, sc inc) x 3 (15)

Rows 4-5 :

2 rows - 15 sc (15)

Info :

Insert the safety eyes into the middle of the magic ring

Row 6 :

(3 sc, sc dec) x 3 (12)

Info :

Stuff the eye

Row 7 :

6 sc dec (6)

Info :

Finish with sl.st. Tie off the thread and leave enough for sewing

β€” Eyelids (Make 2) :

Row 1 :

6 sc in magic ring (6)

Row 2 :

2 sc in each sc (12)

Row 3 :

(1 sc, sc inc) x 6 (18)

Rows 4-6 :

3 rows - 18 sc (18)

Info :

Finish with sl.st. Tie off and leave enough thread for sewing

β€” Paws (Make 4) :

Row 1 :

2 ch, 12 dc in magic ring, sl.st. (12)

Row 2 :

4 sl.st., (6 ch., puff stitch in the 3rd loop from the hook and 1 sc in the 4th, 5th and 6th loops from the hook, 1 sl.st. in the next loop of the first row) - repeat this pattern two more times, 4 sl.st.

Info :

Tie off the thread and leave enough for sewing

β€” Tongue :

Info :

Crochet 4 ch

Row 1 :

Start in the second loop from the hook and crochet 2 sc, 3 sc in last ch, don't turn the work and crochet continuously in circle direction, 1 sc, 1 sc inc (8)

Info :

Finish with sl.st. Tie off the thread and leave enough for sewing

Assembly Instructions

  • Place the eyes into the eyelids and sew them together, then tie off the white yarn in the bottom of the eye
  • Sew the eyes onto the head/body between the 4th and 8th rows of the body
  • Sew the front paws onto the bottom of the frog symmetrically to the muzzle
  • Sew the back paws onto the bottom of the frog in the proper position as shown in reference pictures
  • Sew the tongue onto the muzzle of the frog
  • Embroider French knots on the back of the frog using the dark green yarn, or alternatively use green beads for decoration

Important Notes

  • πŸ’‘Crochet with tight stitches to ensure stuffing doesn't show through any holes in the fabric
  • πŸ’‘Use a smaller hook size if you notice tiny holes appearing in your work
  • πŸ’‘Close the magic ring on the eyes loosely enough to insert safety eyes easily
  • πŸ’‘Put wrong sides of belly and back pieces together when joining them
  • πŸ’‘Stuff the body as you crochet around the edge during assembly for best results
  • πŸ’‘Leave long enough yarn tails on all pieces for secure sewing during assembly

This adorable Little Frog pattern brings a tiny amphibian friend to life with simple techniques and charming details! The contrast between the bright green back and white belly creates a classic frog appearance, while the expressive eyes and webbed toes add personality. Perfect for beginners who want to practice amigurumi fundamentals while creating something utterly delightful. This quick project is wonderful for gift-giving or adding a cheerful touch to any space. 🐸 Happy crocheting! 🧢✨

You ask,

we answer.

FAQs

What yarn weight is best for this frog pattern?

The pattern uses DK weight cotton yarn (125m/50g). Cotton is recommended because it creates tight, neat stitches and holds its shape well for amigurumi projects.

Can I use different colored yarns for this pattern?

Absolutely! While the pattern suggests lime green and white, you can make your frog in any colors you like. Try brown for a toad, or bright fun colors for a fantasy frog!

How do I prevent stuffing from showing through?

Crochet with tight, even stitches throughout the project. If you notice holes forming, switch to a smaller hook size. The pattern specifically notes this is important for a neat finish.

What are French knots and how do I make them?

French knots are decorative embroidered knots used to create the spots on the frog's back. You can find tutorials online, or simply use small green beads as an alternative decoration.

Can I make this frog larger?

Yes! Use a thicker yarn and larger hook to create a bigger frog. Just maintain the same stitch counts and proportions for all pieces.