🧶 Beautiful ✨ Detailed 💝 Adorable

Cute Farm Animals Trio Amigurumi Pattern

Cute Farm Animals Trio Amigurumi Pattern
4.0★ Rating
2-3 Hours Time Needed
2.3K Made This
✂️

Beginner Friendly Level

Perfect for those just starting their sewing journey, with clear instructions and simple techniques

⏱️

Bite-Sized Project

Complete in under 2 hours—quick, fun, and perfect for a little creative escape.

🐰

Whimsical Buddy

Playful characters full of personality, designed to spark imagination and become cherished playtime favorites.

About This Cute Farm Animals Trio Amigurumi Pattern

This delightful farm animal trio brings the countryside to your crochet hook! Each pattern features innovative no-sew construction that eliminates tedious assembly work. The sheep boasts fluffy textured wool created with chain loops, the cow showcases realistic black and white spots, and the pig includes a curly tail detail. Using super bulky yarn means these cuties work up quickly, making them perfect for gift-giving or building your own farmyard collection.

Cute Farm Animals Trio Amigurumi Pattern crochet pattern - detailed view of completed project

All three patterns use the same basic body structure with unique decorative elements that give each animal its distinct personality. The clever use of bobble stitches creates dimensional features while color changes are seamlessly integrated into the construction.

Why You'll Love This Cute Farm Animals Trio Amigurumi Pattern

I absolutely love these patterns because they eliminate all the frustrating sewing work that usually comes with amigurumi! The no-sew technique means you can finish each adorable farm friend in one satisfying session. I'm obsessed with how the bobble stitches create natural texture and dimension, especially in the sheep's fluffy wool detail. The super bulky yarn makes these work up incredibly fast, so you can create an entire farm family in an afternoon. Plus, each animal has such distinct personality—from the cow's sweet expression to the pig's curly tail—that they feel like individual characters rather than cookie-cutter patterns.

Cute Farm Animals Trio Amigurumi Pattern step 1 - construction progress Cute Farm Animals Trio Amigurumi Pattern step 2 - assembly progress Cute Farm Animals Trio Amigurumi Pattern step 3 - details and accessories Cute Farm Animals Trio Amigurumi Pattern step 4 - final assembly and finishing

Switch Things Up

I love experimenting with these versatile farm animal patterns! For a whimsical twist, try making the sheep in rainbow colors instead of traditional white—each loop of wool in a different pastel shade creates an absolutely magical effect. The cow pattern works beautifully as a dairy cow with traditional spots, but I've also made Highland cows using fuzzy brown yarn and adding longer horns.

For the pig, consider using gray yarn to create an adorable elephant instead, adding larger ears and a trunk! You can also adjust the size by changing yarn weight—I've made tiny keychain versions with fingering weight yarn and a 2mm hook that turned out incredibly cute. Another fun variation is adding little felt hearts or flowers as accessories, or embroidering names onto their bodies for personalized gifts.

I've even tried making seasonal versions—a Christmas pig with a Santa hat, a sheep in holiday sweater colors, and a cow with bell collar. The no-sew construction makes it easy to experiment with color blocking throughout the body. Don't be afraid to play with eye placement slightly to create different expressions—moving them closer or farther apart dramatically changes personality!

Common Mistakes & How to Fix Them

✗ Forgetting to stuff the body before decreasing at the head section can make it difficult to achieve proper shaping later ✗ Not keeping consistent tension when working bobble stitches results in uneven texture and affects the overall appearance of features ✗ Switching yarn colors without properly securing the previous color causes loose ends and visible gaps in the finished piece ✗ Placing safety eyes too early or without proper spacing can create an asymmetrical or unbalanced facial expression ✗ Skipping stitch markers when working in continuous rounds leads to losing track of round beginnings and pattern misalignment

Cute Farm Animals Trio Amigurumi Pattern

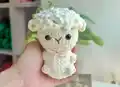
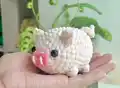
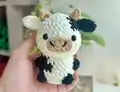
Create an adorable farm friends collection with this charming three-in-one crochet pattern featuring a fluffy sheep, spotted cow, and sweet pig! Each amigurumi is designed with a clever no-sew construction technique, working seamlessly from body to head. Perfect for beginners and experienced crocheters alike, these pocket-sized companions use super bulky yarn for quick results and feature delightful details like bobble stitches for texture, safety eyes for personality, and unique finishing touches that bring each character to life.

Beginner Friendly 2-3 Hours

Materials Needed for Cute Farm Animals Trio Amigurumi Pattern

— Main Fabric

  • 01
    Super Bulky / Category 6 yarn in white color
  • 02
    Super Bulky / Category 6 yarn in skin color or light pink
  • 03
    Super Bulky / Category 6 yarn in black color
  • 04
    Super Bulky / Category 6 yarn in brown color
  • 05
    Super Bulky / Category 6 yarn in pink color
  • 06
    Short length of brown yarn for embroidery

— Tools Required

  • 01
    3.5mm (E) crochet hook
  • 02
    Stitch markers
  • 03
    Sewing needle
  • 04
    Scissors
  • 05
    Plastic safety eyes 10mm
  • 06
    Hot glue gun
  • 07
    Fiberfill stuffing

Progress Tracker

0% Complete

— Sheep Body and Head (No Sew) :

Row 1 :

6 SC in an MR (6)

Row 2 :

6 INC (12)

Row 3 :

(SC, INC) 6 times (18)

Row 4 :

(2 SC, INC) 6 times (24)

Row 5 :

8 SC, BO, 6 SC, BO, 8 SC (24)

Row 6 :

8 SC, SC into the stitch's BO, 6 SC, SC into the stitch's BO, 8 SC (24)

Row 7 :

24 SC (24)

Row 8 :

6 SC, BO, 10 SC, BO, 6 SC (24)

Row 9 :

6 SC, SC into the stitch's BO, 10 SC, SC into the stitch's BO, 6 SC (24)

Row 10 :

(SC, DEC) 8 times (16)

Info :

Change to skin color yarn

Row 11 :

FLO, (SC, INC) 8 times (24)

Row 12 :

(SC, INC) 12 times (36)

Row 13-18 :

36 SC (36)

Row 19 :

BLO, (2 SC, DEC) 9 times (27)

Info :

Stuffing

Row 20 :

BLO, (SC, DEC) 9 times (18)

Row 21 :

BLO, (SC, DEC) 6 times (12)

Row 22 :

BLO, 6 DEC (6)

Info :

Weave in the yarn end and cut

— Sheep's Wool :

Instructions :

Crochet in the FLO from row 21, and continue seamlessly from row 21 down to row 18. (3 ch, Slst) 93 times

Final Detail :

2 Ch, 3 DC, 2 Ch, Slst in one st

— Sheep Ears (Make 2) :

Instructions :

Use Skin color yarn. Crochet the ears onto the stitches at row 18

Info :

Attach eyes on rows 15 and 16, spaced 6 stitches apart. Use a short of brown yarn to embroider the nose

— Cow Body and Head (No Sew) :

Row 1 :

6 SC in an MR (6)

Row 2 :

6 INC (12)

Row 3 :

(SC, INC) 6 times (18)

Row 4 :

(2 SC, INC) 6 times (24)

Row 5 :

8 SC, BO, 6 SC, BO, 8 SC (24)

Row 6 :

15 SC, 4SC, 5 SC (24)

Row 7 :

13 SC, 8SC, 3SC (24)

Row 8 :

6 SC, BO, 6 SC, 4SC, BO, 3SC, 3SC (24)

Row 9 :

15SC, 4SC, 5SC (24)

Row 10 :

(SC, DEC) 8 times (16)

Row 11 :

FLO, (SC, INC) 8 times (24)

Row 12 :

(SC, INC) 12 times (36)

Row 13-15 :

36 SC (36)

Row 16 :

(2SC, DEC) 2 times, (2 SC, DEC) 7 times (27)

Row 17 :

9SC, 16SC, 2SC (27)

Row 18 :

12SC, 13SC, 2SC (27)

Row 19 :

12SC, 15SC (27)

Info :

Stuffing

Row 20 :

SC, DEC, (SC, DEC) 3 times, (SC, DEC) 5 times (18)

Row 21 :

(SC, DEC) 6 times (12)

Row 22 :

6 DEC (6)

Info :

Weave in the yarn end and cut

— Cow Ears (Make 2) :

Instructions :

Begin with white yarn. Make 5 chains start with the second chain from the hook: 3SC, 3SC in the last stitch, 2SC, INC

Attachment :

Attach the ear point straight from the arm going up with 2 SLST at R18-19. Make one piece like this with black yarn

— Cow Horn (Make 2) :

Instructions :

Begin with brown yarn. Crochet ears between R20-21. The starting point is straight from the ears going up. Two horns between are 9 stitches: 3CH, DC, Picot, 2CH, and SLST in the next stitch. Cut the yarn

— Cow Nose :

Instructions :

Use brown yarn. Make 5 chains start with the second chain from the hook: INC, 2SC, 4SC in the last stitch, 2SC, INC. Cut the yarn

Info :

Attach the nose in the head at R14-15. Attach the eyes in the head at R16, 5st apart

— Pig Head and Body (No Sew) :

Row 1 :

6 SC in an MR (6)

Row 2 :

6 INC (12)

Row 3 :

(SC, INC) 6 times (18)

Row 4 :

(2 SC, INC) 6 times (24)

Row 5 :

24SC (24)

Row 6 :

(3 SC, INC) 6 times (30)

Row 7 :

30SC (30)

Row 8 :

3SC, BO, 22SC, BO, 3SC (30)

Row 9 :

7SC, INC, 14SC, INC, 7SC (32)

Row 10-12 :

32SC (32)

Row 13 :

3SC, BO, 24SC, BO, 3SC (32)

Row 14 :

7SC, DEC, 14SC, DEC, 7SC (30)

Row 15 :

(3 SC, DEC) 6 times (24)

Row 16 :

(2 SC, DEC) 6 times (18)

Info :

Stuffing

Row 17 :

SC, DEC 6 times (12)

Row 18 :

DEC 6 times (6)

Info :

Weave in the yarn end and cut

— Pig Tail :

Instructions :

Use pink yarn. Crochet ears at R15. Make 10CH, start with the second chain from the hook: 9 SLST, SLST in the same stitch. Cut the yarn

— Pig Nose :

Instructions :

Use pink yarn. Make 4CH, start with the second chain from the hook: 2SC, INC in the last stitch, SC, INC. Cut the yarn. Sew two white lines to create holes in the shape

Info :

Attach the nose in the head at R1-R2. Attach the eyes in the head at R3, apart 7 stitch

— Pig Ears (Make 2) :

Instructions :

Use light pink yarn. Crochet ears at R6: 2CH, DC in the same stitch, CH, Picot, DC in the next stitch, 2CH, SLST in the same stitch, 7 stitches apart

Assembly Instructions

  • For the sheep: Attach the wool texture by crocheting loops in front loops only from row 21 down to row 18
  • Attach sheep ears directly onto the stitches at row 18 of the head using the same skin color yarn
  • Position sheep safety eyes between rows 15-16 with 6 stitches spacing, then embroider nose with brown yarn
  • For the cow: Sew white and black ears at rows 18-19, positioning them symmetrically on each side
  • Attach cow horns between rows 20-21, spacing them 9 stitches apart from the ears going upward
  • Position cow nose at rows 14-15 and eyes at row 16 with 5 stitches between them
  • For the pig: Attach curly tail at row 15, nose at rows 1-2, and eyes at row 3 with 7 stitch spacing

Important Notes

  • 💡Use stitch markers to track your position when switching between yarn colors during construction
  • 💡Stuff each animal firmly but gently to maintain rounded shapes without overstretching the stitches
  • 💡When working bobble stitches, maintain consistent tension to ensure all texture details are uniform
  • 💡Secure safety eyes firmly before final stuffing as they cannot be repositioned once locked in place
  • 💡For the sheep's wool, work loosely when creating chain loops to achieve fluffy texture
  • 💡Black spots on the cow are created by switching colors mid-row, so keep both colors attached

These charming farm animal patterns bring countryside cuteness to your crochet collection! Each design features innovative no-sew construction that makes assembly a breeze, while bobble stitches and clever details give every animal distinctive personality. Whether you're creating a gift for a child or building your own farmyard display, these quick-working patterns using super bulky yarn will have you finishing adorable friends in just a few hours. Perfect for beginners ready to explore colorwork and texture techniques! 🐑🐄🐷

You ask,

we answer.

FAQs

Can I use different yarn weights for these patterns?

While the pattern is designed for super bulky yarn, you can use worsted or DK weight yarn with a smaller hook (2.5mm-3mm). Your finished animals will be smaller, and you may need to adjust eye size to 6mm or 8mm accordingly.

How do I create the sheep's fluffy wool texture?

After completing row 21, work in the front loops only from row 21 down to row 18. Create loops by chaining 3 and slip stitching into each stitch 93 times. This creates the characteristic fluffy appearance.

What does 'no sew' construction mean?

These patterns work seamlessly from body to head without separating and sewing pieces together. You'll switch colors mid-project and work continuously, eliminating assembly work except for small details like ears and noses.

How do I create the cow's spots?

The spots are made by switching to black yarn mid-row for specific stitches. The pattern indicates where to change colors to create the spotted appearance. Keep both white and black yarn attached as you work.

Can these patterns be made larger for toys?

Yes! Simply use a larger hook and bulkier yarn. For example, using a 6mm hook with jumbo yarn will create significantly larger animals, perfect for huggable toys or room decorations.

What are bobble stitches and how do I make them?

Bobble stitches create dimensional texture by working multiple incomplete stitches in the same stitch, then pulling through all loops at once. They're used to create the animals' legs and facial features in these patterns.