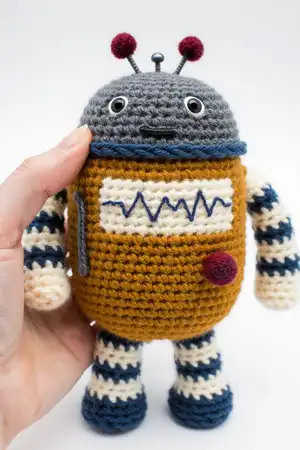
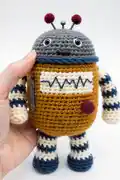
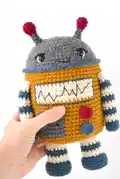
Create your own adorable mechanical companion with this charming robot amigurumi pattern. Pixie stands about 9 inches tall and features colorful details including a display screen, control flap panel, striped limbs, and playful antennae. This delightful project combines multiple yarn colors to bring personality and character to life, making it perfect for gift-giving or adding a whimsical touch to any space. The pattern includes detailed instructions for creating nine separate pieces that come together to form one lovable robotic friend.
Progress Tracker
0% Complete
— BODY - Head :
Info :
With color A (Oxford Grey), make a magic ring
Round 1 (RS) :
Work 8 sc in ring; do not join, work in continuous rounds (8)
Info :
Gently but firmly pull tail to tighten center of ring. Place marker in last stitch to indicate end of round. Move marker up as each round is completed
Round 2 :
Work 2 sc in each st around (16)
Round 3 :
* Sc in next st, 2 sc in next st; rep from * around (24)
Round 4 :
* Sc in next 2 sts, 2 sc in next st; rep from * around (32)
Round 5 :
* Sc in next 3 sts, 2 sc in next st; rep from * around (40)
Round 6 :
* Sc in next 4 sts, 2 sc in next st; rep from * around (48)
Round 7 :
Sc in each st around (48)
Round 8 :
* Sc in next 5 sts, 2 sc in next st; rep from * around (56)
Rounds 9-10 :
Sc in each st around (56)
Round 11 :
* Sc in next 6 sts, 2 sc in next st; rep from * around (64)
Rounds 12-13 :
Sc in each st around and change to B (Denim) in last st of Round 13 (64)
Round 14 :
With B, working in front loops only, sc in each st around; join with sl st in first sc of this round
— BODY - Body :
Round 15 :
From RS, join C (Arrowwood) with sc in back loop of first st of Round 13, sc in each st around (64)
Rounds 16-18 :
With C, sc in each st around (64)
— Display Screen :
Rounds 19-22 :
With C, sc in next 24 sts; with D (Fisherman), sc in next 16 sts; with C, sc in next 24 sts (64)
Rounds 23-25 :
With C, sc in each st around (64)
— Control Flap :
Rounds 26-31 :
With C, sc in next 24 sts; with A, sc in next 8 sts; with C, sc in next 32 sts (64)
Info :
Fasten off A. Work remainder of Body with C only
Rounds 32-33 :
Sc in each st around (64)
Info :
Insert plastic safety eyes on front of Head between Rounds 10 and 13, about 9 sts apart
Round 34 :
Working in back loops only, * sc in next 6 sts, sc2tog; rep from * around (56)
Info :
Begin stuffing piece and continue stuffing until piece is complete
Round 35 :
* Sc in next 5 sts, sc2tog; rep from * around (48)
Round 36 :
* Sc in next 4 sts, sc2tog; rep from * around (40)
Round 37 :
* Sc in next 3 sts, sc2tog; rep from * around (32)
Round 38 :
* Sc in next 2 sts, sc2tog; rep from * around (24)
Round 39 :
* Sc in next st, sc2tog; rep from * around (16)
Round 40 :
* Sc2tog; rep from * around (8)
Info :
Fasten off, leaving a long yarn tail. Thread tail through top of sts of last round, pull to close opening and knot securely
— KNOBS (make 2 - 1 each with B and E) :
Info :
Leaving a long beginning tail, make a magic ring
Round 1 :
Work 10 sc in ring; do not join, work in continuous rounds (10)
Info :
Gently but firmly pull tail to tighten center of ring
Round 2 :
Working in back loops only, sc in next 10 sts; join with sl st in first sc of this round (10)
Info :
Fasten off, leaving a long tail for sewing Knob to Body
— ANTENNAE (make 2) :
Info :
With E (Cranberry), make a magic ring
Round 1 :
Work 6 sc in ring; do not join, work in continuous rounds (6)
Info :
Gently but firmly pull tail to tighten center of ring. Place marker in last stitch to indicate end of round. Move marker up as each round is completed
Round 2 :
Work 2 sc in each st around (12)
Round 3 :
(Sc in next st, 2 sc in next st) 3 times (9)
Round 4 :
Sc in next 9 sts (9)
Round 5 :
Sc in next st, (sc2tog) 4 times and change to A in last st (5)
Rounds 6-7 :
With A, sc in next 5 sts (5)
Round 8 :
With A, sc in next st, 2 sc in next st, sc in next st, 2 sc in next st, sc in next st (7)
Info :
Fasten off, leaving a long tail for sewing Antennae to head
— LEGS (make 2) :
Info :
With B (Denim), make a magic ring
Round 1 :
Work 8 sc in ring; do not join, work in continuous rounds (8)
Info :
Gently but firmly pull tail to tighten center of ring. Place marker in last stitch to indicate end of round. Move marker up as each round is completed
Round 2 :
Work 2 sc in each st around (16)
Round 3 :
* Sc in next st, 2 sc in next st; rep from * around (24)
Round 4 :
Working in back loops only, sc in each st around (24)
Rounds 5-6 :
Sc in each st around (24)
Info :
When changing yarn color to make stripes, do not fasten off old color until instructed. Carry color not in use along WS of piece
Round 7 :
Working in back loops only, * sc in next st, sc2tog; rep from * around and change to D in last st (16)
Info :
Begin stuffing piece and continue stuffing until piece is complete
Round 8 :
With D, working in front loops only, sc in each st around (16)
Round 9 :
With D, sc in each st around and change to B in last st (16)
Rounds 10-11 :
With B, sc in each st around and change to D in last st of Round 11 (16)
Rounds 12-13 :
With D, sc in each st around (16)
Info :
Fasten off, leaving a long tail for sewing Leg to Body
— ARMS (make 2) :
Info :
With B (Denim), make a magic ring
Round 1 :
Work 5 sc in ring; do not join, work in continuous rounds (5)
Info :
Gently but firmly pull tail to tighten center of ring
Round 2 :
Work 2 sc in each st around (10)
Round 3 :
Working in back loops only, sc in each st around (10)
Info :
When changing yarn color to make stripes, do not fasten off old color until instructed. Carry color not in use along WS of piece
Round 4 :
Sc in each st around and change to D in last st (10)
Rounds 5-6 :
With D, sc in each st around and change to B in last st of Round 6 (10)
Rounds 7-8 :
With B, sc in each st around and change to D in last st of Round 8 (10)
Info :
Begin stuffing piece and continue stuffing until piece is complete
Rounds 9-16 :
Rep Rounds 5-8 twice (10)
Round 17 :
With D, sc in each st around (10)
Round 18 :
With D, (sc in next 3 sts, sc2tog) twice (8)
Info :
Fasten off, leaving a long tail for sewing Arm to Body
— FINISHING - Embroidery :
Info :
Use straight or back stitches to embroider Robot details, using 2 or more strands of floss as desired
Step 1 :
With D, embroider curves along outer edges of safety eyes for whites of eyes
Step 2 :
With F, embroider lines along upper edges of safety eyes
Step 3 :
With black embroidery floss, embroider a V-shaped mouth between Rounds 11 and 14, about 5 sts in length
Step 4 :
With black embroidery floss, embroider graphs onto display screen (white section)
Step 5 :
With B, embroider a back stitch border around the display screen
Step 6 :
With A, embroider a back stitch border around the control flap (gray section)
Step 7 :
With F, embroider straight stitch hinges and handle onto control flap
— Assembly :
Step 1 :
Stuff Knobs with beginning yarn tails. With ending yarn tails, sew Knobs to Robot between Rounds 25-29 and between Rounds 30-33
Step 2 :
With D, sew Arms to sides of Body between Rounds 18 and 20
Step 3 :
With D, sew Legs to bottom of Body
Step 4 :
With A, sew Antennae to top of Robot between Rounds 4 and 7
Step 5 :
Weave in all remaining ends
This adorable Pixie the Robot pattern combines classic amigurumi techniques with creative color work to create a charming mechanical companion. The pattern features fun details like embroidered display screens, control panels, and striped limbs that bring personality to life. With its manageable 9-inch size and customizable embroidery details, this robot makes the perfect handmade gift or shelf companion. The magic ring construction and continuous rounds create smooth, professional-looking results that you'll be proud to display. Happy crocheting, and enjoy bringing your very own robot friend to life! 🤖✨