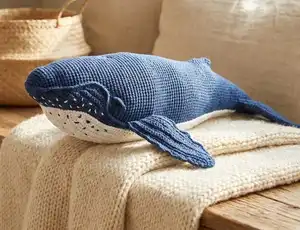
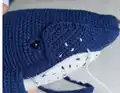
Dive into the ocean of creativity with this enchanting crochet whale pattern! This lifelike amigurumi whale features a beautifully structured body with detailed fins, a distinctive lower jaw, and an elegant tail. The pattern includes wire armature techniques to create posable fins, giving your whale realistic movement and dimension. With its charming white belly spot and careful color work combining blue and white yarn, this pattern creates a stunning marine companion that's perfect for ocean lovers and collectors alike.
Progress Tracker
0% Complete
— HEAD + BODY :
Info :
Blue yarn. Work in spiral without slip stitches or turning chains
Round 1 :
8 sc into MR [8]
Round 3 :
(1 sc, inc)*8 [24]
Round 4 :
12 sc, (1 sc, inc)*6 [30]
Round 5-9 :
30 sc [30] {5 rounds}
Round 10 :
2 sc, inc, (4 sc, inc)*5, 2 sc [36]
Round 12 :
12 sc, (3 sc, inc)*6 [42]
Round 13 :
3 sc, inc, (6 sc, inc)*5, 3 sc [48]
Round 15 :
12 sc, (5 sc, inc)*6 [54]
Round 16-17 :
54 sc [54] {2 rounds}
Round 18 :
15 sc, inc, (6 sc, inc)*5, 3 sc [60]
Round 19-21 :
60 sc [60] {3 rounds}
Round 22 :
(9 sc, inc)*6 [66]
Round 23-24 :
66 sc [66] {2 rounds}
Round 25 :
16 sc, inc, (8 sc, inc)*5, 4 sc [72]
Round 26-27 :
72 sc [72] {2 rounds}
Round 28 :
30 sc, 3 inc, 30 sc, 3 inc, 6 sc [78]
Round 29 :
30 sc, (1 sc, inc)*3, 30 sc, (1 sc, inc)*3, 6 sc [84]
Round 30-34 :
84 sc [84] {5 rounds}
Info :
Insert the safety eyes between rounds 29 and 30 leaving 43 stitches apart
Round 35-44 :
84 sc [84] {10 rounds}
Infos :
Make 3 wires of 40 cm. Curve one end of each piece in a loop and wrap with adhesive roll bandage. Curve the wrapped part at 90 degrees at a distance of 11 cm. Stuff with synthetic fluff. Insert two curved wires between row 38 and 39 below the eyes. Insert third wire into center and secure with duct tape
Round 45-57 :
84 sc [84] {13 rounds}
Round 58 :
12 sc, (11 sc, inc)*6 [90]
Round 60 :
12 sc, (11 sc, dec)*6 [84]
Round 61 :
12 sc, (10 sc, dec)*6 [78]
Round 62-63 :
78 sc [78] {2 rounds}
Info :
Stuff with synthetic fluff
Round 64 :
12 sc, (9 sc, dec)*6 [72]
Round 65-67 :
72 sc [72] {3 rounds}
Round 68 :
24 sc, (6 sc, dec)*6 [66]
Round 69-72 :
66 sc [66] {4 rounds}
Round 73 :
12 sc, 3 hdc in the 1 stitch, 53 sc [68]
Info :
Stuff with synthetic fluff
Round 74 :
26 sc, (5 sc, dec)*6 [62]
Round 75 :
13 sc, 3 hdc in the 1 stitch, 48 sc [64]
Round 77 :
22 sc, (5 sc, dec)*6 [58]
Round 79 :
14 sc, 3 hdc in the 1 stitch, 43 sc [60]
Round 80-81 :
60 sc [60] {2 rounds}
Round 82 :
24 sc, (4 sc, dec)*6 [54]
Info :
Stuff with synthetic fluff
Round 83 :
9 sc, from the 11th stitch from the hook: 35 sc [44]
Info :
Go back to row 83. Fold the missed stitches in half and sew
Round 85-87 :
44 sc [44] {3 rounds}
Round 88 :
(20 sc, dec)*2 [42]
Round 89 :
(5 sc, dec)*6 [36]
Round 90-91 :
36 sc [36] {2 rounds}
Round 92 :
(4 sc, dec)*6 [30]
Round 93-97 :
30 sc [30] {5 rounds}
Round 98 :
(3 sc, dec)*6 [24]
Info :
Finish the end of the line
Round 99-103 :
24 sc [24] {5 rounds}
Round 104 :
(2 sc, dec)*6 [18]
Info :
Stuff with synthetic fluff
Round 105-106 :
18 sc [18] {2 rounds}
Round 107 :
(1 sc, dec)*6 [12]
Round 108-109 :
12 sc [12] {2 rounds}
Info :
Fasten off leaving a tail about 15 cm long. Using a tapestry needle, weave yarn tail through front loop of each stitch and pull tight to close
— RIGHT FIN :
Blue piece :
Round 1: make chain of 30 stitches, from 2nd stitch from hook: 28 sc, 4 sc in 1 stitch, on other side of chain - 28 sc [60]
Blue piece :
Round 2: ch, turn, from 2nd stitch from hook: 28 sc, 4 inc, 3 sc, 7 hdc, 7 dc, 2 inc-dc, 4 dc, 2 hdc, 3 sc [66]
Blue piece :
Round 3: ch, turn, from 2nd stitch from hook: 3 sc, 2 hdc, 5 dc, 2 inc-dc, 8 dc, 5 hdc, 3 sc, 14 sl st, 20 sc, 4 sl st [68]. Don't cut thread
White piece :
Round 1: make chain of 30 stitches, from 2nd stitch from hook: 28 sc, 4 sc in 1 stitch, on other side of chain - 28 sc [60]
White piece :
Round 2: ch, turn, from 2nd stitch from hook: 3 sc, 2 hdc, 4 dc, 2 inc-dc, 7 dc, 7 hdc, 3 sc, 4 inc, 28 sc [66]
White piece :
Round 3: ch, turn, from 2nd stitch from hook: 4 sl st, 20 sc, 14 sl st, 3 sc, 5 hdc, 8 dc, 2 inc-dc, 5 dc, 2 hdc, 3 sc [68]
Infos :
You have made 2 items (one white and one blue). Attach them together wrong side to wrong side. Blue yarn: Keep white detail on top, blue detail on bottom. Ch, turn. Bind off 2 pieces together catching blue piece in stitch and white piece in BLO
Edging :
Ch, turn, from 2nd stitch from hook: 5 sl st, 9 sc, 4 sl st, 1 sc, 3 hdc in 1 stitch, 1 sc, 3 sl st, 2 sc, 3 hdc in 1 stitch, 2 sc, 11 sl st, 2 sc, 3 hdc in 1 stitch, 2 sc, 1 sl st, 3 hdc in 1 stitch, 1 sl st, 1 sc, 3 hdc in 1 stitch, 2 sc, 1 sl st, 3 hdc in 1 stitch, 1 sc, 2 sl st, 3 sc, 8 sl st
— LEFT FIN :
Blue piece :
Round 1: make chain of 30 stitches, from 2nd stitch from hook: 28 sc, 4 sc in 1 stitch, on other side of chain - 28 sc [60]
Blue piece :
Round 2: ch, turn, from 2nd stitch from hook: 28 sc, 4 inc, 3 sc, 7 hdc, 7 dc, 2 inc-dc, 4 dc, 2 hdc, 3 sc [66]
Blue piece :
Round 3: ch, turn, from 2nd stitch from hook: 3 sc, 2 hdc, 5 dc, 2 inc-dc, 8 dc, 5 hdc, 3 sc, 14 sl st, 20 sc, 4 sl st [68]
White piece :
Round 1: make chain of 30 stitches, from 2nd stitch from hook: 28 sc, 4 sc in 1 stitch, on other side of chain - 28 sc [60]
White piece :
Round 2: ch, turn, from 2nd stitch from hook: 3 sc, 2 hdc, 4 dc, 2 inc-dc, 7 dc, 7 hdc, 3 sc, 4 inc, 28 sc [66]
White piece :
Round 3: ch, turn, from 2nd stitch from hook: 4 sl st, 20 sc, 14 sl st, 3 sc, 5 hdc, 8 dc, 2 inc-dc, 5 dc, 2 hdc, 3 sc [68]
Infos :
You have made 2 items (one white and one blue). Attach them together wrong side to wrong side. Blue yarn: Keep white detail on top, blue detail on bottom. Ch, turn. Bind off 2 pieces together catching blue piece in stitch and white piece in BLO
Edging :
Ch, turn: 8 sl st, 3 sc, 2 sl st, 1 sc, 3 hdc in 1 stitch, 1 sl st, 2 sc, 3 hdc in 1 stitch, 1 sc, 1 sl st, 3 hdc in 1 stitch, 1 sl st, 2 sc, 3 hdc in 1 stitch, 2 sc, 11 sl st, 2 sc, 3 hdc in 1 stitch, 2 sc, 3 sl st, 1 sc, 3 hdc in 1 stitch, 1 sc, 4 sl st, 9 sc, 5 sl st
— LOWER JAW :
Round 1 :
make chain of 28 stitches, from 2nd stitch from hook: 26 sc, 3 sc in 1 stitch, on other side of chain - 26 sc [55]
Round 2 :
ch, turn, from 2nd stitch from hook: 26 sc, 3 inc, 26 sc [58]
Round 3 :
ch, turn, from 2nd stitch from hook: 26 sc, (1 sc, inc)*3, 26 sc [61]
Round 4 :
ch, turn, from 2nd stitch from hook: 27 sc, inc, (2 sc, inc)*2, 27 sc [64]
Round 5 :
ch, turn, from 2nd stitch from hook: 26 sc, (3 sc, inc)*3, 26 sc [67]
Round 6 :
ch, turn, from 2nd stitch from hook: 27 sc, dec [28]
Round 7 :
ch, turn, from 2nd stitch from hook: dec, 26 sc [27]
Round 8 :
ch, turn, from 2nd stitch from hook: 25 sc, dec [26]
Round 9 :
ch, turn, from 2nd stitch from hook: dec, 24 sc [25]
Round 10 :
ch, turn, from 2nd stitch from hook: 23 sc, dec [24]
Round 11 :
ch, turn, from 2nd stitch from hook: dec, 22 sc [23]
Round 12 :
ch, turn, from 2nd stitch from hook: 21 sc, dec [22]
Round 13 :
ch, turn, from 2nd stitch from hook: 22 sc [22]
Round 14 :
ch, turn, from 2nd stitch from hook: 20 sc, dec [21]
Round 15 :
ch, turn, from 2nd stitch from hook: 12 sc [12]
Round 16 :
ch, turn, from 2nd stitch from hook: dec, 8 sc, dec [10]
Round 17 :
ch, turn, from 2nd stitch from hook: dec, 6 sc, dec [8]
Round 18 :
ch, turn, from 2nd stitch from hook: 6 sc, dec [7]
Round 19 :
ch, turn, from 2nd stitch from hook: dec, 5 sc [6]
Round 20 :
ch, turn, from 2nd stitch from hook: dec, 2 sc, dec [4]
Info :
Back to 5th row. New thread. On the other side of chain
Round 2 :
ch, turn, from 2nd stitch from hook: dec, 26 sc [27]
Round 3 :
ch, turn, from 2nd stitch from hook: 25 sc, dec [26]
Round 4 :
ch, turn, from 2nd stitch from hook: dec, 24 sc [25]
Round 5 :
ch, turn, from 2nd stitch from hook: 23 sc, dec [24]
Round 6 :
ch, turn, from 2nd stitch from hook: dec, 22 sc [23]
Round 7 :
ch, turn, from 2nd stitch from hook: 21 sc, dec [22]
Round 8 :
ch, turn, from 2nd stitch from hook: 22 sc [22]
Round 9 :
ch, turn, from 2nd stitch from hook: 20 sc, dec [21]
Round 10 :
ch, turn, from 2nd stitch from hook: 12 sc [12]
Round 11 :
ch, turn, from 2nd stitch from hook: dec, 8 sc, dec [10]
Round 12 :
ch, turn, from 2nd stitch from hook: dec, 6 sc, dec [8]
Round 13 :
ch, turn, from 2nd stitch from hook: 6 sc, dec [7]
Round 14 :
ch, turn, from 2nd stitch from hook: dec, 5 sc [6]
Round 15 :
ch, turn, from 2nd stitch from hook: dec, 2 sc, dec [4]
Info :
Crochet sc on the edge
— TAIL :
Info :
Make 2 blue pieces and 2 white pieces. Blue yarn
Round 1 :
make chain of 13 stitches, from 2nd stitch from hook: 12 sc [12]
Round 2 :
ch, turn, from 2nd stitch from hook: inc, 9 sc, dec [12]
Round 3 :
ch, turn, from 2nd stitch from hook: dec, 9 sc, inc [12]
Round 4 :
ch, turn, from 2nd stitch from hook: inc, 9 sc, dec [12]
Round 5 :
ch, turn, from 2nd stitch from hook: 12 sc [12]
Round 6 :
ch, turn, from 2nd stitch from hook: 12 sc [12]
Round 7 :
ch, turn, from 2nd stitch from hook: 12 sc [12]
Round 8 :
ch, turn, from 2nd stitch from hook: 10 sc, dec [11]
Round 9 :
ch, turn, from 2nd stitch from hook: 11 sc [11]
Round 10 :
ch, turn, from 2nd stitch from hook: 11 sc[11]
Round 11 :
ch, turn, from 2nd stitch from hook: 9 sc, dec [10]
Round 12 :
ch, turn, from 2nd stitch from hook: 8 sc, dec [9]
Round 13 :
ch, turn, from 2nd stitch from hook: 9 sc [9]
Round 14 :
ch, turn, from 2nd stitch from hook: 7 sc, dec [8]
Round 15 :
ch, turn, from 2nd stitch from hook: 8 sc [8]
Round 16 :
ch, turn, from 2nd stitch from hook: 6 sc, dec [7]
Round 17 :
ch, turn, from 2nd stitch from hook: dec, 5 sc [6]
Round 18 :
ch, turn, from 2nd stitch from hook: 4 sc, dec [5]
Round 19 :
ch, turn, from 2nd stitch from hook: 2 dec, inc [4]
Round 20 :
ch, turn, from 2nd stitch from hook: 2 dec [2]
Round 21 :
ch, turn, from 2nd stitch from hook: dec [1]
Info :
Crochet sc on the edge
Info :
Bind off 2 pieces together (blue and white). Catch blue piece in stitch and white piece in BLO
— WHITE SPOT ON ABDOMEN :
Round 1 :
make chain of 70 stitches, from 2nd stitch from hook: 68 sc, 4 sc in 1 stitch, on other side of chain - 68 sc [140]
Round 2 :
ch, turn, from 2nd stitch from hook: 7 sl st, 61 sc, 4 inc, 61 sc [137]
Round 3 :
turn, from 2nd stitch from hook: 3 sl st, 57 sc, (1 sc, inc)*4, 58 sc [130]
Round 4 :
turn, from 2nd stitch from hook: 57 sc, inc, (2 sc, inc)*3, 58 sc [130]
Round 5 :
turn, from 2nd stitch from hook: 3 sl st, 53 sc, (3 sc, inc)*4, 54 sc [130]
Round 6 :
turn, from 2nd stitch from hook: 3 sl st, 52 sc, inc, (4 sc, inc)*3, 53 sc [128]
Round 7 :
turn, from 2nd stitch from hook: 3 sl st, 47 sc, (5 sc, inc)*4, 48 sc [126]
Round 8 :
turn, from 2nd stitch from hook: 3 sl st, 7 sc, 3 hdc, 3 dc, 3 hdc, 31 sc, inc, (6 sc, inc)*3, 32 sc, 3 hdc, 3 dc, 3 hdc, 10 sc [127]
Round 9 :
turn, from 2nd stitch from hook: 3 sl st, 6 sc, 3 hdc, 3 dc, 3 hdc, 29 sc, (7 sc, inc)*4, 28 sc, 3 hdc, 3 dc, 3 hdc, 7 sc [127]
Round 10 :
turn, from 2nd stitch from hook: 35 sl st, 12 sc, inc, (8 sc, inc)*3, 13 sc [92]
Round 11 :
turn, from 2nd stitch from hook: 3 sl st, 49 sc [52]
Info :
Crochet sc on the edge
This magnificent crochet whale pattern brings the majestic beauty of the ocean into your hands! With its innovative wire armature system for posable fins, detailed construction techniques, and stunning blue-and-white color work, this pattern creates a truly impressive marine masterpiece. The combination of sculptural shaping, strategic stuffing, and careful assembly results in a lifelike whale that's perfect for ocean enthusiasts and experienced crocheters looking for their next challenging project. Dive into this pattern and create your own gentle giant of the sea! 🐋✨