About This Crochet Sunflower Square Bedspread Pattern
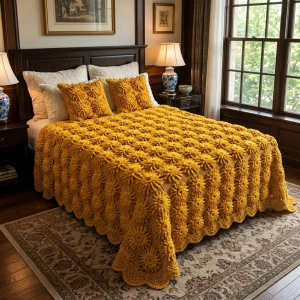
A lovely wedding or housewarming gift for someone who loves a cozy, traditional bedroom, and it looks just as rich draped across a sofa or folded at the foot of a bed.
Ideal for those with basic crocheting experience, featuring slightly more advanced stitches and techniques to expand your skills.
A 10-12 hour project—great for savoring the process over several sessions.
A comforting piece for home or gifts that brings handmade warmth to everyday moments and special occasions.
A lovely wedding or housewarming gift for someone who loves a cozy, traditional bedroom, and it looks just as rich draped across a sofa or folded at the foot of a bed.
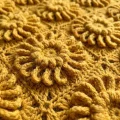
I'm a little bit obsessed with the moment the flower comes alive. You stitch the petals in the front loops only, then tip them forward and work the frame into the loops tucked behind, and a flat little circle suddenly has real dimension. It feels like a magic trick the first time. And because every square is its own tiny project, I get that happy finished feeling again and again instead of waiting for one giant blanket to be done.

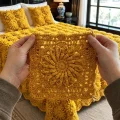
I made my first batch of these squares for my grandmother's old guest room, which has dark wood furniture and a lot of blue and white china. I wanted something that felt like afternoon sun, and mustard gold turned out to be exactly it.
Here's what I learned the hard way. Choose your yarn by looking at the skein in daylight, not under shop lights, because mustard can swing toward olive or toward orange depending on the dye. Buy everything from one dye lot, too. I ran out around square 60 once and the difference showed up like a stripe.
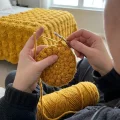
I work a handful of squares each week while watching something, then count them on Sunday. Ten a week feels doable, and in about two months I'm laying them out on the floor and arranging the joins. That floor layout moment is my favorite part, even more than the finish.
If gold isn't your color, try deep teal, rust, or cream with a single darker round on the frame. The stitch counts don't change at all, so you can swap shades freely and still follow every round exactly as written.
There's something about a bedspread the color of late-summer sunshine that makes a whole bedroom feel warmer. You'll stitch one sunflower square at a time, so there's always a finish line within reach, and before long that little stack on your table turns into a pile you can't wait to join. Pick a soft, plush worsted yarn, settle into your favorite chair, and let the flowers do the talking. Two matching pillow shams are included so the whole bed ends up dressed in the same golden glow.
Each finished square measures about 20 cm (8 in) across with a 4 mm hook and worsted weight yarn. The full bedspread uses 9 squares across and 11 down (99 squares) and finishes at about 185 x 225 cm (73 x 89 in) after the border. The two pillow shams need 8 more squares, so 107 squares in total. To resize, add or remove whole columns or rows, each one changes the size by about 20 cm (8 in). Keep columns plus rows at 17, 20, 23, 26 and so on so the border stitch count divides by 6. Round 1 of the border has 34 x (columns + rows) + 4 sc, and that number divided by 6 gives the number of shells in Round 2.
Make an MR. ch3 (counts as first dc), 15dc in the ring. Pull the ring closed and sl st to the top of the beginning ch3 (16 dc).
ch1, 2sc in each dc around. sl st to the first sc (32 sc).
Working in FLO only, [sl st in next st, (sc, 3dc, sc) in next st] x16. This makes 16 raised petals and uses all 32 sts of Round 2. The last petal lands in the same st you joined into, so no joining sl st is needed (16 petals).
ch1. Fold the petals forward so you can see the unworked back loops of Round 2. Working in BLO of Round 2 only, sc in each of the 32 sts around. sl st to the first sc (32 sc).
ch3 (counts as first dc), ch2, dc in the same st for the first corner. dc in each of the next 7 sc. [(dc, ch2, dc) in next sc, dc in each of the next 7 sc] x3. sl st to the top of the beginning ch3 (36 dc, four ch2 sps). Each side has 9 dc from one ch2 sp to the next.
sl st into the ch2 sp. ch3 (counts as first dc), dc, ch2, 2dc in the same sp. [dc in next dc, (ch1, skip 1 dc, dc in next dc) x4, 2dc, ch2, 2dc in next ch2 sp] x3. dc in next dc, (ch1, skip 1 dc, dc in next dc) x4. sl st to the top of the beginning ch3 (36 dc, 16 ch1 sps, four ch2 sps). Each side has 13 sts from one ch2 sp to the next, counting every dc and every ch1 sp.
sl st in next dc and into the ch2 sp. ch1, 3sc in the same sp. [sc in each of the next 13 sts (every dc and every ch1 sp), 3sc in next ch2 sp] x3. sc in each of the next 13 sts. sl st to the first sc (64 sc). The middle sc of each 3sc group is the tip of the square, and each edge has 17 sc counting both tips. Fasten off and weave in ends.
Work the border after all 99 squares are joined into one 9 by 11 rectangle. Every square edge contributes 17 sc counting both tips, so the numbers below add up exactly. The first shell starts just past the outer corner, so scallops at the corners may look slightly off center, which is perfectly normal and blocks out nicely.
Join yarn with a sl st in the tip sc at any outer corner of the bedspread. ch1, 3sc in the same tip sc. Working around, sc in each sc along every square edge, and at each seam sc in the tip of one square and then in the tip of the next. Work 3sc in the tip sc of each of the other three outer corners. The top and bottom edges each have 153 sc and the side edges each have 187 sc, counting the corner tips once. sl st to the first sc (684 sc).
ch1, then starting in the first sc of Round 1, [sc in next sc, skip 2 sc, 5dc in next sc, skip 2 sc] x114. sl st to the first sc (114 shells). Fasten off and weave in ends.
For each sham, make 8 squares: 4 for the front and 4 for the back. Join each set of 4 into a panel 2 squares across and 2 down, about 40 cm (16 in) square, following the joining method in the assembly steps. Both panels are then worked together in one edging round.
Hold the front and back panels with wrong sides together and the tips of the corners matched. Join yarn with a sl st in a tip sc at one corner, ch1, 3sc through both layers in the same tip sc. Working through both layers, sc in each sc along the first side, 3sc in the next tip, sc in each sc along the second side, 3sc in the next tip, then sc in each sc along the third side. Each side has 34 sc counting the corner tips once. Stop here and slide the pillow insert inside.
Work 3sc in the tip sc at the end of the third side, then sc through both layers in each sc along the fourth side, closing the sham. Work 3sc in the last tip and sl st to the first sc of Round 1. Fasten off and weave in ends.
Your first sunflower square is closer than you think, and I promise the second one goes faster. By the fourth or fifth, your hands will know exactly where every petal goes and the stack on your table will start to look seriously impressive. Take your time, enjoy the rhythm, and don't worry if your early squares look a little different from your tenth, because blocking evens out plenty. One day soon you'll pull this golden bedspread over your bed and feel every stitch of it. Happy hooking! 🧶✨
You can, but the size changes a lot. DK weight with a 3.5 mm hook gives squares closer to 16 cm (6.3 in), so you would need more squares for the same bed. Chunky yarn makes the petals heavy and the lace frame closes up. Make one square, measure it, and recalculate your columns and rows, keeping columns plus rows at 17, 20, 23, 26 and so on.
Make 5 squares across and 6 down, which is 30 squares and about 100 x 120 cm (39 x 47 in). Columns plus rows is 11, so Round 1 of the border has 378 sc and Round 2 has 63 shells. Join and border it exactly like the large version.
Working Round 3 in FLO leaves the back loops of Round 2 free, and those free loops are where you build the lace frame in Round 4. The unused front loops become the raised petals, and the back loops become a clean ledge for the square to grow from.
Whipstitch through the back loops only, using the same yarn, and match tip to tip. Join the squares into 11 strips of 9 first, then join the strips, rather than sewing squares in a random order. That keeps the corners lined up and avoids a wobbly grid.
Check that every square edge has 17 sc including both tips, that you worked one sc in each of the two tips at every seam, and that each outer corner got 3sc. For a 9 by 11 layout the total should be 684 sc, which divides into 114 shells. If your count is different, look for a missed seam tip before starting Round 2.