🧶 Beautiful ✨ Detailed 💝 Adorable

Crochet Puff Quilt Pattern

Crochet Puff Quilt Pattern
4.4★ Rating
15-20 Hours Time Needed
2.0K Made This
✂️

Beginner Friendly Level

Perfect for those just starting their sewing journey, with clear instructions and simple techniques

⏱️

Slow & Steady

A 10-12 hour project—great for savoring the process over several sessions.

🏡

Cozy Accent

A warm touch for your space that transforms ordinary corners into inviting nooks filled with handmade charm.

About This Crochet Puff Quilt Pattern

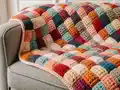
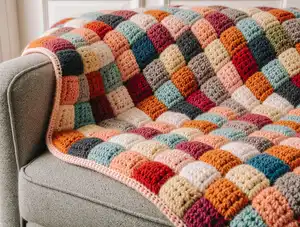
This Crochet Puff Quilt pattern transforms simple half double crochet stitches into a three-dimensional textured blanket that's both visually stunning and incredibly cozy. Each individual square is worked in flat rounds, lightly stuffed, and then seamlessly joined to create a puffy, quilt-like effect. The pattern is perfect for yarn stash busting, allowing you to mix colors creatively or maintain a cohesive color scheme throughout your project.

Crochet Puff Quilt Pattern crochet pattern - detailed view of completed project

With flexible sizing options, you can create anything from a small baby blanket to a generous bed covering by simply adjusting the number of squares. The detailed tutorials for whip stitch and mattress stitch ensure professional-looking seams that maintain the blanket's integrity and beauty.

Why You'll Love This Crochet Puff Quilt Pattern

I absolutely love this pattern because it's incredibly satisfying to watch your blanket grow square by square, and the stuffed puff effect creates such a luxurious, cozy texture that's perfect for snuggling. The repetitive nature of creating each square makes it a relaxing, meditative project that's easy to pick up and put down, while the seaming process adds an engaging challenge that keeps things interesting. I also appreciate how forgiving this pattern is—you can use any worsted weight yarn from your stash, mix and match colors to your heart's content, and still end up with a cohesive, beautiful finished piece. The heavyweight feel of the completed blanket makes it perfect for cold winter nights, and the dimensional texture adds such visual interest that it becomes a statement piece in any room.

Crochet Puff Quilt Pattern step 1 - construction progress Crochet Puff Quilt Pattern step 2 - assembly progress Crochet Puff Quilt Pattern step 3 - details and accessories Crochet Puff Quilt Pattern step 4 - final assembly and finishing

Switch Things Up

I love experimenting with color combinations in this puff quilt pattern to create entirely different moods and styles. For a modern minimalist look, I stick to a monochromatic palette using different shades of gray or cream, which creates subtle dimension through texture alone. When I'm feeling bold, I arrange squares in an ombre gradient that transitions smoothly from deep blues through turquoise to pale aqua, creating a stunning ocean-inspired effect.

Another variation I adore is creating a checkerboard pattern with just two contrasting colors—classic black and white never fails to make a statement. For baby blankets, I choose soft pastels in random arrangements, or I create a deliberate pattern with alternating rows of color. During the holidays, I've made versions using seasonal colors like rich burgundy, forest green, and cream for a cozy Christmas aesthetic.

You can also play with the stuffing amount to create different levels of puffiness—some squares more plump, others flatter—for added visual interest. I've even experimented with different yarn textures, mixing smooth cotton with fuzzy chenille squares for a tactile experience. The seaming yarn color is another opportunity for creativity; using a contrasting color makes the grid structure a design feature rather than hiding it.

Common Mistakes & How to Fix Them

✗ Stuffing squares too firmly before closing can cause uneven shapes and make seaming difficult—stuff lightly and evenly for best results ✗ Forgetting to work on the back side while seaming can result in your color arrangement being reversed on the finished blanket ✗ Not maintaining consistent tension throughout rounds can create warped squares that don't align properly when joining together ✗ Skipping the beginning chain one and accidentally counting it as a stitch will throw off your stitch count throughout the entire square ✗ Pulling mattress stitch seams too tight between rows can cause puckering and distortion in the overall blanket structure

Crochet Puff Quilt Pattern

Create a stunning heavyweight quilt-style blanket using simple half double crochet stitches and innovative seaming techniques. This versatile pattern allows you to customize your blanket size by joining stuffed squares together, making it perfect for using up yarn scraps while creating a cozy, textured masterpiece. Each puffy square adds dimension and warmth, resulting in a unique heirloom-quality blanket that's both practical and beautiful for any home.

Beginner Friendly 15-20 Hours

Materials Needed for Crochet Puff Quilt Pattern

— Main Fabric

  • 01
    Worsted weight (4-weight) yarn, approximately 15-20 yards per square
  • 02
    100% cotton yarn recommended for consistent results (any brand)
  • 03
    Additional yarn for seaming squares and rows together

— Tools Required

  • 01
    5.0mm crochet hook (or hook to meet gauge)
  • 02
    Yarn needle for seaming
  • 03
    Scissors
  • 04
    Polyester fiberfill stuffing
  • 05
    Stitch marker (optional but helpful)
  • 06
    Flexible tape measure

Progress Tracker

0% Complete

— Individual Square Construction:

Starting Chain:

Ch 11

Round 1:

Starting in the second ch from the hook, hdc in each ch across. Rotate your work to the other side of the ch and hdc in each ch across. Slst to the starting stitch. (20 stitches)

Info:

When working along the second side of your ch, lay your starting tail down across the row and crochet over top of it to secure this tail without having to weave it in. Use a stitch marker at the beginning of each round to help keep track of your stitch count if needed.

Round 2-8:

Ch 1 and turn. Hdc in each of the next 20 stitches. Slst to the starting stitch. (20 stitches)

Finishing Square:

Fasten off, leaving a long tail (roughly 20-24 inches)

— Stuffing and Closing:

Info:

Begin lightly stuffing your square. Attach a yarn needle to the end of your tail and use the whip stitch to begin seaming across the top. Finish filling in stuffing if needed, and whip stitch to the end, completely closing off your square. If this is your first square of a new row, you may go ahead and weave in this end.

— Joining Squares Side by Side:

Info:

As you seam all of your squares together, you will be looking at the back side of the work. Keep this in mind as you seam, if you would like your colors to be in a specific arrangement.

Step 1:

Repeat the entire square-making process for your next square, but don't weave in your final end yet.

Step 2:

With your yarn needle still attached, seam this square to your previous square using the whip stitch method shown in Tutorial 2.

Step 3:

Decide how wide you would like your blanket to be, in increments of 3 inches (or increments of how wide each square is for you). Continue repeating this pattern until you have attached enough squares side by side to achieve your desired width. This will be one row of squares.

— Joining Rows Together:

Step 1:

Complete a second full row of squares.

Step 2:

Seam the two rows together using the mattress stitch shown in Tutorial 3. You will be using a completely separate strand of yarn for this, any color of your choosing.

Step 3:

Repeat this entire process for your entire project.

Final Step:

Once you achieve your desired width and length, weave in all ends and enjoy your completed puff quilt!

Assembly Instructions

  • Work each square individually following the pattern through Round 8, then fasten off with a long tail for seaming.
  • Lightly stuff each square before closing the top with whip stitch, being careful not to overstuff which can distort the shape.
  • Remember you'll be working on the back side when seaming squares together, so plan your color arrangement accordingly.
  • Join squares side by side using whip stitch to create complete rows, continuing until you reach your desired blanket width.
  • Use mattress stitch with a separate strand of yarn to join completed rows together, ensuring corners align properly.
  • Begin mattress stitch by measuring out a yarn strand roughly three times the length of the work you need to seam.
  • When joining rows, pick up strands just off from the very side of squares (not on the edge) to create invisible seams on the front of the work.

Important Notes

  • 💡Beginning chain 1 does NOT count as a stitch throughout this pattern, so don't include it in your stitch counts.
  • 💡Each square measures 3 inches by 3 inches before stuffing, but meeting precise gauge is not extremely important due to flexible sizing.
  • 💡Use the invisible join technique (slip stitch to starting stitch) at the end of each round for the neatest appearance.
  • 💡Lay your starting tail across the foundation chain and crochet over it to save time weaving in ends later.
  • 💡When using mattress stitch to join rows, make sure to create secure corner connections by going through all four corner points.
  • 💡The pattern works beautifully with 100% cotton yarn, but you can use any worsted weight fiber of your choice.
  • 💡Plan your color scheme in advance if you want a specific pattern, or work randomly with scraps for a scrappy quilt look.

This Crochet Puff Quilt pattern is a delightful blend of simplicity and texture that creates a truly special heirloom piece. The innovative technique of stuffing individual squares and joining them together results in a three-dimensional blanket that's as beautiful as it is cozy. Whether you're working through your yarn stash or carefully coordinating colors, each square you complete brings you closer to a stunning finished project. The detailed photo tutorials make even the seaming process easy to master, ensuring professional results every time. 🧶 Happy crocheting! 🧵✨

You ask,

we answer.

FAQs

How many squares do I need for a standard throw blanket?

For a standard throw blanket measuring approximately 54 inches by 54 inches, you'll need 324 squares total (18 squares by 18 squares). Each square measures 3 inches, so you can adjust the number based on your desired finished size by dividing your target dimensions by 3.

Can I use different yarn weights for this pattern?

While the pattern is written for worsted weight (4-weight) yarn, you can adapt it for other weights by adjusting your hook size and checking your gauge. Just ensure your squares are all roughly the same size before stuffing and seaming. Lighter weights will create smaller, more delicate squares, while bulkier yarns will make larger, chunkier squares.

How do I keep my color arrangement organized while working?

Remember that you'll be looking at the back side of your work while seaming, so your color arrangement will be reversed on the finished blanket. Lay out your completed squares in your desired pattern before seaming, then work with the wrong side facing you to ensure the right side shows your intended design.

What's the best way to stuff the squares?

Stuff lightly and evenly, filling just enough to create a gentle puff without overstuffing. The pattern suggests stuffing to the amount shown in Figure 3. Overstuffing will make the squares bulge and create difficulties when seaming, while understuffing won't give you the desired puffy texture.

Do I need to use the same color yarn for seaming?

Not at all! For side-by-side square seaming, you'll use the tail from closing each square. For joining rows with mattress stitch, you can choose any color yarn you like—matching, contrasting, or a neutral that blends with multiple colors in your blanket.