🧢 Beautiful ✨ Detailed πŸ’ Adorable

Baby Ballerina Strappy Flats Crochet Pattern

Baby Ballerina Strappy Flats Crochet Pattern
4.8β˜… Rating
3-4 Hours Time Needed
1.9K Made This
βœ‚οΈ

Intermediate Level

Ideal for those with basic knitting experience, featuring slightly more advanced stitches and techniques to expand your skills.

⏱️

Bite-Sized Project

Complete in under 2 hoursβ€”quick, fun, and perfect for a little creative escape.

πŸŽ€

Playful Twist

Fun patterns meet timeless design in pieces that express personality while remaining wonderfully wearable.

About This Baby Ballerina Strappy Flats Crochet Pattern

These sweet baby ballerina flats bring classic ballet style to the tiniest feet in your life. The pattern features a clever construction that starts with a sturdy sole and builds up to a delicate strappy design. With three size options and multiple strap variations, you can create the perfect pair for newborns through babies up to one year old. The optional decorative flower adds an extra touch of sweetness to these already precious booties.

Baby Ballerina Strappy Flats Crochet Pattern crochet pattern - detailed view of completed project

The pattern uses worsted weight yarn for the shoe body and fingering weight for delicate flower details. Adjustable ribbon straps ensure a comfortable fit while creating that signature ballerina look that makes these shoes truly special.

Why You'll Love This Baby Ballerina Strappy Flats Crochet Pattern

I absolutely love how these tiny ballet flats capture the elegance of real ballerina shoes in such a precious miniature form. The way the strappy design wraps around little ankles is simply adorable, and I appreciate how the pattern gives you flexibility with three different strap options to suit your preference. What really makes my heart sing is watching these come together so quicklyβ€”you can finish a pair in an afternoon and have the sweetest gift ready for a baby shower or photoshoot. The spike stitch detail adds beautiful texture, and the optional flower embellishment lets you add your own creative touch. These aren't just booties; they're tiny works of wearable art that any baby would look precious wearing!

Baby Ballerina Strappy Flats Crochet Pattern step 1 - construction progress Baby Ballerina Strappy Flats Crochet Pattern step 2 - assembly progress Baby Ballerina Strappy Flats Crochet Pattern step 3 - details and accessories Baby Ballerina Strappy Flats Crochet Pattern step 4 - final assembly and finishing

Switch Things Up

I love how versatile this pattern truly is once you master the basic construction! Try experimenting with different color combinations - pastel pink and white for classic ballerina vibes, or bold colors like red and black for a modern twist. You could even work the sole in a contrasting color to make it pop.

The flower embellishment opens up endless creative possibilities. Instead of the standard flower, try adding a small bow, a crocheted heart, or even tiny pearl beads for extra sparkle. I've made versions with multiple small flowers clustered together, and they look absolutely precious!

Don't feel limited to the three strap options provided - mix and match elements from different options to create your own unique design. I've combined the center loop with side details for an extra decorative look that photographs beautifully.

Consider the yarn fiber content based on the season and purpose. Cotton yarn works wonderfully for spring and summer babies, while a soft acrylic blend adds extra warmth for cooler months. For special occasion shoes, try a yarn with a subtle shimmer or metallic thread.

The blocking step is where you can really customize the final shape. I like to slightly curl up the toe area for an authentic ballet slipper look, or keep it flatter for a more mary-jane style appearance. Play around with the shaping while the shoes are damp to discover what you like best!

Common Mistakes & How to Fix Them

βœ— Not maintaining gauge can result in shoes that are too tight or too loose for the intended size, so always check your gauge before starting the full project βœ— Forgetting to mark your stitches at the beginning of each round leads to confusion and misaligned patterns, especially during the color change rounds βœ— Working Round 5 in the wrong location by inserting the hook through the slip stitches instead of between them and the unworked loops creates a tight, puckered look βœ— Pulling the spike stitches too tightly in Round 6 causes the shoe to bunch and lose its smooth shape, so work them with gentle, even tension

Baby Ballerina Strappy Flats Crochet Pattern

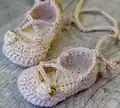
Create these adorable strappy ballet flats perfect for your little dancer! This charming pattern features delicate crochet booties with adjustable ribbon laces and optional decorative flowers. Available in three sizes from newborn to 12 months, these sweet shoes combine comfort with timeless elegance. The pattern includes multiple strap options so you can customize the look to match any outfit or occasion.

Intermediate 3-4 Hours

Materials Needed for Baby Ballerina Strappy Flats Crochet Pattern

β€” Main Fabric

  • 01
    Sole Color (Color A) - 30 yards worsted weight yarn
  • 02
    Upper Color (Color B) - 45 yards worsted weight yarn for largest size
  • 03
    Flower accent - 6 yards fingering weight yarn
  • 04
    Optional ribbon - 2 pieces of one yard lengths of 1.5 inch ribbon

β€” Tools Required

  • 01
    Crochet hook size F (3.75mm) for shoe
  • 02
    Crochet hook size D (3.25mm) for flower and lace
  • 03
    Stitch markers
  • 04
    Yarn needle for weaving in ends
  • 05
    Scissors
  • 06
    Spray bottle for blocking (misting shoes with water)

Progress Tracker

0% Complete

β€” Newborn Size (3.75 inches long) :

Round 1 :

With color A, ch 11, mark lp on hk, 2 hdc in 2nd ch from hook, 8 hdc, 4 hdc in last ch, 8 hdc down the other side of foundation ch, 2 hdc in last ch, join with sl st to marked st (24 total sts)

Round 2 :

Ch 1, mark lp on hk, skip first st, 2 sc in each of the next two sts, 8 sc, 2 sc in each of the next 4 sts, 8 sc, 2 sc in each of the last two sts, join with sl st to marked st (32 total sts)

Round 3 :

Ch 1, mark lp on hk, 2 sc in each of the first 2 sts, 8 sc, 2 hdc, 2 hdc in each of the next 8 sts, 2 hdc, 8 sc, 2 sc in each of the last 2 sts, join with sl st to marked st. Cut yarn, leaving loop on hook and tail long enough to weave in (44 total sts)

Round 4 :

With color B, yarn over and pull lp through lp on hk, mark lp on hk, 44 bl sl st, join with sl st to marked st (44 total sts)
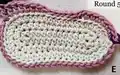
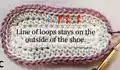
Round 5 :

This round is worked over the stitches of the last round. Insert hk between sl sts and line of unworked loops from previous round. Ch 1, mark lp on hk, 5 hdc, 1 sc, 5 sl st, 3 sc, 1 hdc, 14 dc, 1 hdc, 3 sc, 5 sl st, 1 sc, 5 hdc, join with sl st to marked st (44 total sts)

Round 6 :

Ch 2, mark lp on hk, 3 dc, 3 hdc, 5 spike st, 7 sc, 8 hdc, 7 sc, 5 spike st, 3 hdc, 3 dc, join with sl st to marked st (44 total sts)

Round 7 :

Ch 1, mark lp on hk, skip first st, 4 hdc, 4 sc, [sk next st, 1 sl st] 4 times, 6 sc2tog, [1 sl st, sk next st] 4 times, 4 sc, 2 hdc, 2 hdc in last st, join with sl st to marked st (30 total sts)
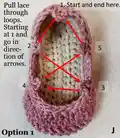
Round 8 Option 1 :

Ch 1, mark lp on hk, 3 bl sc, 3 bl sl st, ch 3, 1 bl sl st back in same st, 6 bl sl st, ch 3, 1 bl sl st back in same st, 7 bl sl st, ch 3, 1 bl sl st back in same st, 6 bl sl st, ch 3, 1 bl sl st back in same st, 3 bl sl st, 2 bl sc, join with sl st to marked st, ch 4, sl st back in same st, bind off

Strap :

Using D size hk, make a ch that measures 36 inches long, bind off, tie loose ends in knots, and trim. Pull strap through loops made in round 8

β€” 3-6 Months Size (4.25 inches long) :

Round 1 :

With color A, ch 13, mark lp on hk, 2 hdc in 2nd ch from hook, 10 hdc, 4 hdc in last ch, 10 hdc down the other side of foundation ch, 2 hdc in last ch, join with sl st to marked st (28 total sts)

Round 2 :

Ch 1, mark lp on hk, skip first st, 2 sc in each of the next two sts, 7 sc, 3 hdc, 2 hdc in each of the next 4 sts, 3 hdc, 7 sc, 2 sc in each of the last two sts, join with sl st to marked st (36 total sts)

Round 3 :

Ch 1, mark lp on hk, 2 hdc in each of the first 2 sts, 12 hdc, 2 hdc in each of the next 8 sts, 12 hdc, 2 hdc in each of the last 2 sts, join with sl st to marked st. Cut yarn, leaving loop on hook and tail long enough to weave in (48 total sts)

Round 4 :

With color B, yarn over and pull lp through lp on hk, mark lp on hk, 48 bl sl st, join with sl st to marked st (48 total sts)

Round 5 :

This round is worked over the stitches of the last round. Insert hk between sl sts and line of unworked loops from previous round. Ch 1, mark lp on hk, skip first st, 6 hdc, 1 sc, 6 sl st, 2 sc, 2 hdc, 14 dc, 2 hdc, 2 sc, 6 sl st, 1 sc, 4 hdc, 2 hdc in last st, join with sl st to marked st (48 total sts)

Round 6 :

Ch 2, mark lp on hk, 4 dc, 3 hdc, 6 spike st, 5 sc, 12 hdc, 5 sc, 6 spike st, 3 hdc, 4 dc, join with sl st to marked st (48 total sts)

Round 7 :

Ch 1, mark lp on hk, skip first st, 3 hdc, 8 sc, [skip next st, 1 sl st] 4 times, 5 sc2tog, [1 sl st, skip next st] 4 times, 8 sc, 1 hdc, 2 hdc in last st, join with sl st to marked st (35 total sts)

Round 8 Option 1 :

Ch 1, mark lp on hk, 4 bl sc, 3 bl sl st, ch 3, 1 bl sl st back in same st, 6 bl sl st, ch 3, 1 bl sl st back in same st, 10 bl sl st, ch 3, 1 bl sl st back in same st, 6 bl sl st, ch 3, 1 bl sl st back in same st, 3 bl sl st, 3 bl sc, join with sl st to marked st, ch 4, sl st back in same st, bind off and weave in ends

Strap :

Using D size hk, make a ch that measures 42 inches long, bind off, tie loose ends in knots, and trim. Pull strap through loops made in round 8

β€” 6-12 Months Size (4.75 inches long) :

Round 1 :

With color A, ch 15, mark lp on hk, 2 hdc in 2nd ch from hook, 12 hdc, 4 hdc in last ch, 12 hdc down the other side of foundation ch, 2 hdc in last ch, join with sl st to marked st (32 total sts)

Round 2 :

Ch 1, mark lp on hk, skip first st, 2 sc in each of the next two sts, 7 sc, 5 hdc, 2 hdc in each of the next 4 sts, 5 hdc, 7 sc, 2 sc in each of the last two sts, join with sl st to marked st (40 total sts)

Round 3 :

Ch 1, mark lp on hk, 2 hdc in each of the first 2 sts, 14 hdc, 2 hdc in each of the next 8 sts, 14 hdc, 2 hdc in each of the last 2 sts, join with sl st to marked st. Cut yarn, leaving loop on hook and tail long enough to weave in (52 total sts)

Round 4 :

With color B, yarn over and pull lp through lp on hk, mark lp on hk, 52 bl sl st, join with sl st to marked st (52 total sts)

Round 5 :

This round is worked over the stitches of the last round. Insert hk between sl sts and line of unworked loops from previous round. Ch 1, mark lp on hk, skip first st, 6 hdc, 1 sc, 7 sl st, 2 sc, 3 hdc, 14 dc, 3 hdc, 2 sc, 7 sl st, 1 sc, 4 hdc, 2 hdc in last st, join with sl st to marked st (52 total sts)

Round 6 :

Ch 2, mark lp on hk, 4 dc, 3 hdc, 7 spike st, 4 sc, 3 hdc, 10 dc, 3 hdc, 4 sc, 7 spike st, 3 hdc, 4 dc, join with sl st to marked st (52 total sts)

Round 7 :

Ch 1, mark lp on hk, skip first st, 4 hdc, 7 sc, [skip next st, 1 sl st] 4 times, 1 sc2tog, 5 hdc2tog, 1 sc2tog, [1 sl st, skip next st] 4 times, 7 sc, 2 hdc, 2 hdc in last st, join with sl st to marked st (37 total sts)

Round 8 Option 1 :

Ch 1, mark lp on hk, 4 bl sc, 3 bl sl st, ch 3, 1 bl sl st back in same st, 7 bl sl st, ch 3, 1 bl sl st back in same st, 10 bl sl st, ch 3, 1 bl sl st back in same st, 7 bl sl st, ch 3, 1 bl sl st back in same st, 3 bl sl st, 3 bl sc, join with sl st to marked st, ch 4, sl st back in same st, bind off

Strap :

Using D size hk, make a ch that measures 48 inches long, bind off, tie loose ends in knots, and trim. Pull strap through loops made in round 8

β€” Flower Embellishment (Optional) :

Step 1 :

With flower color, make a magic ring about six inches from the end. With thumb and forefinger hold yarn where it crosses

Step 2 :

Pull a lp through the ring you just made and crochet over 2 strands

Step 3 :

[Chain 3 for tiniest size or 4 for tiny size, sl st back to ring] 10 times for tiniest or 12 times for tiny. Bind off

Step 4 :

With leaf color pull a lp through ring, ch 4 for tiniest size or 5 for tiny size, sl st back to ring 2 times, bind off

Step 5 :

Pull ends to center and then pull beginning tail you started with tightly to close ring

Step 6 :

Arrange petals and leaves to your liking. Tie ends in knot behind flower and attach to shoe

β€” Blocking Instructions :

Info :

Mist shoes with water, shape them to desired form by pulling out wrinkles and ripples, let dry completely

Assembly Instructions

  • Complete both shoes following the same pattern instructions to create a matching pair
  • Thread the ribbon or crocheted strap through the loops created in Round 8, starting at position 1 and following the numbered sequence
  • For Option 1, pull the strap through all four loops in a crisscross pattern and tie at the ankle
  • For Option 2 side tie, position the loops differently for left and right shoes to allow for side tying
  • For Option 3 center loop, thread ribbon through and tie in a bow at the center front
  • Block finished shoes by misting with water and shaping to remove any wrinkles or ripples, then let dry completely
  • Attach optional flower embellishment to the front or side of shoe using yarn tails tied behind the flower

Important Notes

  • πŸ’‘Gauge is critical for proper fit - 4.5 hdc to one inch using F hook, adjust hook size if needed
  • πŸ’‘Do not count the chain stitch as a stitch at the beginning of each round
  • πŸ’‘Always mark your loop on the hook at the start of each round to keep track of where rounds begin and end
  • πŸ’‘When working Round 5, insert your hook between the slip stitches and the line of unworked loops from the previous round, not through the slip stitches themselves
  • πŸ’‘Spike stitches in Round 6 are worked into the row below, not the current row, to create the decorative texture
  • πŸ’‘The pattern includes three different strap options - choose your favorite or make all three to see which you prefer
  • πŸ’‘Block finished shoes to achieve the best shape and professional appearance

These precious Baby Ballerina Strappy Flats bring timeless ballet elegance to the tiniest toes! Perfect for special photoshoots, baby showers, or everyday sweetness, this pattern combines practicality with classic style. With three size options and multiple strap variations, you can customize these adorable booties to create the perfect fit and look. The optional flower embellishment adds that extra touch of handmade charm that makes these shoes truly special. 🩰✨

You ask,

we answer.

FAQs

Which yarn weight works best for these baby shoes?

The pattern calls for worsted weight yarn for the shoe body (Colors A and B) and fingering weight yarn for the optional flower embellishment. The pictured version uses 'I Love This Cotton' from Hobby Lobby, which works beautifully for baby items.

How do I know which size to make?

The pattern includes three sizes: Newborn (3.75 inches long), 3-6 Months (4.25 inches long), and 6-12 Months (4.75 inches long). Measure the baby's foot length and choose the size closest to that measurement, or make the next size up if between sizes.

What is a spike stitch and how do I work it?

A spike stitch is worked like a single crochet but you insert your hook into the previous row below instead of the current row. Insert hook in the stitch one row below, yarn over, pull up a loop, yarn over and pull through both loops on hook. This creates a beautiful textured effect.

Do I need to use ribbon or can I crochet the straps?

You have both options! The pattern provides instructions for crocheting straps using a chain (36 inches for newborn, 42 inches for 3-6 months, 48 inches for 6-12 months), or you can substitute with 1.5 inch wide ribbon cut to the same lengths.

What are the different strap options and how do they differ?

The pattern includes three strap options: Option 1 features straps that crisscross over the foot, Option 2 creates a side tie design (with different instructions for left and right shoes), and Option 3 has a center loop for a bow at the front. Choose based on your preferred style!

Is blocking really necessary for these baby shoes?

Yes, blocking makes a significant difference! Simply mist the finished shoes with water, gently shape them to remove wrinkles and ripples, and let them dry completely. This gives your shoes a polished, professional appearance and helps them hold their shape better.