About This Crochet Star Motif Bedspread and Pillow Sham Pattern
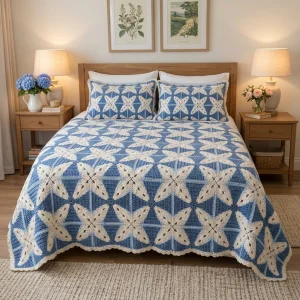
A lovely wedding or housewarming gift for someone who loves a cottage-style bedroom, and a keepsake you can pass down. Make the sham set first for a quick win.
Ideal for those with basic crocheting experience, featuring slightly more advanced stitches and techniques to expand your skills.
A 10-12 hour project—great for savoring the process over several sessions.
Everyday comfort with practical charm, designed for both functionality and style through changing seasons.
A lovely wedding or housewarming gift for someone who loves a cottage-style bedroom, and a keepsake you can pass down. Make the sham set first for a quick win.
I love how calm this one is to make. After the second or third square my hands knew the petal rows by heart, and I stopped counting out loud, which never happens with lace. The petals are the part I look forward to, because shaping one with those little increases and decreases feels like drawing a leaf with yarn. I also love that you get a finished piece every evening, so it never feels like a never-ending blanket. Mine now lives on our guest bed and visitors always ask where it came from.

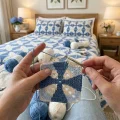
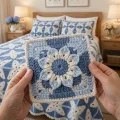
The first time I made one of these squares, I sewed the petals on before blocking and ended up with a puckered mess. I picked everything apart, soaked the pieces, pinned them to size, and tried again. Now I always block the blue squares and the petals separately, and the stars sit flat every time.
Here's the tip I wish I'd had sooner: lay all four petals on the square with the tips pointing at the corners and step back before you sew. Squint at it. If the star looks even from across the room, it will look even on the bed. I pin first, then tack the center, then stitch the edges in one direction.
On colors, I made a small test set in sage green with a soft oatmeal star, and it felt completely different, almost like a woodland quilt. A charcoal square with a blush star would look gorgeous too. Whatever you pick, buy all the blue at once, because slight dye lot shifts show up like faint stripes once a few dozen squares sit side by side. Keep a little ball of cream aside for repairs later.
Picture your bedroom wrapped in soft denim blue, with a creamy four-pointed star blooming in the middle of every square. You build this bedspread one motif at a time, so you can tuck a square in your bag and stitch at the kitchen table, on the bus, or while the kettle boils. Once the squares are joined with crisp cream seams and trimmed with a scalloped edge, you'll also have two matching pillow shams that tie the whole bed together. It looks like a classic cottage quilt, but it's all simple rows, a handful of shaped petals, and a rhythm you'll fall into fast.
Each square is approximately 25 cm (10 in) wide and tall. The full bedspread of 8 squares across and 9 down measures about 200 x 225 cm (79 x 89 in) before the border and roughly 205 x 230 cm (81 x 91 in) after it. Each sham front is 2 squares across and 3 down, about 50 x 75 cm (20 x 30 in). Gauge is approximately 14 dc and 8 rows in 10 cm (4 in). To widen the bedspread, add squares in pairs across so the border stitch count stays a multiple of 4. To lengthen it, add whole rows of squares and add 80 sc to Border Round 1 for each added row. Each extra square adds 25 cm (10 in).
With blue, ch 37, dc in 4th ch from hook and in each ch across (35, counting the ch 3 as a dc)
ch 3 (counts as first dc), turn, dc in each st across, placing the last dc in the top of the previous turning ch (35)
Fasten off after Row 20 and weave in the beginning tail. The square should measure about 25 cm (10 in) each way. If yours comes out smaller or larger, change your hook size before making more, because the border counts depend on 35 sts across and 20 rows.
Each petal is worked flat in rows from the narrow base point out to the tip. It measures about 13 cm (5 in) long and 6.5 cm (2.5 in) wide at the widest point. The star is made separately and sewn onto the blue square, which lets the blue show through the little eyelet in each petal. In every row the turning ch 3 stands in for the first dc, so do not work into the first st of the previous row. The last st of each row goes into the top of the previous turning ch.
With cream, ch 5, dc in 4th ch from hook and in next ch (3, counting the ch 3 as a dc)
ch 3 (counts as first dc), turn, 2 dc in next st, 2 dc in last st (5)
ch 3 (counts as first dc), turn, 2 dc in next st, dc in next 2 sts, 2 dc in last st (7)
ch 3 (counts as first dc), turn, 2 dc in next st, dc in next 4 sts, 2 dc in last st (9)
ch 3 (counts as first dc), turn, dc in next 3 sts, ch 1, sk next st (this is the center st), dc in last 4 sts (8 dc and 1 ch-1 sp, 9 in all)
ch 3 (counts as first dc), turn, dc in next 3 sts, dc in ch-1 sp, dc in last 4 sts (9)
ch 3 (counts as first dc), turn, dc in each st across (9)
ch 3 (counts as first dc), turn, dc2tog over next 2 sts, dc in next 4 sts, dc2tog over last 2 sts (7)
ch 3 (counts as first dc), turn, dc2tog over next 2 sts, dc in next 2 sts, dc2tog over last 2 sts (5)
ch 3 (counts as first dc), turn, dc2tog over next 2 sts, dc2tog over last 2 sts (3)
ch 2, turn, dc3tog over the 3 sts (1). Fasten off, leaving a 30 cm (12 in) tail for sewing
Make all 336 petals before you start sewing so you can work in a steady batch. Each blue square gets 4 petals, sewn on before the squares are joined (see the assembly steps).
Use cream and the larger hook so the seams stay stretchy. Always hold squares wrong sides together, so the slip stitch ridge shows on the right side as a raised cream line. Keep Row 20 of every square at the top. Sew the petals onto every square before joining.
Hold 2 squares wrong sides together with side edges aligned. Insert hook through both layers in the first row end, then sl st through both layers in each of the 20 row ends (20 sl st per seam). Add squares the same way until each strip has 8 squares (7 seams). Make 9 strips
Hold 2 strips wrong sides together with the seams matching. Sl st through both layers in each st along the top edge of one strip and the bottom edge of the next (35 sl st per square, 280 sl st per seam). Join all 9 strips the same way (8 seams)
For each sham, join 2 squares side by side with 20 sl st to make a strip, and make 3 strips. Join the strips with 35 sl st per square (70 sl st per seam, 2 seams). The front measures about 50 x 75 cm (20 x 30 in). Make 2 sham fronts
The border is worked in cream with the smaller hook. Corner sts are the first and last sts of the top and bottom edges. Count each side as you go, so the scallop repeat of 4 lands evenly.
Join cream with a sl st in the top left corner st, ch 1, 3 sc in same st, sc in each of next 278 sts across the top, 3 sc in next corner st (284 along the top). Work 2 sc in each of the 178 row ends down the right side (356). 3 sc in corner st, sc in each of next 278 sts across the bottom, 3 sc in next corner st (284). Work 2 sc in each of the 178 row ends up the left side (356). Join with a sl st to first sc (1280)
ch 1, *sk next sc, 3 dc in next sc, sk next sc, sl st in next sc, repeat from * around (320 scallops). Join with a sl st to the base of the ch 1 and fasten off
Each back panel is approximately 50 x 45 cm (20 x 18 in). Two panels overlap by about 15 cm (6 in) to make an envelope opening, so the sham fits a pillow insert of roughly 50 x 75 cm (20 x 30 in).
With blue, ch 72, dc in 4th ch from hook and in each ch across (70, counting the ch 3 as a dc)
ch 3 (counts as first dc), turn, dc in each st across, placing the last dc in the top of the previous turning ch (70)
ch 1, turn, sc in each st across (70). Fasten off and weave in ends. This sc edge is the opening edge of the panel
Work the edging around the joined sham front before attaching the back panels. Corner sts are the first and last sts of the top and bottom edges.
Join cream with a sl st in the top left corner st, ch 1, 3 sc in same st, sc in each of next 68 sts across the top, 3 sc in next corner st (74 along the top). Work 2 sc in each of the 58 row ends down the right side (116). 3 sc in corner st, sc in each of next 68 sts across the bottom, 3 sc in next corner st (74). Work 2 sc in each of the 58 row ends up the left side (116). Join with a sl st to first sc (380)
ch 1, *sk next sc, 3 dc in next sc, sk next sc, sl st in next sc, repeat from * around (95 scallops). Join with a sl st to the base of the ch 1 and fasten off
Every square you finish is a little step toward a bed that feels handmade in the best way. Take your time, pick a cozy playlist, and enjoy watching the stars appear one after another. When the last scallop is stitched and the bedspread is spread across your mattress, you'll feel proud of every stitch. Share the finished set with someone you love, or keep it all for yourself. Happy crocheting! 🧶✨ Wrap yourself in something you made with your own two hands. 🧵
You can, but the squares will come out bigger. With worsted weight and a 5 mm hook each square may reach about 28 cm (11 in), so the bedspread grows by roughly 24 cm (9.5 in) in each direction. The border counts in this pattern assume 35 sts and 20 rows, so swatch first and adjust the number of squares if you want to keep the finished size.
Making each petal flat lets you shape the leaf points cleanly with simple increases and decreases, and the eyelet in Rows 5 and 6 shows the blue base through the cream. It also means you can crochet petals in batches while watching TV, then sew them on once everything is blocked.
A throw of 4 squares across and 5 down is about 100 x 125 cm (39 x 49 in) and needs 20 squares. Check the border count: top and bottom each get 3 sc in the corners plus 35 sc per square minus 2, and each side gets 2 sc in every row end except the 2 corner rows. Keep the total divisible by 4 so the scallops land evenly.
Wet block each square pinned flat to 25 cm (10 in) and let it dry completely. Dense double crochet rows can roll slightly at the foundation edge, and blocking sets Row 1 and Row 20 straight so the sl st seams line up stitch for stitch.
If you can work double crochet and turn rows, you can make the squares. The petals add increases, decreases, and one eyelet row, so work one petal on its own before starting the rest. The joining and border are repetitive but not difficult, and the shams are a good place to practice before you commit to the full bedspread.
Pick a mid-tone for the base and a lighter shade for the stars so the points show clearly. A sage base with oatmeal petals or a charcoal base with soft blush petals both work well. Keep the seams and border in the same shade as the stars so the grid reads as part of the design.
