🧢 Beautiful ✨ Detailed πŸ’ Adorable

Lady Bunny Amigurumi Pattern

Lady Bunny Amigurumi Pattern
4.5β˜…Rating
5-8 HoursTime Needed
3.2KMade This
βœ‚οΈ

Intermediate Level

Ideal for those with basic crocheting experience, featuring slightly more advanced stitches and techniques to expand your skills.

⏱️

Weekend Treat

Takes 5-7 hours, making it an enjoyable project to finish over a couple of days.

🐰

Whimsical Buddy

Playful characters full of personality, designed to spark imagination and become cherished playtime favorites.

About This Lady Bunny Amigurumi Pattern

Lady Bunny Amigurumi Pattern crochet pattern - detailed view

Perfect for crafters who enjoy storytelling through their work, this bunny looks stunning as a centerpiece in a child's bedroom or as a whimsical addition to a spring-themed mantle display.

Why You'll Love This Lady Bunny Amigurumi Pattern

I honestly fell in love with the tiny details on this oneβ€”the way the little thumb on the paw is shaped and how the dress has that beautiful fullness. It’s one of those projects where every section feels like a mini-achievement, and seeing her hold that little basket of carrots at the end is just the cutest thing ever!

Lady Bunny Amigurumi Pattern step 1 Lady Bunny Amigurumi Pattern step 2 Lady Bunny Amigurumi Pattern step 3 Lady Bunny Amigurumi Pattern step 4

Switch Things Up

There is something about a bunny in a little dress that just makes my heart melt every single time. When I first started designing this pattern, I wanted to capture that feeling of a crisp spring morning in the garden. I spent quite a bit of time perfecting the little basket because I think props really give amigurumi their own story.

I remember making a version of this for a friend's baby shower, and I decided to use a soft lavender for the dress instead of the dark pink. It completely changed the vibe! That's the beauty of crochetβ€”you can take a foundation like this and tweak the colors to match a nursery theme or even a favorite outfit. If you're feeling adventurous, try adding some tiny embroidery flowers directly onto the green shirt or even giving her a little cotton tail using a small pom-pom.

As you work through the torso, don't rush the stuffing process. I always say that stuffing is 50% of the shaping! Take your time to really fill out those hips and the base of the neck so she stands up straight and proud. I can't wait to see your versions! Happy hooking!

Common Mistakes & How to Fix Them

βœ— When joining the legs at Round 22, ensure both feet are pointing perfectly forward; if the join is off by even one stitch, your bunny will end up with a pigeon-toed or twisted stance.βœ— The thumb detail on the arms is quite small, so it's easy to accidentally skip the stitch immediately following the chain-2 loopβ€”keep a close eye on your stitch count there.βœ— For the dress, if you don't work Round 11 strictly in the back loops, you'll lose that distinct ridge that gives the hem its finished, professional look.βœ— When embroidering the sleeping eyes, placing them too high on the head can make the bunny look startled rather than sleepy; aim for Round 16 to keep her looking sweet and calm.

Lady Bunny Amigurumi Pattern

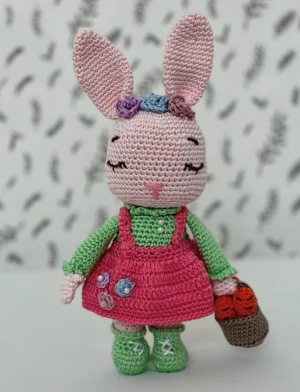
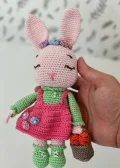
Meet your new favorite springtime project! This precious Lady Bunny isn't just a toy; she's a little character full of personality, from her tiny flower crown down to her custom-made carrot basket. You'll love the way the textures come together, blending soft pinks with vibrant garden greens. Whether you're making her for a nursery shelf or as a special gift for a little one, the process of watching her come to life is truly rewarding. Get your hooks ready for a project that feels like a breath of fresh air.

Intermediate 5-8 Hours

Materials Needed for Lady Bunny Amigurumi Pattern

β€” Main Fabric

  • 01
    Cotton or acrylic blend yarn in Soft Pink for the body and ears
  • 02
    Soft Green yarn for the shirt and boots
  • 03
    Dark Pink yarn for the removable dress
  • 04
    Brown or Smoked yarn for the miniature basket
  • 05
    Orange yarn for the tiny carrots
  • 06
    Small amounts of blue and purple yarn for the floral accents

β€” Tools Required

  • 01
    2.5 mm crochet hook (or size needed to achieve a tight fabric)
  • 02
    Black embroidery thread for the eyes and lashes
  • 03
    Polyester fiberfill stuffing
  • 04
    Tapestry needle for assembly and embroidery
  • 05
    Stitch markers to track rounds
  • 06
    Straight pins for positioning pieces before sewing
  • 07
    Small pearl beads for dress decoration (optional)

Progress Tracker

0% Complete

β€” 1. Legs (Make 2) :

Round 1 :

Start with Soft Pink yarn and work 8 sc into a MR (8)

Round 2 :

Work 2 sc into every stitch around (16)

Round 3 :

Work 5 inc evenly spaced around the circle (21)

Round 4-6 :

sc in each st around (21)

Round 7 :

6 sc, work 5 dec across the next stitches, then 5 sc (16)

Round 8 :

sc around, working 2 dec evenly spaced (14)

Round 9-11 :

sc in each st around (14)

Colour Change :

Switch to Soft Green yarn

Round 12 :

In flo only, sc in each st around (14)

Round 13-21 :

sc in each st around (14)

Info :

Fasten off the first leg. Repeat for the second leg but do not cut the yarn after Round 21.

β€” 2. Torso :

Round 22 :

From the second leg, ch 2 and join to the first leg with a sc. sc around the first leg (14), sc into the 2 ch, sc around the second leg (14), sc into the other side of the 2 ch (32)

Round 23 :

sc in each st around (32)

Round 24-26 :

sc in each st around (32)

Round 27 :

Work 4 inc evenly spaced around the torso (36)

Round 28-35 :

sc in each st around (36)

Round 36 :

Work (4 sc, dec) 6 times (30)

Round 37 :

sc in each st around (30)

Round 38 :

Work (3 sc, dec) 6 times (24)

Round 39 :

sc in each st around (24)

Round 40 :

In flo only, sc in each st around (24)

Round 41 :

In blo only, ch 3 in each st and fasten off to create a ruffled neck edge (24)
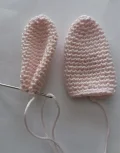
β€” 3. Ears (Make 2) :

Round 1 :

Using Soft Pink, work 6 sc into a MR (6)

Round 2 :

Work (2 sc, inc) twice (8)

Round 3 :

Work (3 sc, inc) twice (10)

Round 4 :

Work (4 sc, inc) twice (12)

Round 5 :

Work (5 sc, inc) twice (14)

Round 6 :

Work (6 sc, inc) twice (16)

Round 7 :

Work (7 sc, inc) twice (18)

Round 8-17 :

sc in each st around (18)

Round 18 :

Work (7 sc, dec) twice (16)

Round 19 :

sc in each st around (16)

Info :

Fasten off leaving a long tail for sewing. Do not stuff the ears.
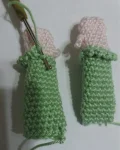
β€” 4. Arms (Make 2) :

Round 1 :

Using Soft Pink, ch 5. Starting in 2nd ch from hook, sc in each ch, then work around the other side of the chain (10)

Round 2-5 :

sc in each st around (10)

Round 6 :

5 sc, ch 2, sl st in 2nd ch from hook, sc in the same base stitch to create a thumb, 4 sc (10)

Round 7 :

sc in each st around (10)

Round 8 :

Work 4 dec evenly spaced (6)

Round 9 :

Work 4 inc evenly spaced (10)

Round 10 :

Work 4 inc evenly spaced (14)

Colour Change :

Switch to Soft Green yarn

Round 11 :

In flo only, sc in each st around (14)

Round 12-22 :

sc in each st around (14)

Info :

Flatten the top of the arm and sc through both layers (7) to close. Fasten off leaving a long tail.

β€” 5. Head :

Round 1 :

Using Soft Pink, work 6 sc into a MR (6)

Round 2 :

Work 2 sc in every st (12)

Round 3 :

Work (1 sc, inc) 6 times (18)

Round 4 :

Work (2 sc, inc) 6 times (24)

Round 5 :

Work (3 sc, inc) 6 times (30)

Round 6 :

Work (4 sc, inc) 6 times (36)

Round 7 :

Work (5 sc, inc) 6 times (42)

Round 8 :

Work (6 sc, inc) 6 times (48)

Round 9-14 :

sc in each st around (48)

Round 15 :

11 sc, (inc, 3 sc) twice, 20 sc, (inc, 3 sc) twice, 11 sc (52)

Round 16 :

sc in each st around (52)

Round 17 :

13 sc, (inc, 3 sc) twice, 22 sc, (inc, 3 sc) twice, 13 sc (56)

Round 18-21 :

sc in each st around (56)

Round 22 :

Work (8 sc, dec) 5 times, then 6 sc (51)

Round 23 :

Work (7 sc, dec) 5 times, then 6 sc (46)

Round 24 :

Work (6 sc, dec) 5 times, then 6 sc (41)

Round 25 :

Work (5 sc, dec) 5 times, then 6 sc (36)

Round 26 :

Work (4 sc, dec) 6 times (30)

Round 27 :

Work (3 sc, dec) 6 times (24)

Round 28 :

Work (2 sc, dec) 6 times (18)

Round 29 :

sc in each st around (18)

Info :

Fasten off and leave a tail for sewing. Stuff the head firmly.

β€” 6. Dress :

Round 1 :

Using Dark Pink, ch 40. Join with a sl st to form a ring (40)

Round 2-4 :

sc in each st around (40)

Round 5 :

Work 2 dc in every st around (80)

Round 6-10 :

dc in each st around (80)

Round 11 :

In blo only, sc in each st around. Fasten off (80)

Straps :

Make 2: ch 30, sc in 2nd ch from hook and each ch across. Fasten off (29)

β€” 7. Basket & Carrots :

Basket R1 :

Using Brown, work 8 sc in MR (8)

Basket R2 :

Work 2 sc in every st (16)

Basket R3 :

Work (1 sc, inc) 8 times (24)

Basket R4 :

Work (2 sc, inc) 8 times (32)

Basket R5 :

In blo only, sc in each st around (32)

Basket R6-11 :

sc in each st around (32)

Handle :

ch 20, sl st to the opposite side of the basket, then sc back along the chain. Fasten off.

Carrot R1 :

Using Orange, work 8 sc in MR (8)

Carrot R2-8 :

sc in each st around (8)

Carrot R9-13 :

Work 1 dec in each round until closed. Fasten off.

β€” 8. Flowers :

Dress Flowers :

Make 3: Work 8 sc into a MR and fasten off.

Coronet :

ch 10. In 4th ch from hook, (3 dc, ch 1, sl st) to make a petal. Repeat in next 2 ch, then sc in remaining ch. Fasten off.

Assembly Instructions

  • Stuff the body and head firmly before sewing the head to the neck opening at Round 41 of the torso.
  • Position the ears on top of the head between Rounds 3 and 7, ensuring they are centered and symmetrical.
  • Sew the arms to the sides of the torso at Round 36, just below the neck ruffle.
  • Embroider the sleeping eyes using black thread on Round 16, roughly 8 stitches apart, and add a small pink nose.
  • Slide the dress onto the bunny and sew the straps over the shoulders, crossing them in the back for stability.
  • Attach the small dress flowers to the front of the skirt and the coronet flowers to the head between the ears.
  • Place the tiny carrots inside the basket and secure the basket handle to one of the bunny's paws.

Important Notes

  • πŸ’‘Maintain a very tight tension throughout the project to ensure the stuffing doesn't show through the stitches.
  • πŸ’‘When working the 'Thumb' on the arm, make sure your ch-2 loop is tight so it doesn't leave a hole in the hand fabric.
  • πŸ’‘You can add a bit of pink blush to the bunny's cheeks using a real cosmetic blush or a fabric marker for extra cuteness.
  • πŸ’‘If the dress feels too loose, you can add a small snap button or a tiny crochet tie at the back of the waist.
  • πŸ’‘For the carrot greens, simply tie a few strands of green yarn to the top of each orange carrot and trim them short.

I hope you enjoyed every stitch of making Lady Bunny! There's something so therapeutic about working on these small, detailed pieces and seeing them all come together into a character with so much charm. She’s the perfect companion for a quiet afternoon of crafting and a wonderful way to celebrate the changing seasons. Don't forget to share your finished bunny with our communityβ€”I absolutely love seeing the different color combinations you all come up with! Happy crocheting, and may your basket always be full of creative joy. 🧢 ✨ 🐰

You ask,

we answer.

FAQs

Can I make the dress permanent instead of removable?

Absolutely! To make it permanent, you can sew the top edge of the dress directly to the torso at Round 30 before attaching the arms and straps.

The bunny's head seems a bit heavy, how can I support it?

If you find the head is wobbling, you can insert a piece of rolled-up felt or a thick plastic straw into the neck and up into the head before closing to act as a 'spine'.

What yarn should I use if I want a larger bunny?

You can easily scale this up by using Worsted weight yarn and a 3.5mm or 4.0mm hook. This will result in a bunny roughly 30-40% larger than the original.

How do I get the 'sleeping' look for the eyes?

Instead of round safety eyes, use a simple 'u' shape embroidery stitch. Start at Round 16, go down one row and across two stitches, then back up to create a gentle curve.