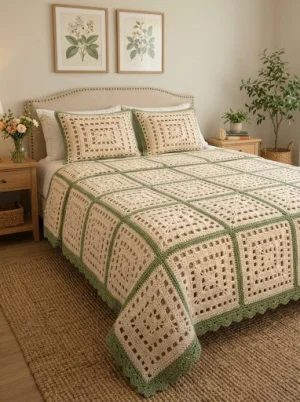
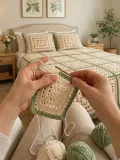
Imagine pulling back a crocheted coverlet that looks like it belongs in a sunny farmhouse guest room, and knowing your own hands made every stitch. This one grows square by square, so it's easy to pick up and put down between other things. You get that happy little moment every time a motif comes off your hook, and the stack slowly turns into something you'll want to show off. Gather a few skeins of cotton, find your comfiest chair, and settle in for a project that rewards your patience with a true heirloom feel.
Progress Tracker
0% Complete
— 1. Square Motif (make 60) :
Info :
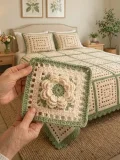
Each finished motif measures approximately 26 cm (10.2 in) square. Make 48 motifs for the bedspread and 12 for the two shams, 60 in total. The finished bedspread, 6 motifs wide and 8 long, measures roughly 162 x 214 cm (64 x 84 in) with the edging, and each sham measures roughly 55 x 81 cm (21.5 x 32 in). To resize the bedspread, add or remove motifs in pairs along a side. Each added pair adds about 52 cm (20.5 in) and 66 sts to that edge, which gives exactly 11 more scallops, so the edging still fits evenly.
Info :
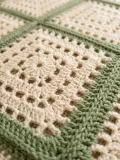
Rounds 1-9 are worked in cream and Round 10 is worked in green. Join every round with a sl st to the top of the beginning ch-3 unless told otherwise, and don't turn your work.
Round 1 :
Ch 4 and join with a sl st to the first ch to form a ring. Ch 3 (counts as dc), 2 dc in ring, ch 2, [3 dc in ring, ch 2] 3 times. Sl st to top of beginning ch-3. (12 dc, 4 ch-2 corner sps)
Round 2 :
Sl st in each of next 2 dc and into next ch-2 sp. Ch 3 (counts as dc), 2 dc, ch 2, 3 dc in same sp. Ch 1, sk next 3 dc. [(3 dc, ch 2, 3 dc) in next ch-2 sp, ch 1, sk next 3 dc] 3 times. Sl st to top of beginning ch-3. (24 dc, 4 corner ch-2 sps, 4 ch-1 sps)
Round 3 :
Sl st in each of next 2 dc and into next ch-2 sp. Ch 3, 2 dc, ch 2, 3 dc in same sp. [Ch 1, 3 dc in next ch-1 sp, ch 1, (3 dc, ch 2, 3 dc) in next corner sp] 3 times. Ch 1, 3 dc in next ch-1 sp, ch 1. Sl st to top of beginning ch-3. (36 dc, 4 corner ch-2 sps, 8 ch-1 sps)
Round 4 :
Sl st in each of next 2 dc and into next ch-2 sp. Ch 3, 2 dc, ch 2, 3 dc in same sp. [Ch 1, 3 dc in next ch-1 sp, ch 1, 3 dc in next ch-1 sp, ch 1, (3 dc, ch 2, 3 dc) in next corner sp] 3 times. Ch 1, 3 dc in next ch-1 sp, ch 1, 3 dc in next ch-1 sp, ch 1. Sl st to top of beginning ch-3. (48 dc, 4 corner ch-2 sps, 12 ch-1 sps)
Round 5 :
Sl st in each of next 2 dc and into next ch-2 sp. Ch 3 (counts as dc), dc in same sp, ch 2, 2 dc in same sp. [Dc in each dc and in each ch-1 sp across the side (15 dc), (2 dc, ch 2, 2 dc) in next corner sp] 3 times. Dc in each dc and in each ch-1 sp across the last side (15 dc). Sl st to top of beginning ch-3. (76 dc, 4 corner ch-2 sps, 19 dc on each side between corners)
Round 6 :
Sl st in next dc and into next ch-2 sp. Ch 3 (counts as dc), ch 2, dc in same sp. [(Ch 1, sk 1 st, dc in next st) 9 times, ch 1, sk 1 st, (dc, ch 2, dc) in next corner sp] 3 times. (Ch 1, sk 1 st, dc in next st) 9 times, ch 1, sk 1 st. Sl st to top of beginning ch-3. (44 dc, 40 ch-1 sps, 4 corner ch-2 sps)
Round 7 :
Sl st into next ch-2 sp. Ch 3 (counts as dc), dc in same sp, ch 2, 2 dc in same sp. [Dc in each dc and in each ch-1 sp across the side (21 dc), (2 dc, ch 2, 2 dc) in next corner sp] 3 times. Dc in each dc and in each ch-1 sp across the last side (21 dc). Sl st to top of beginning ch-3. (100 dc, 4 corner ch-2 sps, 25 dc on each side between corners)
Round 8 :
Sl st in next dc and into next ch-2 sp. Ch 3 (counts as dc), ch 2, dc in same sp. [(Ch 1, sk 1 st, dc in next st) 12 times, ch 1, sk 1 st, (dc, ch 2, dc) in next corner sp] 3 times. (Ch 1, sk 1 st, dc in next st) 12 times, ch 1, sk 1 st. Sl st to top of beginning ch-3. (56 dc, 52 ch-1 sps, 4 corner ch-2 sps)
Round 9 :
Sl st into next ch-2 sp. Ch 3 (counts as dc), dc in same sp, ch 2, 2 dc in same sp. [Dc in each dc and in each ch-1 sp across the side (27 dc), (2 dc, ch 2, 2 dc) in next corner sp] 3 times. Dc in each dc and in each ch-1 sp across the last side (27 dc). Sl st to top of beginning ch-3. Fasten off cream. (124 dc, 4 corner ch-2 sps, 31 dc on each side between corners)
Round 10 (Green) :
Join green with a sl st in any corner ch-2 sp. Ch 1, sc in same sp. [Sc in each of next 31 dc, sc in next corner sp] 3 times. Sc in each of next 31 dc. Sl st to first sc. Fasten off. (128 sc: 31 along each side plus 1 at each corner, so every side has 33 sc from corner to corner)
— 2. Joining the Motifs :
Info :
Weave in the cream and green ends and block every motif to 26 cm (10.2 in) square before joining. Squares of matching size make the seams much easier. Every seam in this pattern is worked in green.
Single Seam :
Place 2 motifs with wrong sides together and the green edges lined up. Join green with a sl st through the BLO of both corner sc. Sl st through the BLO of both layers in each of the next 32 pairs of sts, ending in the corner sc at the far end. Fasten off. (33 sl sts per seam)
Strips :
Using the single seam, join 6 motifs side by side to make 1 strip. Each strip has 5 seams. Make 8 strips for the bedspread. For the shams, make 2 strips of 3 motifs for each sham, which means 2 seams per strip.
Joining Strips :
Lay the 8 strips side by side and join them along their long edges with the same BLO sl st seam. Each strip-to-strip seam runs across 6 motifs, so work 1 sl st in each of the 198 pairs of sts (33 per motif). For each sham, join its 2 strips with 1 seam of 99 sl sts. You'll have 7 strip-to-strip seams for the bedspread.
Info :
Where four motif corners meet, pull the first sl st of each new seam snug so no gap opens at the crossing point. If a tiny hole shows, close it with a few sl sts through the four corner sc.
— 3. Scalloped Edging (Green, bedspread only) :
Info :
The bedspread now has 198 sts along each width edge (6 motifs, 33 sts each) and 264 sts along each length edge (8 motifs, 33 sts each), counting the corner sts at both ends. Both numbers divide evenly by 6, which is why the scallops fit without any fudging.
Round 1 :
Join green with a sl st in a corner st at the start of a width edge. Ch 1, 3 sc in same st. Sc in each of next 196 sts along the width edge, 3 sc in next corner st, sc in each of next 262 sts along the length edge, 3 sc in next corner st, sc in each of next 196 sts, 3 sc in next corner st, sc in each of next 262 sts. Sl st to first sc. (928 sc)
Round 2 :
Sl st in next sc (the middle sc of the corner). 7 dc in same st for the corner shell. [Sk 2 sts, 5 dc in next st, sk 2 sts, sl st in next st] 33 times across the width edge. 7 dc in next corner middle st. [Sk 2 sts, 5 dc in next st, sk 2 sts, sl st in next st] 44 times along the length edge. 7 dc in next corner middle st. Work the bracket 33 times across the width edge. 7 dc in next corner middle st. Work the bracket 44 times along the length edge. Fasten off. (798 dc: 33 scallops on each width edge, 44 on each length edge, and a 7 dc shell at each corner)
— 4. Pillow Sham Front (make 2) :
Info :
Each sham front is 6 motifs joined 2 wide by 3 long (see the Joining the Motifs section). The back is a simple cream fabric envelope, which keeps the sham easy to wash and saves a lot of extra motifs. The finished front measures roughly 55 x 81 cm (21.5 x 32 in) and fits a standard 50 x 75 cm (20 x 30 in) pillow.
Round 1 :
Join green with a sl st in a corner st at the end of a short edge. Ch 1, 3 sc in same st. Sc in each of next 64 sts along the short edge, 3 sc in next corner st, sc in each of next 97 sts along the long edge, 3 sc in next corner st, sc in each of next 64 sts, 3 sc in next corner st, sc in each of next 97 sts. Sl st to first sc. (334 sc)
Round 2 :
Sl st in next sc (the middle sc of the corner). Ch 1, 3 sc in same st. Sc in each of next 66 sts, 3 sc in next corner middle st, sc in each of next 99 sts, 3 sc in next corner middle st, sc in each of next 66 sts, 3 sc in next corner middle st, sc in each of next 99 sts. Sl st to first sc. Fasten off. (342 sc)
Every square you finish is one step closer to a bedroom that feels calm, tidy and a little bit special. 🧶 Take your time, keep a tray of finished motifs where you can admire them, and don't worry if your first few squares aren't perfect, because blocking works wonders. ✨ Once the last scallop is done and the shams are plumped, you'll have a set that looks like it came from a boutique but carries all the love of handmade work. Happy crocheting, and enjoy every cozy stitch! 🧵