About This Crochet Heart Square Bedspread and Pillow Sham Pattern
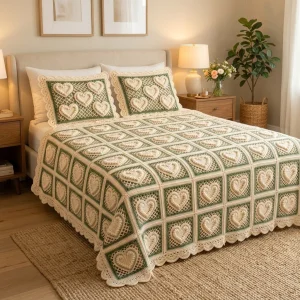
Give it as a wedding or housewarming gift, or keep it for your own guest room. It looks lovely draped over a bed with the shams propped against the pillows.
Ideal for those with basic crocheting experience, featuring slightly more advanced stitches and techniques to expand your skills.
A 10-12 hour project—great for savoring the process over several sessions.
A comforting piece for home or gifts that brings handmade warmth to everyday moments and special occasions.
Give it as a wedding or housewarming gift, or keep it for your own guest room. It looks lovely draped over a bed with the shams propped against the pillows.
I'll be honest, the mesh squares are what sold me. They're so forgiving that I can stitch one while chatting with friends, and then the heart gives me a little burst of shaping to look forward to. There's something deeply satisfying about stacking a pile of finished squares with the hearts still unsewn, like a deck of cards waiting for their moment. And that sage frame? It makes every block look like it was tucked into its own tiny picture frame.

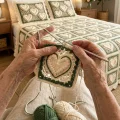
When I first sketched this bedspread, I planned a small cushion cover. Then I made one square, set the heart on top, and I couldn't stop. Three squares later I was already measuring my bed.
Here's the tip that changed my whole experience: make your hearts in batches of ten while you're watching something you don't have to follow closely. The back-loop-only rows are so rhythmic that you stop counting after the third heart, and the notch between the two lobes starts to feel almost automatic. I keep a little bowl on the coffee table and toss each finished heart in, so the pile grows right where I can see it.
Color-wise, I tested a dusty rose frame on one square and it was sweet, almost nursery-like. A deeper forest green gives a moodier, cottagecore look, and a grey-blue frame feels very calm. Whatever you pick, keep the hearts and mesh cream so the raised texture catches the light.
Finally, block everything before joining. Cotton relaxes beautifully with steam and your seams stay perfectly flat.
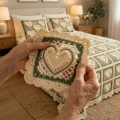
Picture a whole bed wrapped in little cream hearts, each one nestled in a lacy mesh square and framed in soft sage green. This bedspread is built one square at a time, so you can pick it up in tiny pockets of free time and watch it grow into something heirloom-worthy. You'll stitch each square, sew a ridged heart onto the center, join everything into one big blanket, and finish with a ruffled shell edge. Add the two matching pillow shams and your whole bedroom feels calm, pulled together, and a little romantic.
The finished bedspread is approximately 136 x 170 cm (53.5 x 67 in) before the edging, made from 8 squares across and 10 squares down (80 squares). Each finished square is approximately 17 cm (6.7 in). Each pillow sham is approximately 36 x 27 cm (14 x 10.5 in) before the edging. To make the bedspread longer or wider, add squares in pairs. Two extra squares add approximately 34 cm (13.4 in) and add 9 shell repeats to that side in Round 2 of the bedspread edging. Keep both the across count and the down count even so the shell repeats land evenly at the corners. For a queen size coverlet that drapes, 10 across and 12 down gives approximately 170 x 204 cm (67 x 80 in). Gauge varies, so make and block one square first.
With cream, ch 22. Sc in 2nd ch from hook and in each ch across (21).
Ch 3 (counts as dc), turn. (Ch 1, skip next st, dc in next st) 10 times (11 dc, 10 ch-1 sp, 21 sts).
Ch 3 (counts as dc), turn. (Ch 1, skip next ch-1 sp, dc in next dc) 9 times, ch 1, skip next ch-1 sp, dc in 3rd ch of beg ch-3 (11 dc, 10 ch-1 sp, 21 sts). Repeat this row 10 times in total for Rows 3 through 12.
Ch 1, turn. Sc in each dc and in each ch-1 sp across, ending with sc in 3rd ch of beg ch-3 (21). Fasten off cream.
Hold the mesh with the RS facing you and the foundation chain at the bottom. A row end means the edge of each dc row, so work into the dc post or turning chain. Place a stitch marker in each corner as you go so the corner groups stay in the right place.
With RS facing, join green with a sl st in the first st of Row 13 (a top corner). Ch 1, 3 sc in same st (corner). Sc in each of the next 19 sts across the top. 3 sc in the last st of Row 13 (corner). Along the side, work (2 sc in next row end, sc in next row end) 3 times, then 2 sc in each of the next 5 row ends (19 sc). Along the bottom, work 3 sc in the first free loop of the foundation ch (corner), sc in each of the next 19 free loops, 3 sc in the last free loop (corner). Along the last side, work the same 19 sc as the first side. Sl st to first sc (88 sc: four corners of 3 sc and four sides of 19 sc).
Ch 1, sc in each sc around, working 3 sc in the middle sc of each 3-sc corner group. Sl st to first sc (96 sc). Each corner group now has 5 sts. Fasten off green.
Join cream with a sl st in any st. Ch 1, sc in each st around, working 3 sc in the middle (3rd) st of each 5-st corner group. Sl st to first sc (104 sts: four corner groups of 7 sts and four sides of 19 sts). Fasten off and leave the tail to weave in.
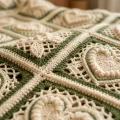
The heart is worked flat in cream, starting at the bottom point and widening, then finished with one lobe at a time. From Row 2 onward work every st in BLO, which creates the raised, ridged texture. Ch 1 at the start of each row does not count as a st. The finished heart is approximately 7 cm wide and 6.5 cm tall (2.8 x 2.6 in).
Ch 2. 2 sc in 2nd ch from hook (2).
Ch 1, turn. 2 sc BLO in each st (4).
Ch 1, turn. 2 sc BLO in first st, sc BLO in next 2 sts, 2 sc BLO in last st (6).
Ch 1, turn. 2 sc BLO in first st, sc BLO in next 4 sts, 2 sc BLO in last st (8).
Ch 1, turn. 2 sc BLO in first st, sc BLO in next 6 sts, 2 sc BLO in last st (10).
Ch 1, turn. 2 sc BLO in first st, sc BLO in next 8 sts, 2 sc BLO in last st (12).
Ch 1, turn. 2 sc BLO in first st, sc BLO in next 10 sts, 2 sc BLO in last st (14).
Ch 1, turn. 2 sc BLO in first st, sc BLO in next 6 sts. Leave the remaining 7 sts unworked (8).
Ch 1, turn. Sc2tog BLO over first 2 sts, sc BLO in next 5 sts, 2 sc BLO in last st (8).
Ch 1, turn. 2 sc BLO in first st, sc BLO in next 5 sts, sc2tog BLO over last 2 sts (8).
Ch 1, turn. Sc2tog BLO over first 2 sts, sc BLO in next 4 sts, sc2tog BLO over last 2 sts (6).
Ch 1, turn. Sc2tog BLO over first 2 sts, sc BLO in next 2 sts, sc2tog BLO over last 2 sts (4).
Ch 1, turn. (Sc2tog BLO over next 2 sts) twice (2). Fasten off.
With the same side facing as for the first lobe's Row 8, rejoin cream with a sl st BLO in the 8th st of Row 7, which is the first unworked st beside the first lobe. Ch 1, sc BLO in same st and in each of the next 5 sts, 2 sc BLO in last st (8).
Ch 1, turn. 2 sc BLO in first st, sc BLO in next 5 sts, sc2tog BLO over last 2 sts (8).
Ch 1, turn. Sc2tog BLO over first 2 sts, sc BLO in next 5 sts, 2 sc BLO in last st (8).
Ch 1, turn. Sc2tog BLO over first 2 sts, sc BLO in next 4 sts, sc2tog BLO over last 2 sts (6).
Ch 1, turn. Sc2tog BLO over first 2 sts, sc BLO in next 2 sts, sc2tog BLO over last 2 sts (4).
Ch 1, turn. (Sc2tog BLO over next 2 sts) twice (2). Fasten off and leave a long tail for sewing the heart to its square.
Lay out the squares 8 across and 10 down, with all hearts pointing the same way. Each side of a square has 27 sts, counted from one corner center st to the next. A corner center st is the middle st of a 7-st corner group, and it is also the st where the three sc were worked in Round 3. Use cream and a loose tension for every join.
Place 2 squares with RS together. Insert the hook through the BLO of both squares and sl st across all 27 sts of the side, from corner center to corner center. Add squares in the same way until you have a strip of 8 squares (7 joins). Make 10 strips in total.
Place 2 strips with RS together, with the long sides aligned. Sl st through the BLO of both layers along the whole long side, working 27 sts for each of the 8 squares and joining the corner centers where squares meet (216 sl sts per seam). Continue until all 10 strips are joined (9 seams). Fasten off and weave in the tails.
Work with the RS facing and keep turning the corners without turning the work. A shell is dc, (ch 1, dc) 6 times, all in the same st (7 dc and 6 ch-1 sp). Corner centers are the corner center sts of the four outer corner squares, where you will work 3 sc in Round 1.
Join cream with a sl st in any outer corner center st. Ch 1, 3 sc in same st. Sc in each st along the edge to the next corner center, which is 214 sts along the top and bottom edges and 268 sts along each side edge. Work 3 sc in each corner center st. Sl st to first sc (976 sc).
Sl st in the middle sc of the first corner group. Ch 3 (counts as dc), (ch 1, dc) 6 times in same st for the first corner shell. Along the first top edge: (skip 2 sts, shell in next st, skip 2 sts, sc in next st) 36 times. Shell in the next corner center st. Along the first side edge: (skip 2 sts, shell in next st, skip 2 sts, sc in next st) 45 times. Shell in the next corner center st. Along the bottom edge: (skip 2 sts, shell in next st, skip 2 sts, sc in next st) 36 times. Shell in the next corner center st. Along the last side edge: (skip 2 sts, shell in next st, skip 2 sts, sc in next st) 45 times. Sl st to 3rd ch of beg ch-3 (166 shells, including 4 corner shells, and 162 sc between them). Fasten off and weave in the tail.
Each sham front is a wide mesh panel with a green frame and a shell edge. It is made as a decorative front that you stitch onto a plain pillow cover. To make a larger sham, add 2 chains to the foundation chain for every extra mesh square, and keep the shell counts in the edging in line with the multiples given there.
With cream, ch 52. Sc in 2nd ch from hook and in each ch across (51).
Ch 3 (counts as dc), turn. (Ch 1, skip next st, dc in next st) 25 times (26 dc, 25 ch-1 sp, 51 sts).
Ch 3 (counts as dc), turn. (Ch 1, skip next ch-1 sp, dc in next dc) 24 times, ch 1, skip next ch-1 sp, dc in 3rd ch of beg ch-3 (26 dc, 25 ch-1 sp, 51 sts). Repeat this row 20 times in total for Rows 3 through 22.
Ch 1, turn. Sc in each dc and in each ch-1 sp across, ending with sc in 3rd ch of beg ch-3 (51). Fasten off cream.
With RS facing, join green with a sl st in the first st of Row 23. Ch 1, 3 sc in same st (corner). Sc in each of the next 49 sts. 3 sc in the last st of Row 23 (corner). Along the side, work (2 sc in next row end, sc in next row end) 8 times, then 2 sc in each of the next 5 row ends (34 sc). Along the bottom, work 3 sc in the first free loop of the foundation ch (corner), sc in each of the next 49 free loops, 3 sc in the last free loop (corner). Along the last side, work the same 34 sc as the first side. Sl st to first sc (178 sc).
Ch 1, sc in each sc around, working 3 sc in the middle sc of each 3-sc corner group. Sl st to first sc (186 sc). Fasten off green.
Join cream with a sl st in any st. Ch 1, sc in each st around, working 3 sc in the middle (3rd) st of each 5-st corner group. Sl st to first sc (194 sts: four corner groups of 7 sts, 49 sts along each top and bottom, and 34 sts along each side).
Sl st in the middle (4th) st of the first 7-st corner group. Ch 3 (counts as dc), (ch 1, dc) 6 times in same st for the first corner shell. Along the top: (skip 2 sts, shell in next st, skip 1 st, sc in next st) 11 times. Shell in the next corner center st. Along the side: (skip 2 sts, shell in next st, skip 1 st, sc in next st) 8 times. Shell in the next corner center st. Along the bottom: (skip 2 sts, shell in next st, skip 1 st, sc in next st) 11 times. Shell in the next corner center st. Along the last side: (skip 2 sts, shell in next st, skip 1 st, sc in next st) 8 times. Sl st to 3rd ch of beg ch-3 (42 shells including 4 corner shells, and 38 sc between them). Fasten off and weave in the tail.
Every heart you finish is one more little reason to smile, and before you know it a pile of squares turns into a bed you'll want to show off. Take your time, enjoy the easy rhythm of the mesh and the quiet charm of each shell edge, and let this become the piece your guests ask about. Pour a cup of tea, lay out your cream and sage yarn, and start with a single square. The rest follows one happy stitch at a time. 🧶✨🧵
You can, but the pattern was designed around DK weight cotton and a hook of about 3.5 mm. Worsted weight makes each square closer to 20 cm or more, so the same 8 by 10 layout becomes much bigger and uses more yarn. Make one square and block it first, then change the number of squares to reach your bed size.
For a coverlet that drapes, use 10 squares across and 12 down (120 squares), which gives roughly 170 x 204 cm (67 x 80 in) with squares near 17 cm. Keep both numbers even so the shell repeats in the edging land evenly at the corners.
Making the heart separately lets you work it in the back loops only, which gives the ridged raised texture, and the mesh underneath stays open and lacy. Sewing also lets you place each heart exactly on stitch 11, so every square matches.
Each square is simple dc and ch-1 mesh, and the heart only needs increases and sc2tog decreases. If you can read short rows, you can do it. The hardest part is staying consistent over 80 squares and counting the edging, so keep markers in the corners.
Yes. Make four squares and join them in a 2 by 2 block for a small cushion front, or make a single square with a heart and add the shell edging. Use the sham edging counts if the sides match the sham, or work an sc round and add shells every 5 sts.
