🧢 Beautiful ✨ Detailed πŸ’ Adorable

Kimono Baby Kyoko Amigurumi Pattern

Kimono Baby Kyoko Amigurumi Pattern
3.9β˜… Rating
12-15 Hours Time Needed
2.8K Made This
βœ‚οΈ

Advanced Level

Designed for experienced knitters, these patterns involve intricate designs and complex techniques to challenge and inspire.

⏱️

Slow & Steady

A 10-12 hour projectβ€”great for savoring the process over several sessions.

🧸

Cute Companion

An adorable friend to cherish, handcrafted with love to bring comfort and joy for years to come.

About This Kimono Baby Kyoko Amigurumi Pattern

This intricate Kimono Baby Kyoko pattern brings Japanese tradition to life through crochet artistry. The pattern includes detailed instructions for creating a complete doll with authentic clothing pieces, from the delicate haneri collar to the decorative obi back piece. With careful attention to cultural details like the kanzashi flower hairpiece and traditional footwear, this pattern offers an immersive crafting experience that celebrates Japanese aesthetic beauty.

Kimono Baby Kyoko Amigurumi Pattern crochet pattern - detailed view of completed project

The finished doll measures approximately 19cm tall and features wire-reinforced arms for posability. Each clothing piece is worked separately and assembled to create layers of authentic traditional dress.

Why You'll Love This Kimono Baby Kyoko Amigurumi Pattern

I absolutely love how this pattern combines cultural education with crochet artistry. The level of detail in the traditional Japanese clothing is stunning, and I find myself learning about kimono construction while creating each piece. What I enjoy most is the modular approach where you craft each garment separately, allowing you to really appreciate the layers and authenticity of traditional dress. The embroidered flower details on the kimono add such elegance, and creating the tiny accessories like the zori sandals and kanzashi hairpiece feels incredibly rewarding. This pattern has taught me so much about Japanese culture while expanding my crochet skills.

Kimono Baby Kyoko Amigurumi Pattern step 1 - construction progress Kimono Baby Kyoko Amigurumi Pattern step 2 - assembly progress Kimono Baby Kyoko Amigurumi Pattern step 3 - details and accessories Kimono Baby Kyoko Amigurumi Pattern step 4 - final assembly and finishing

Switch Things Up

I love how versatile this Kimono Baby Kyoko pattern is for personal customization. While the traditional light blue kimono with pink obi is stunning, I often experiment with different color combinations to create unique variations. You could try a deep burgundy kimono with gold accents for an autumn feel, or soft pastels for a spring celebration theme.

The hair color and style offer another wonderful opportunity for creativity. I've made versions with darker brown hair for a more traditional look, and even experimented with lighter auburn shades. You could also adjust the bang length or add more hair strands for fuller styling options.

Consider changing the embroidered flower designs on the kimono to reflect different seasons or personal preferences. Cherry blossoms, chrysanthemums, or plum blossoms would all be beautiful alternatives that maintain the Japanese aesthetic while adding your personal touch.

The accessories are perfect for mixing and matching too. I sometimes create multiple obi belts in different colors so the doll can have wardrobe changes. You could also experiment with different kanzashi designs using various flower shapes and colors.

For a more modern interpretation, try working with metallic threads for the embroidery or adding tiny beads to the kimono for extra sparkle. This works especially well if you're creating a doll for display rather than play.

Common Mistakes & How to Fix Them

βœ— Forgetting to leave long yarn tails for sewing pieces together, which makes assembly difficult and creates weak attachment points βœ— Stuffing the arms when instructions specify wire only, resulting in stiff limbs that don't pose correctly βœ— Missing color changes in the body and kimono sections, disrupting the traditional garment appearance and layering effect βœ— Skipping the BLO and FLO instructions which are crucial for creating proper fabric texture and garment draping βœ— Not checking left versus right sleeve orientation before attaching, leading to reversed kimono closure that looks incorrect

Kimono Baby Kyoko Amigurumi Pattern

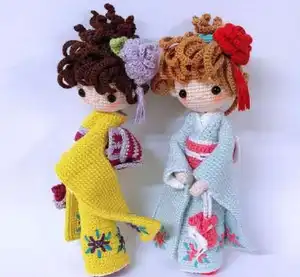
Create an enchanting Japanese-inspired amigurumi doll with this detailed Kimono Baby Kyoko pattern. Standing at 19cm tall, this charming character features authentic traditional Japanese clothing including a beautiful kimono with embroidered flowers, an obi belt with decorative back piece, tabi socks, and zori sandals. Complete with an elegant kanzashi hair accessory and a sweet fuguro pouch, every detail has been thoughtfully designed to capture the essence of Japanese culture. Perfect for those who love cultural crafts and detailed character work.

Advanced 12-15 Hours

Materials Needed for Kimono Baby Kyoko Amigurumi Pattern

β€” Main Fabric

  • 01
    4 ply acrylic yarn or 3# lace yarn in skin tone
  • 02
    4 ply acrylic yarn in white color
  • 03
    4 ply acrylic yarn in light blue color
  • 04
    4 ply acrylic yarn in pink color
  • 05
    4 ply acrylic yarn in red color
  • 06
    4 ply acrylic yarn in dark blue color
  • 07
    4 ply acrylic yarn for hair color

β€” Tools Required

  • 01
    1.75mm crochet hook
  • 02
    6mm black safety eyes
  • 03
    Non-woven fabric
  • 04
    Wire (both thick and thin gauges)
  • 05
    Wire 0.89mm or 1mm for arms
  • 06
    Hard plastic card for shoe support
  • 07
    Buttons for obiage
  • 08
    Fabric pieces
  • 09
    Polyester stuffing
  • 10
    Tapestry needle
  • 11
    Scissors
  • 12
    Stitch markers
  • 13
    Pins for assembly

Progress Tracker

0% Complete

β€” Arm (Make 2) :

Round 1 :

Work in Spiral: Magic ring 6 sc (6) - Skin color

Round 2-20 :

6 sc (6)

Info :

Fasten off and leave a LONG end for sewing armpit hole. Only put wire in arms - no stuffing

β€” Leg (Make 2) :

Round 1 :

Work in Spiral: Magic ring 6 sc (6) - Skin color

Round 2-15 :

6 sc (6)

Round 16 :

5 sc, inc (7)

Round 17-18 :

7 sc (7)

Round 19 :

3 sc, inc, 3 sc (8)

Round 20-21 :

8 sc (8)

Round 22 :

7 sc, inc (9)

Round 23 :

4 sc, inc, 4 sc (10)

Round 24 :

10 sc (10) - Fasten off

β€” Body :

Info :

From now on make a sl st and 1 ch at the end of each row. Find the middle point on the inside of the legs and make 3 ch to join the right leg to left leg at the back

Round 25 :

10 sc, 3 sc, 10 sc, 3 sc, sl st, 1 ch (26) - White color

Round 26 :

26 sc, sl st, 1 ch (26)

Round 27 :

24 sc, dec, sl st, 1 ch (25)

Round 28 :

4 sc, dec, 12 sc, dec, 5 sc, sl st, 1 ch (23)

Round 29 :

Change color BLO 21 sc, dec, sl st, 1 ch (22) - Skin color

Round 30 :

4 sc, dec, 10 sc, dec, 4 sc, sl st, 1 ch (20)

Round 31 :

3 sc, dec, 10 sc, dec, 3 sc, sl st, 1 ch (18)

Round 32 :

(sc, dec) x 6, sl st, 1 ch (12)

Round 33-41 :

12 sc, sl st, 1 ch (12)

Round 42 :

3 sc, (add ARM: sc, dec, 3 sc), 6 sc, (add ARM: 3 sc, dec, sc), 3 sc, sl st, 1 ch (22)

Round 43 :

dec, 20 sc, sl st, 1 ch (21)

Round 44 :

(sc, dec) x 7, sl st, 1 ch (14) - Put in wire and stuff

Round 45 :

7 dec, sl st, 1 ch (7)

Round 46-47 :

7 sc, sl st, 1 ch (7)

Round 48 :

inc, 6 sc, sl st, 1 ch (8)

β€” Head :

Round 49 :

FLO 8 inc, sl st, 1 ch (16) - Skin color

Round 50 :

(sc, inc) x 8, sl st, 1 ch (24)

Round 51 :

(sc, inc, sc) x 8, sl st, 1 ch (32)

Round 52 :

(3 sc, inc) x 8, sl st, 1 ch (40)

Round 53 :

(5 sc, inc, 4 sc) x 4, sl st, 1 ch (44)

Round 54-63 :

44 sc, sl st, 1 ch (44)

Info :

Eye position should be placed as shown in reference pictures

Round 64 :

10 sc, dec, 20 sc, dec, 10 sc, sl st, 1 ch (42)

Round 65 :

(5 sc, dec) x 6, sl st, 1 ch (36)

Round 66 :

(2 sc, dec, 2 sc) x 6, sl st, 1 ch (30)

Round 67 :

(3 sc, dec) x 6, sl st, 1 ch (24)

Round 68 :

(sc, dec, sc) x 6, sl st, 1 ch (18) - Stuff

Round 69 :

(sc, dec) x 6, sl st, 1 ch (12)

Round 70 :

6 dec, sl st (6) - Stuff and fasten off

β€” Ear (Make 2) :

Round 1 :

Magic ring 4 sc, sl st (5) - Do not join. Fasten off and leave a LONG end - Skin color

β€” Nose :

Info :

Please see reference pictures for nose construction - Skin color

β€” Hair Cap :

Info :

Make a sl st and 1 ch at the end of each round

Round 1 :

Magic ring 3 ch, 11 dc, sl st, 1 ch (12) - 3 ch counts as 1 dc - Hair color

Round 2 :

3 ch, dc, 11 dc inc, sl st, 1 ch (24)

Round 3 :

3 ch, dc inc, (dc, dc inc) x 11, sl st, 1 ch (36)

Round 4 :

3 ch, dc, dc inc, (2 dc, dc inc) x 11, sl st, 1 ch (48)

Round 5 :

48 dc, sl st, 1 ch (48)

Round 6 :

48 hdc, sl st (48) - DO NOT fasten off and continue

Info :

Please see HAIR CHART for reference

β€” Hair Strands (1-16) :

Strands 1-16 :

26 ch, turn to 2nd st, sl st, 15 sc, 9 hdc, skip 1 st and make sl st at reverse direction (16 strands total)

β€” Hair Strands (17-24) :

Strands 17-24 :

26 ch, turn to 2nd st, sl st, 15 sc, 9 hdc, skip 1 st and make sl st at outside stitch (8 strands total) - DO NOT fasten off and continue

β€” Hair Bangs :

Info :

Make a sl st to next inside stitch at the end of each round

Bang 1 :

24 ch, turn to 2nd st, 23 sl st (1 strand)

Bang 2 :

24 ch, turn to 2nd st, 23 sl st (1 strand)

Bang 3 :

12 ch, turn to 2nd st, 11 sl st (1 strand)

Bang 4 :

13 ch, turn to 2nd st, 12 sl st (1 strand)

Bang 5 :

14 ch, turn to 2nd st, 13 sl st (1 strand)

Bang 6-7 :

2 hair strands in each st: 14 ch, turn to 2nd st, 13 sl st (2 strands)

Bang 8-9 :

2 hair strands in each st: 15 ch, turn to 2nd st, 14 sl st (2 strands)

Bang 10-11 (Middle point) :

2 hair strands in each st: 16 ch, turn to 2nd st, 15 sl st (2 strands)

Bang 12-13 :

2 hair strands in each st: 15 ch, turn to 2nd st, 14 sl st (2 strands)

Bang 14-15 :

2 hair strands in each st: 14 ch, turn to 2nd st, 13 sl st (2 strands)

Bang 16 :

14 ch, turn to 2nd st, 13 sl st (1 strand)

Bang 17 :

13 ch, turn to 2nd st, 12 sl st (1 strand)

Bang 18 :

12 ch, turn to 2nd st, 11 sl st (1 strand)

Bang 19 :

26 ch, turn to 2nd st, 25 sl st (1 strand)

Bang 20 :

26 ch, turn to 2nd st, 25 sl st (1 strand) - Fasten off

Info :

Tidy and roll the bangs inward WITHOUT glue

β€” Haneri (Collar Insert) :

Info :

Leave LONG LONG yarn and start Work in Rows - White color

Row 1 :

31 ch, turn to 2nd st, 30 sc, 1 ch and turn (30)

Row 2 :

sc, skip 1 st, 26 sc, skip 1 st, 1 sc, 1 ch and turn (28)

Row 3 :

sc, skip 1 st, 24 sc, skip 1 st, 1 sc, 1 ch and turn (26)

Row 4 :

sc, skip 1 st, 22 sc, skip 1 st, 1 sc, 1 ch and turn (24)

Final :

Crochet downward 3 sc - Fasten off and leave a LONG end

β€” Kimono :

Row 1 :

Work in Rows: 19 ch, turn to 2nd st, (sc, inc, sc) x 6, 1 ch and turn (24) - Light Blue color

Row 2 :

sc, inc, 20 sc, inc, sc, 1 ch and turn (26)

Row 3 :

sc, inc, 22 sc, inc, sc, 1 ch and turn (28)

Row 4 :

sc, inc, 24 sc, inc, sc, 1 ch and turn (30)

Row 5 :

sc, inc, 2 sc, 3 ch, skip 7 sts, 8 sc, 3 ch, skip 7 sts, sc, 2 inc, sc, 1 ch and turn (25)

Row 6-11 :

25 sc, 1 ch and turn (25)

Row 12 :

25 sc, 3 ch, turn to 2nd st (28)

Row 13 :

3 sc, (inc, 2 sc) x 8, 1 ch and turn (35)

Row 14 :

35 sc, 1 ch and turn (35)

Row 15 :

3 sc, (inc, 3 sc) x 8, 1 ch and turn (43)

Row 16-51 :

43 sc, 1 ch and turn (43)

Row 52 :

43 sc (43) - Fasten off

Row 53 :

BLO 43 sl st (43) - Fasten off - White color

Info :

Please see reference pictures to ensure the left (B) and right (A) for sleeves

β€” Sleeve Left (B) :

Info :

Work in Rounds. Start crochet from middle of inner - Light Blue color

Round 1-2 :

12 sc, sl st, 1 ch (12)

Round 3 :

11 sc, inc, sl st, 1 ch (13)

Round 4 :

13 sc, sl st, 1 ch (13)

Round 5 :

inc, 12 sc, sl st, 1 ch (14)

Round 6 :

33 ch, turn to 2nd st, 32 sc, 14 sc, sl st, 1 ch (46)

Round 7-18 :

32 sc + 32 sc + 14 sc, sl st, 1 ch (78)

Round 19 :

32 sc + 32 sc + 14 sc, sl st (78) - Fasten off and leave a LONG LONG end

Cuff :

BLO 22 dc (22) - Fasten off - White color

β€” Sleeve Right (A) :

Info :

Work in Rounds. Start crochet from middle of inner - Light Blue color

Round 1-2 :

12 sc, sl st, 1 ch (12)

Round 3 :

11 sc, inc, sl st, 1 ch (13)

Round 4 :

13 sc, sl st, 1 ch (13)

Round 5 :

inc, 12 sc, sl st, 1 ch (14)

Round 6 :

14 sc, 33 ch, turn to 2nd st, 32 sc, sl st, 1 ch (46)

Round 7-18 :

32 sc + 32 sc + 14 sc, sl st, 1 ch (78)

Round 19 :

32 sc + 32 sc + 14 sc, sl st (78) - Fasten off and leave a LONG LONG end

Cuff :

BLO 22 dc (22) - Fasten off - White color

Info :

IMPORTANT NOTE: Crochet the cuff and embroidery before sew the sleeves

β€” Collar :

Row 1 :

1 ch, 7 hdc, crochet up 7 hdc, 4 hdc inc, 7 hdc, crochet down 14 hdc, sl st (44) - Fasten off - Light Blue color

Row 2 :

Crochet loosely BLO 44 sl st along the row 1 (44) - Fasten off - White color

β€” Obiage (Sash Support) :

Row 1 :

Work in Rows: 28 ch, turn to 2nd st, 27 sc, 1 ch and turn (27) - White color

Row 2-6 :

27 hdc, 1 ch and turn (27)

Row 7 :

27 sc, crochet down sc, 7 ch, 6 sc, 7 ch, sc, sl st (27 + 21) - Fasten off

β€” Obi (Main Belt) :

Info :

Leave LONG yarn for sew and join the obiage and start - Pink color

Row 1 :

Work in Rows: 32 ch, turn to 2nd st, 31 sc, 1 ch and turn (31)

Row 2 :

31 sc, 1 ch and turn (31)

Row 3 :

FLO 31 sc, 1 ch and turn (31)

Row 4 :

31 sc, 1 ch and turn (31)

Row 5 :

FLO 31 sc, 1 ch and turn (31)

Row 6 :

31 sc, 1 ch and turn (31)

Row 7 :

FLO 31 sc, 1 ch and turn (31)

Row 8 :

31 sc (31) - Fasten off and leave a LONG end

Info :

Sew the Obi to middle of the Obiage. Sew two buttons to Obiage

β€” Obijime (Cord Belt) :

Cord :

130 ch (130) - Fasten off - White color

β€” Obi Back (Decorative Back Piece) :

Row 1 :

Work in Rows: 56 ch, turn to 2nd st, 55 sc, 1 ch and turn (55) - White color

Row 2-3 :

Change color 55 sc, 1 ch and turn (55) - Pink color

Row 4-5 :

Change color 55 sc, 1 ch and turn (55) - White color

Row 6-7 :

Change color 55 sc, 1 ch and turn (55) - Pink color

Row 8 :

Change color 55 sc, 1 ch, crochet round the whole circumference 7 sc, 3sc, 53 sc, 3sc, 6 sc, 3sc, 53 sc, inc, sl st (185) - Fasten off - White color

β€” Embroidery :

Decoration :

Flower embroider on Kimono and sleeves (8 flowers total) - Pink and Dark Blue colors. See reference pictures and chart

β€” Tabi (Socks - Make 2) :

Round 1 :

Work in Rounds: 5 ch, turn to 2nd st, 3 sc, 3sc, 3 sc, sl st, 1 ch (9) - White color

Round 2 :

inc, 2 sc, 3 inc, 2 sc, inc, sl st, 1 ch (14)

Round 3 :

BLO 14 sc, sl st, 1 ch (14)

Round 4 :

4 sc, 3 hdc dec, 4 sc, sl st, 1 ch (11)

Round 5-7 :

11 sc, sl st, 1 ch (11)

Round 8 :

11 sc, sl st (11) - Fasten off

β€” Zori (Sandals - Make 2) :

Round 1 :

Work in Rounds: 5 ch, turn to 2nd st, 3 sc, 3sc, 3 sc, sl st, 1 ch (9) - Red color

Round 2 :

inc, 2 sc, 3 inc, 2 sc, inc, sl st (14)

Round 3 :

Put in shoe support, join the 3 dec: crochet loosely BLO + FLO 14 sl st (14) - Fasten off and leave a LONG LONG end for Zori string

β€” Fuguro (Small Pouch) :

Round 1 :

Magic Ring 8 sc, sl st, 1 ch (8) - Pink color

Round 2 :

7 hdc inc, hdc, sl st, 1 ch (15)

Round 3 :

15 sc, sl st, 1 ch (15)

Round 4 :

3 ch, 14 dc, sl st, 1 ch (15) - 3 ch counts as 1 dc

Round 5 :

15 sc, sl st, 1 ch (15)

Round 6 :

(2 sc, 2 ch, skip 1 st) x 5, sl st, 1 ch (15) - 2 ch counts as 1 st

Round 7 :

(3 ch, sc) x 15, sl st (76) - Fasten off

String :

80 ch (80) - Fasten off - White color

β€” Kanzashi Flower (Hair Ornament) :

Row 1 :

Work in Rows: 50 ch, turn to 8th st, dc, (2 ch, skip 2 sts, dc) x 14, 1 ch and turn (43) - Red color

Row 2 :

(Crochet in hole 5 dc, sl st) x 15 (90) - Fasten off

β€” Leaf (Make 2) :

Round 1 :

Work in Rounds: 10 ch, turn to 2nd st, 2 sc, 2 hdc, dc, dc inc, dc, hdc, (sc, sc with 3 ch and sl st in same st, sc), hdc, dc, dc inc, dc, 2 hdc, 2 sc, sl st (21) - Fasten off - Dark Blue color

β€” Tassel :

Info :

See reference pictures for tassel construction - Red color

Assembly Instructions

  • Sew ears to sides of head between rounds 54-56, positioning them symmetrically on each side.
  • Attach nose to center of face using embroidery thread, referencing the provided pictures for proper placement and shaping.
  • Place 6mm safety eyes between rounds 13-14 of the head, separated by approximately 4 stitches.
  • Wrap and secure haneri (white collar insert) around the neckline of the kimono, ensuring it sits properly before sewing.
  • Dress the doll in kimono following the step-by-step wearing instructions provided in reference pictures, layering pieces correctly.
  • Attach left and right sleeves to kimono armholes, making sure to match correct sides (A and B) as indicated in pattern.
  • Secure obiage around waist, then attach obi (pink belt) to center of obiage, and add buttons as decoration.
  • Tie obijime cord around the obi, then attach decorative obi back piece to complete the traditional belt ensemble.
  • Put tabi socks on feet first, then slide on zori sandals and create straps using the long yarn tail left from construction.
  • Position hair cap on head and secure with pins before sewing, then style bangs by rolling them inward without glue.
  • Attach kanzashi flower ornament with leaves and tassel to side of hair as a decorative hair accessory.
  • Thread white string through fuguro pouch holes and attach to doll's hand or obi for final authentic detail.

Important Notes

  • πŸ’‘Use stitch markers to keep track of rounds, especially during the complex clothing construction and color changes throughout the kimono pieces
  • πŸ’‘Leave extra long yarn tails when fastening off pieces that need to be sewn together, as assembly requires secure attachment points
  • πŸ’‘Pay careful attention to BLO and FLO instructions as they create the texture and proper draping essential for authentic kimono appearance
  • πŸ’‘Verify left versus right orientation for sleeves before attaching them to the kimono to ensure proper traditional garment closure
  • πŸ’‘Complete all embroidery on kimono and sleeve pieces before sewing them together for easier stitching and better detail work
  • πŸ’‘Insert wire into arms only without stuffing to allow for posing and natural movement of the doll's limbs
  • πŸ’‘Reference the provided pictures frequently during assembly, especially for cultural elements like kimono layering and obi placement
  • πŸ’‘Stuff the body and head firmly but evenly to maintain the doll's shape while ensuring the wire framework remains properly positioned

This exquisite Kimono Baby Kyoko pattern celebrates the beauty of Japanese traditional dress through intricate crochet work. Every detail, from the delicate haneri collar to the elaborate obi back piece, has been thoughtfully designed to honor authentic kimono construction. The pattern includes complete instructions for creating not just the doll, but an entire wardrobe of traditional accessories including tabi socks, zori sandals, and a stunning kanzashi hair ornament. This project offers both a creative challenge and a cultural learning experience that will result in a treasured keepsake. 🧢 Happy crocheting! 🎌✨

You ask,

we answer.

FAQs

What skill level is required for this pattern?

This is an advanced pattern recommended for experienced crocheters. It involves intricate colorwork, detailed clothing construction, multiple small accessories, and requires understanding of various techniques including working in rows and rounds, BLO/FLO stitching, and embroidery.

Can I use different yarn weights for this pattern?

While the pattern specifies 4 ply acrylic or 3# lace yarn with a 1.75mm hook, you can adjust yarn weight, but be aware this will change the finished size. If using heavier yarn, increase your hook size accordingly and expect a larger doll. Always maintain consistent tension for best results.

How do I attach the wire to the arms without stuffing them?

Cut wire to the appropriate length (slightly shorter than the arm), insert it through the center of the crocheted arm piece, and secure the ends by bending them into small loops. This allows the arms to be posed while keeping them lightweight and flexible.

What is the best way to embroider the flowers on the kimono?

Use the provided charts as reference and work the embroidery with a tapestry needle and matching yarn colors. Create the eight flowers using pink and dark blue, following the pictures for placement. Surface embroidery works best - don't pull stitches too tight to avoid puckering the fabric.

How do I properly layer the kimono pieces on the doll?

Follow the step-by-step wearing instructions in the reference pictures. Start with the white haneri at the neckline, add the kimono body, attach sleeves, then layer the obiage, obi belt, obijime cord, and finish with the decorative obi back piece. Proper layering is essential for an authentic look.

Can I make the doll taller or shorter?

Yes, you can adjust the height by adding or removing rounds in the leg, body, and neck sections. However, this will require recalculating clothing measurements. The current pattern creates a 19cm doll, and changing the body size means adapting all clothing pieces proportionally.

What should I use for the shoe support in the zori sandals?

The pattern recommends hard plastic card material. Cut small oval shapes that fit inside the sandal base to provide structure. You can use old gift cards, plastic packaging, or thin cardboard coated with clear tape for water resistance.

How do I create the hairstyle without using glue?

The pattern instructs to roll the bangs inward naturally without adhesive. The crocheted hair strands have enough texture to hold their shape when gently curled and positioned. You can secure the hair cap to the head with strategic stitching and use pins temporarily while sewing.