🧢 Beautiful ✨ Detailed πŸ’ Adorable

Classic Baby Boots Crochet Pattern

Classic Baby Boots Crochet Pattern
4.8β˜… Rating
2-3 Hours Time Needed
1.9K Made This
βœ‚οΈ

Intermediate Level

Ideal for those with basic knitting experience, featuring slightly more advanced stitches and techniques to expand your skills.

⏱️

Bite-Sized Project

Complete in under 2 hoursβ€”quick, fun, and perfect for a little creative escape.

🧸

Tiny Treasure

Small, sweet, and gift-worthy creations that fit perfectly in the palm of your hand with detailed charm.

About This Classic Baby Boots Crochet Pattern

This Classic Baby Boots pattern is thoughtfully designed to accommodate different yarn weights and baby sizes, making it incredibly versatile for your crafting needs. The pattern starts with creating a sturdy sole worked in rounds, then builds up the upper portion using back post stitches for added structure and texture. The distinctive ribbed cuff is worked as you go, attaching seamlessly to the boot opening and creating a professional finish that looks store-bought but carries that special handmade touch.

Classic Baby Boots Crochet Pattern crochet pattern - detailed view of completed project

Each size is carefully calculated with specific gauge measurements to ensure the perfect fit for your little one. The pattern includes detailed photo instructions showing every step, making it accessible even for those newer to working in the round.

Why You'll Love This Classic Baby Boots Crochet Pattern

I absolutely love this pattern because it's one of those rare designs that looks impressive but is actually quite manageable once you get into the rhythm. The ribbed cuff technique is particularly satisfying to work, and I appreciate how the pattern teaches you to join as you go rather than sewing everything together at the end. What really makes this special is the versatility - you can customize the cuff length, choose your favorite yarn weight, and even mix colors to match any nursery theme or outfit. The finished booties are sturdy enough to stay on little feet but soft enough for delicate baby skin, and they make such thoughtful gifts that new parents genuinely appreciate and use.

Classic Baby Boots Crochet Pattern step 1 - construction progress Classic Baby Boots Crochet Pattern step 2 - assembly progress Classic Baby Boots Crochet Pattern step 3 - details and accessories Classic Baby Boots Crochet Pattern step 4 - final assembly and finishing

Switch Things Up

I love experimenting with color combinations when making these classic baby boots - they're the perfect canvas for creativity! One of my favorite variations is using a neutral color like cream or gray for the sole and upper portion, then adding a pop of bright color for the ribbed cuff. This creates a modern two-tone look that's absolutely adorable.

For a more whimsical approach, I sometimes work the cuff in stripes by changing colors every two rows. The ribbed texture really makes the stripes stand out beautifully, and it's a great way to use up small amounts of leftover yarn from other projects. You could even match the stripes to a specific outfit or nursery theme.

Another fun modification I enjoy is adding small embellishments after the boots are complete. Tiny crochet flowers, buttons, or even a small bow sewn onto the cuff can transform these simple boots into something extra special. Just make sure any additions are securely attached if the boots are for a young baby.

I've also experimented with different cuff lengths beyond the two options in the pattern. Sometimes I'll make an extra-long cuff that can be rolled down multiple times for a slouchy boot look that's reminiscent of adult winter boots. It's absolutely precious on chubby baby legs!

For texture variation, you could work the cuff in a different stitch pattern entirely - perhaps a simple shell stitch or even picot edging for a more delicate, feminine touch. The basic boot structure is so solid that it can handle all sorts of creative modifications to the cuff design.

Common Mistakes & How to Fix Them

βœ— Not maintaining consistent tension when working back post half double crochet stitches which can cause the upper boot to look uneven or twisted around the sole foundation βœ— Losing track of stitch counts during decrease rounds for the toe shaping, resulting in an asymmetrical or poorly fitted front that doesn't close properly over baby's foot βœ— Forgetting to carry the yarn tail through the first few rounds of the sole, leaving loose ends that need weaving in later and creating extra bulk inside the bootie βœ— Miscounting the unused chain loops when joining the cuff in the final row, causing the ribbed section to twist or pucker instead of laying flat and professional-looking βœ— Working the ribbed cuff rows too tightly which makes it difficult to pick up loops from Round 8 and can cause the entire cuff to curl inward uncomfortably

Classic Baby Boots Crochet Pattern

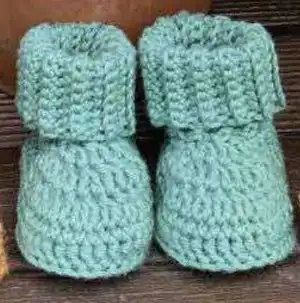
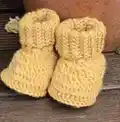
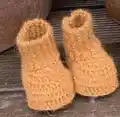
Create adorable handmade baby boots with this versatile crochet pattern available in multiple sizes and yarn weights. This delightful pattern guides you through crafting cozy booties for newborns up to 6-month-old babies, with options for both 4ply fingering, 8ply DK, and 10ply Aran weight yarns. The pattern features a classic ribbed cuff design that can be made short or long to fold over, creating a timeless look that pairs perfectly with any baby outfit. Perfect for baby showers, gifts, or your own little one's wardrobe.

Intermediate 2-3 Hours

Materials Needed for Classic Baby Boots Crochet Pattern

β€” Main Fabric

  • 01
    4ply/Fingering weight yarn - 50g for Newborn size
  • 02
    8ply/DK weight yarn - 50g for Newborn and 1-3 months sizes
  • 03
    10ply/Worsted/Aran weight yarn - 50g for 4-6 months size

β€” Tools Required

  • 01
    3.25mm crochet hook (for 4ply/Fingering weight)
  • 02
    3.5mm crochet hook (for 8ply/DK Newborn)
  • 03
    4mm crochet hook (for 8ply/DK 1-3 months)
  • 04
    4.5mm crochet hook (for 10ply/Aran 4-6 months)
  • 05
    Scissors
  • 06
    Darning needle
  • 07
    Tape measure
  • 08
    Stitch markers

Progress Tracker

0% Complete

β€” Size 2, 3, 4 Instructions (DK and Aran Yarns) :

Starting Chain :

Chain 11

β€” Sole :

Round 1 :

2hdc into 2nd chain from your hook, then hdc in next 8st, 5hdc into last stitch (which will take you around the corner, and take the 'tail' with you), hdc into each of the 8 lower loops of the ch (taking the tail with you to neatly conceal it), 3hdc in last st, join with sl st into 1st hdc (26st)

Round 2 :

ch1 and 2hdc in same stitch, 2hdc in next, hdc in next 9sts, 2hdc into the next 5sts, hdc in next 9sts, 2hdc into the next 2sts (worked in join stitch), join with sl st into first hdc (36st)

Round 3 :

ch1 and 1hdc in same stitch, 2hdc in next st, 1hdc, 2hdc, hdc in next 8st, 1dc, *2dc, 1dc, 2dc, 1dc, 2dc* repeat, 1dc, hdc in next 8st, *2hdc, 1hdc* repeat x1, finishing in the last st, sl st into 1st hdc (46st)

β€” Upper Part :

Round 4 :

ch1 keep loose, Back Post hdc (BPhdc) into each stitch of Round 3, join with sl st into first hdc (46st)

Info :

You can cut off loose tail from beginning at this point as we have carried it through the row and it is now on the inside of the bootie

Round 5 :

ch1, sc into same st as ch1, sc in next 45sts, join with sl st into first sc (46st)

Round 6 :

ch1, sc into same st as ch1, sc in next 10sts, hdc in next 2st, dc2tog 10x, hdc in next 2sts, sc in next 11sts, join with sl st into first sc (36st)

Round 7 :

ch1, sc into same st as ch1, sc in next 9st, hdc in next 2st, dc2tog 6x, hdc in next 2st, sc in next 10st, join with sl st into first sc (30st)

Round 8 :

ch1, sc into same st as ch1, sc in next 11sts, dc2tog 3x, sc in next 12sts, join with sl st into first sc (27st)

β€” The Cuff :

Info :

Do not cut yarn. Chain 15 for fold down cuff or chain 9 for shorter cuff

Row 1 :

sc in 2nd ch from hook, sc in each ch (back to bootie). Working on RS, pick up a loop from very first st of Round 8, and pick up a loop from next 2sts of Rnd 8 (4 loops on hook), yo and pull through all 4 loops. 14st rib for long cuff (8st rib for short cuff)

Row 2 :

turn, sc in BLO of each of the 14(8)sts, ch1. 14st rib for long cuff (8st rib for short cuff)

Row 3 :

turn, sc in BLO of each of the 14(8)sts, ch1 (back to bootie), pick up a loop (from same st of Round 8 where last loop was picked up from), and pick up a loop from next 2sts of Rnd 8 (4 loops on hook), yo and pull through all 4 loops. 14st rib for long cuff (8st rib for short cuff)

Info :

Count each stitch in your odd rows - st 14(8) can be hard to find, you may need to 'dig' for it

Row 4 :

turn, sc in BLO of each of the 14(8)sts, ch1

Rows 5-26 :

Repeat Row 3 and Row 4 eleven times (to Row 26)

Row 27 :

This row we will join to the unused loops of the chain (which we worked Row 1 into) to join up the cuff. Turn and place a SM (SM1) in the back loop of the first stitch you will work into for the next row. Now turn boot inside out, count the unused loops of the chain down to the boot and mark the 13th (7th) one with another SM (SM2). Sc through first loop AND back loop of first st of Row 26 (this is the loop with SM1), sc through [ch loop and Row 26 BLO] for 12(6) more sts, working last sc into the 13th (7th) loop with the SM2. 14th (8th) st does not need to be worked - it is very hard to find. Cut a tail and sew it into boot and this will act as the 14th(8th)st. Secure and trim off loose end

Info :

Make second boot using same instructions

β€” Size 1 Instructions (Fingering/4ply Yarn) :

Starting Chain :

Chain 13

β€” Sole :

Round 1 :

2dc into 2nd chain from your hook, then dc into next 10sts, 5dc into last st (which will take you around the corner. Take the 'tail' with you), dc into each of the 10 lower loops of the chs (taking the tail with you to neatly conceal it), 3dc in last st, join with sl st into ch before first dc (30st)

Round 2 :

ch1 and 2hdc in same st, 2hdc in next, hdc in next 10sts, 2hdc into the next 5sts, hdc in next 11sts, 2hdc into the next 2sts, join with sl st into first hdc (39st)

Round 3 :

ch1 and 1hdc in same st, 2hdc in next st, 1hdc, 2hdc in the next st, hdc in next 10sts, 1dc, *2dc, 1dc, 2dc, 1dc, 2dc* repeat from *to* x1, 1dc, hdc in next 10sts, 2hdc, 1hdc, 2hdc, 1hdc into sl st join of previous round, sl st into first hdc (50st)

Info :

You can cut off loose tail from beginning of sole at this point as we have carried it through

β€” Upper Part :

Round 4 :

ch1, Back Post hdc (BPhdc) into each st of Round 3, join with sl st into first hdc (50st)

Info :

The first stitch is quite tricky to pull through, but the rest are much easier

Round 5 :

ch1, hdc in same st as ch1, hdc into each stitch, join with sl st into 1st hdc (50st)

Round 6 :

ch1, sc into same st as ch1, sc in next 11sts, hdc in next 2sts, dc2tog 11x, hdc in next 2sts, sc in next 13sts (last st in join), join with sl st into first sc (40st)

Round 7 :

ch1, sc into same st as ch1, sc in next 10sts, hdc in next 3sts, dc2tog 6x, hdc in next 3sts, sc in next 11sts, join with sl st into first sc (34st)

Round 8 :

ch1, sc into same st as ch1, sc in next 11sts, hdc in next 2sts, dc2tog 3x, hdc in next 2sts, sc in next 12sts, join with sl st into first sc (31st)

β€” The Cuff :

Info :

Do not cut yarn. Chain 15 for fold down cuff or chain 9 for shorter cuff

Row 1 :

sc in 2nd ch from hook, sc in each ch (back to bootie). Working on RS, pick up a loop from very first st of Rnd 8, and pick up a loop from next 2sts of Rnd 8 (4 loops on hook), yo and pull through all 4 loops. 14st rib for long cuff (8st rib for short cuff)

Row 2 :

turn, sc in BLO of each of the 14(8)sts, ch1. 14st rib for long cuff (8st rib for short cuff)

Row 3 :

turn, sc in BLO of each of the 14(8)sts, ch1 (back to bootie), pick up a loop (from same st of Rnd 8 where last loop of Row 1 join was picked up) and pick up a loop from next 2sts of Rnd 8 (4 loops on hook), yo and pull through all 4 loops. 14st rib for long cuff (8st rib for short cuff)

Info :

Count each st in your odd rows - st14(8) can be hard to find, you may need to 'dig' for it

Rows 4-30 :

Repeat Row 3 and Row 4 thirteen times (to row 30)

Row 31 :

This row we join to the unworked loops of the chain (which we worked Row 1 into) to join up the cuff. Turn and place a SM (SM1) in the back loop of the first stitch you will work into for the next row. Now turn boot inside out, count the back loops of the chain down from the top and mark the 13th (7th) one with a SM (SM2). Sc through first loop AND back loop of first st of Row 30 (this is the loop with SM1), sc through [ch loop and corresponding Row 30 BLO] for 12(6) more sts back to boot, working last sc into the 13th (7th) loop with the SM. 14th (8th) st does not need to be worked - it is very hard to find. Cut a tail and sew it into boot and this will act as the 14th (8th) stitch. Secure and trim off loose end

Info :

Make second boot using same instructions

Assembly Instructions

  • Ensure all yarn tails are securely woven into the inside of the bootie and trimmed close to the fabric to prevent unraveling
  • The cuff should lay flat and smooth once joined - gently steam block if needed to help the ribbing relax into shape
  • Check that both booties are identical in size by measuring the sole length and comparing stitch counts before finishing
  • The ribbed cuff can be worn folded down for a classic look or left up for extra warmth around baby's ankles

Important Notes

  • πŸ’‘Gauge is crucial for proper fit - take time to check your tension matches the pattern specifications before starting
  • πŸ’‘The back post half double crochet stitch in Round 4 creates the foundation ridge that gives the boot structure
  • πŸ’‘Keep stitch markers handy to track your position, especially when working the cuff join in the final rows
  • πŸ’‘The ribbed cuff technique works the same for both short and long versions - only the initial chain length differs
  • πŸ’‘Different yarn weights and hook sizes will produce different sized booties, so follow the size chart carefully
  • πŸ’‘When picking up loops from Round 8 for the cuff, work loosely to avoid puckering the boot opening

These Classic Baby Boots are a timeless addition to any crocheter's pattern collection, offering flexibility in sizing and yarn choice to suit any project need. The combination of a structured sole, shaped upper, and professional ribbed cuff creates booties that are both adorable and functional. Whether you're crafting for your own little one or creating a heartfelt handmade gift, these boots work up quickly and deliver impressive results that will be treasured for years to come. 🧢 Happy crocheting! 🧡✨

You ask,

we answer.

FAQs

Can I use a different yarn weight than specified in the pattern?

While the pattern is designed for specific yarn weights (4ply, 8ply, and 10ply), you can experiment with other weights as long as you adjust your hook size accordingly and check your gauge. Keep in mind that changing yarn weight will affect the final size of the bootie, so you may need to adjust which size instructions you follow.

What is the back post half double crochet (BPhdc) stitch and why is it important?

The BPhdc stitch is worked by inserting your hook from back to front around the post of the stitch from the previous round, rather than through the top loops. This creates a ridge that gives the boot its structure and helps the upper portion stand up properly from the sole. The pattern includes video tutorial links to help you master this technique.

How do I choose between the short cuff and long fold-down cuff?

The choice is purely aesthetic and functional preference. The short cuff (chain 9) creates a neat finished edge, while the long cuff (chain 15) can be folded down for a classic boot look or left up for extra warmth. Both use the same construction technique, just with different starting chain lengths.

Why is Row 27 (or Row 31 for Size 1) so complicated for joining the cuff?

This joining technique creates a seamless, professional finish without visible seams. By joining to the unused loops of the starting chain, the cuff forms a complete tube around the boot opening. While it seems complex at first, following the stitch marker placement carefully ensures perfect alignment, and the result is worth the extra attention to detail.

Can I make these booties for older babies or toddlers?

This pattern is specifically designed for babies up to 6 months old. To make larger sizes, you would need to increase the starting chain length for the sole and adjust the number of increase rounds accordingly. It's recommended to take foot measurements and adjust the pattern gradually, testing as you go to ensure proper fit.