🧶 Beautiful ✨ Detailed 💝 Adorable

Chicken Drumstick Amigurumi Pattern

Chicken Drumstick Amigurumi Pattern
4.4★ Rating
6-8 Hours Time Needed
4.0K Made This
✂️

Intermediate Level

Ideal for those with basic knitting experience, featuring slightly more advanced stitches and techniques to expand your skills.

⏱️

Weekend Treat

Takes 5-7 hours, making it an enjoyable project to finish over a couple of days.

🐥

Charming Critter

Delightful animal designs with sweet details that capture the essence of your favorite woodland and farmyard friends.

About This Chicken Drumstick Amigurumi Pattern

Chicken Drumstick Amigurumi Pattern crochet pattern - detailed view of completed project

What makes this pattern extra special is the playful concept of a chicken sitting on its own drumstick—it's both funny and adorable, making it a perfect conversation starter and a unique addition to any amigurumi collection!

Why You'll Love This Chicken Drumstick Amigurumi Pattern

I am absolutely head-over-heels for this pattern because it's just so unexpectedly clever and hilarious! The irony of a cute little chicken sitting proudly on top of a drumstick never fails to make me giggle, and everyone who sees it has the same delighted reaction. I love how the drumstick construction creates such a realistic bone-to-meat transition with those strategic color changes and shaping techniques. Working the hollow top section is so satisfying because you can really see how perfectly the chicken will sit there. The tiny details on the chicken itself—those little red feet, the sweet beak, and those safety eyes that give it such an innocent expression—just add to the humor and charm. Adding the decorative bow at the end makes it feel like a special gift, which is perfect because this is absolutely the kind of project people treasure forever. It's challenging enough to be interesting but not so difficult that it becomes frustrating, making it the perfect weekend project!

Chicken Drumstick Amigurumi Pattern step 1 - construction progress Chicken Drumstick Amigurumi Pattern step 2 - assembly progress Chicken Drumstick Amigurumi Pattern step 3 - details and accessories Chicken Drumstick Amigurumi Pattern step 4 - final assembly and finishing

Switch Things Up

I love experimenting with this pattern to create fun variations that add even more personality! Try making the chicken in different colors to represent various chicken breeds—white for a classic hen, brown for a Rhode Island Red, or even spotted patterns for a unique farm look. You could also adjust the comb size to make it more or less prominent depending on your preference.

For the drumstick, play with the brown shade to create different levels of 'cooking'—lighter tan for a lightly cooked look, or deeper mahogany brown for a well-done appearance. Some crafters even add texture by using bobble stitches or surface crochet to mimic grill marks or seasoning specks on the meat portion!

Consider making different sizes too—a larger version makes a great display piece, while mini versions using thinner yarn and smaller hooks create adorable keychains or ornaments. You could even create a whole family of chickens sitting on drumsticks of varying sizes! For extra whimsy, try embroidering tiny details like eyebrows or rosy cheeks on the chicken, or add small felt details for added dimension. The possibilities are endless!

Common Mistakes & How to Fix Them

✗ Not stuffing the drumstick meat portion firmly enough, which causes it to lose its rounded, realistic shape and appear deflated ✗ Forgetting to insert safety eyes into the chicken body before closing it completely, making installation nearly impossible afterward ✗ Pulling the hollow top section decreases too tightly, which makes the opening too small for the chicken to sit properly ✗ Skipping the step to push the bone portion inside the meat section, leaving an awkward protruding bone instead of realistic structure

Chicken Drumstick Amigurumi Pattern

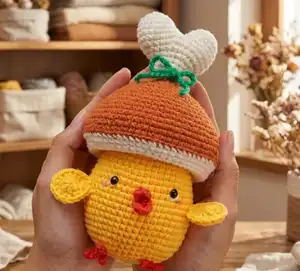
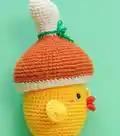
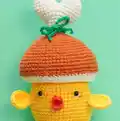
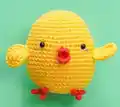
Create the ultimate food-meets-fun amigurumi with this adorable chicken drumstick pattern that features a cute yellow chick perched on top of a realistic-looking drumstick! This clever design combines a fully detailed chicken character with red comb and legs, positioned perfectly on a brown and white drumstick complete with bone details. The pattern includes instructions for both the chicken and drumstick components, plus a decorative chain bow to make it look like a delightful gift. Perfect for food lovers and anyone who appreciates clever, humorous amigurumi designs!

Intermediate 6-8 Hours

Materials Needed for Chicken Drumstick Amigurumi Pattern

— Main Fabric

  • 01
    White YarnArt Jeans 03 (50g, 160m)
  • 02
    Brown Etrofil Jeans 60 (50g, 160m)
  • 03
    Yellow YarnArt Jeans 35 (50g, 160m)
  • 04
    Red YarnArt Jeans 26 (50g, 160m)

— Tools Required

  • 01
    Crochet hook size 2.5mm
  • 02
    1 pair of 6mm safety eyes
  • 03
    Tapestry needles
  • 04
    Brown thread
  • 05
    Pins
  • 06
    Stitch markers
  • 07
    Scissors
  • 08
    Polyester fiberfill

Progress Tracker

0% Complete

— Drumstick (yarn A) :

Round 1 :

sc 6 into a magic loop (6)

Round 2 :

inc 6 (12)

Round 3 :

[sc 1, inc] 6x (18)

Round 4-5 :

sc 18 (2 rnds) (18)

Info :

Break the yarn, make the 2nd piece the same way but do not break the yarn, join with the 1st piece, and continue to crochet the following rnds

Round 6 :

sc 18 (on the 1st piece), sc 18 (on the 2nd piece) (36)

Round 7 :

sc 36 (36)

Round 8 :

[sc 4, dec] 6x (30)

Round 9 :

[sc 3, dec] 6x (24)

Round 10 :

[sc 2, dec] 6x (18)

Round 11 :

[sc 4, dec] 3x (15)

Round 12-14 :

sc 15 (3 rnds), break yarn A, change to yarn B, stuff firmly (15)

Round 15 :

[sc 4, inc] 3x (18)

Round 16 :

[sc 2, inc] 6x (24)

Round 17 :

[sc 3, inc] 6x (30)

Round 18 :

[sc 2, inc, sc 2] 6x (36)

Round 19 :

[sc 5, inc] 6x (42)

Round 20 :

[sc 3, inc, sc 3] 6x (48)

Round 21 :

sc 48 (48)

Round 22 :

[sc 7, inc] 6x (54)

Round 23 :

sc 54 (54)

Round 24 :

[sc 4, inc, sc 4] 6x (60)

Round 25 :

sc 60 (60)

Round 26 :

[sc 9, inc] 6x (66)

Round 27-30 :

sc 66 (4 rnds), break yarn B, change to yarn A (66)

Round 31 :

(blo) [sc 9, dec] 6x (60)

Round 32 :

[sc 4, dec, sc 4] 6x (54)

Round 33 :

[sc 7, dec] 6x (48)

Round 34 :

(blo) sc 48 (48)

Round 35-41 :

sc 48 (7 rnds), stuff very slightly (48)

Round 42 :

[sc 6, dec] 6x (42)

Round 43 :

[sc 5, dec] 6x (36)

Round 44 :

[sc 4, dec] 6x (30)

Round 45 :

[sc 3, dec] 6x (24)

Round 46 :

[sc 2, dec] 6x (18)

Round 47 :

[sc 1, dec] 6x (12)

Round 48 :

dec 6 (6)

Infos :

Break the yarn, weave in the last 6 sts together. Push the inner part inside, hide the remaining yarn.

— Chicken's Legs (yarn D, X2) :

Round 1 :

[ch 4, start from the 2nd st from the hook, slst 3] 3x (9)

Info :

Break the yarn with a long rest to sew later

— Chicken's Body (yarn C) :

Round 1 :

sc 6 into a magic loop (6)

Round 2 :

inc 6 (12)

Round 3 :

[sc 1, inc] 6x (18)

Round 4 :

[sc 1, inc, sc 1] 6x (24)

Round 5 :

[sc 3, inc] 6x (30)

Round 6 :

[sc 2, inc, sc 2] 6x (36)

Round 7 :

[sc 8, inc] 4x (40)

Round 8-9 :

sc 40 (2 rnds) (40)

Round 10 :

[sc 9, inc] 4x (44)

Round 11-12 :

sc 44 (2 rnds) (44)

Round 13 :

[sc 10, inc] 4x (48)

Round 14-22 :

sc 48 (9 rnds), insert the eyes between rnd 13&14, 8 sts apart (48)

Round 23 :

[sc 6, dec] 6x (42)

Round 24 :

[sc 5, dec] 6x (36)

Round 25 :

[sc 4, dec] 6x, stuff firmly (30)

Round 26 :

[sc 3, dec] 6x (24)

Round 27 :

[sc 2, dec] 6x (18)

Round 28 :

[sc 1, dec] 6x (12)

Round 29 :

dec 6 (6)

Info :

Break the yarn, weave in the last 6 sts

— Chicken's Wings (yarn C, X2) :

Round 1 :

ch 4, start from the 2nd st from the hook, inc, sc 1, (dc 4) on the last st, continue to crochet on the opposite side, sc 1, inc (10)

Round 2 :

inc, sc 1, dc, [(dc 2) on the next st] 4x, dc, sc 1, inc (16)

Info :

Break the yarn with a long rest to sew later

— Chicken's Mouth (yarn D) :

Round 1 :

Magic loop, ch 1, dc 3, slst on the loop, dc 3, ch 1, slst on the loop (6)

Info :

Break the yarn with a long rest to sew later

Assembly Instructions

  • Insert 6mm safety eyes between rounds 13 and 14 of the chicken body, spacing them 8 stitches apart for proper positioning
  • Sew the red beak piece to the center front of the chicken's face between and slightly below the eyes
  • Attach both yellow wings to the sides of the chicken body at approximately mid-height for balanced wing placement
  • Sew the red three-toed feet to the bottom of the chicken body, positioning them to allow stable sitting when placed on drumstick
  • Position the completed chicken on top of the hollow drumstick opening, securing with a few tack stitches if desired for permanent display
  • Create a decorative bow by making a chain of 55 stitches and tying it around the drumstick just below where the chicken sits
  • Adjust the bow loops and tails to create an attractive gift-wrapped appearance that completes the whimsical presentation

Important Notes

  • 💡Stuff the drumstick meat portion very firmly to maintain the rounded, realistic drumstick shape throughout the piece
  • 💡Pay careful attention to color change points between white bone and brown meat sections for clean transitions
  • 💡The hollow top section should be stuffed only very lightly to maintain the opening where the chicken will sit
  • 💡Insert safety eyes into the chicken body before completely closing to ensure they are secure and properly positioned
  • 💡Use pins to test chicken placement on the drumstick before final assembly to ensure the best visual balance
  • 💡The decorative chain bow is optional but adds a charming gift-wrapped element that enhances the overall presentation

This hilarious and heartwarming Chicken Drumstick pattern combines clever humor with adorable execution to create something truly memorable! The juxtaposition of the sweet innocent chicken perched on its own drumstick brings smiles and laughter to everyone who encounters it. With its realistic drumstick construction and charming chicken details, this pattern offers both a satisfying crafting experience and a conversation-starting finished piece. Whether displayed on a shelf, given as a unique gift, or used to bring joy to your own space, this amigurumi delivers delight in every stitch! Happy crocheting! 🧶🍗✨

You ask,

we answer.

FAQs

Can I make the chicken removable from the drumstick?

Absolutely! Instead of sewing the chicken permanently to the drumstick, you can simply place it on top. The hollow opening is designed to hold the chicken securely without attachment, making it easy to remove and reposition.

What if the chicken doesn't sit properly on the drumstick?

Make sure the top opening of the drumstick isn't too tight or too loose. You can adjust by modifying the final decrease rounds slightly, or add a few tack stitches to secure the chicken in the perfect position if needed.

Can I use different colors for a unique look?

Yes! Try making a darker roasted drumstick with deeper brown, or create different chicken colors like white for a different breed. You could even make fantasy versions with colorful chickens and creative drumstick tones!

How do I get the bone portion to stay inside the meat section?

After completing the white bone section and transitioning to brown, the decreases naturally create a narrower neck that fits inside. Gently push it inward as instructed, and the stuffing will help hold it in place securely.

Is the decorative bow necessary?

The bow is optional but highly recommended! It adds a whimsical 'gift' element that enhances the humor and charm. However, if you prefer a simpler look, the piece stands beautifully on its own without it.