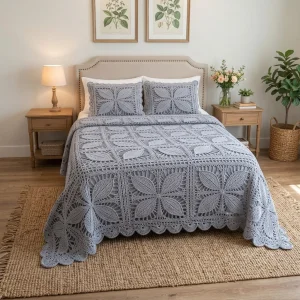
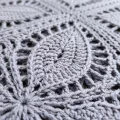
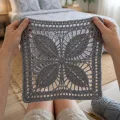
Picture a bedroom that feels calmer the moment you walk in. This crochet bedspread pattern gives you a soft dusty blue-grey coverlet built from airy lace squares, each topped with a cross of four sculpted leaves. A deep scalloped border frames the whole thing, and a pair of matching pillow shams finishes the set. It has the look of a treasured heirloom, and you get to stitch every inch of it yourself.
Progress Tracker
0% Complete
— 1. Lace Mesh Square (make 38) :
Info :
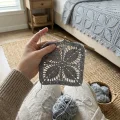
Each square measures about 30 cm (12 in) after blocking. The finished bedspread is roughly 160 x 190 cm (63 x 75 in) with the border, and each pillow sham front is roughly 70 x 70 cm (27.5 in). You'll make 38 squares in total: 30 for the bedspread (5 across, 6 long) and 8 for the shams.
Info :
Corner shorthand: [dc, ch1] x3 in next dc means dc, ch1, dc, ch1, dc, ch1 all worked into the same dc. Work every ch1 over the ch1 sp below instead of into it, and always skip the first dc of the previous round because the starting ch4 replaces it. Every round adds 8 dc, so the round number times 8 gives your dc count.
Round 1 :
Make a MR, ch4 (counts as dc and ch1), [dc in MR, ch1] x7, sl st to the 3rd ch of ch4 and pull the MR closed (8 dc, 8 ch1 sps)
Round 2 :
ch4 (counts as dc and ch1), skip first dc, [dc, ch1] x3 in next dc, [dc in next dc, ch1] x1, [dc, ch1] x3 in next dc, [dc in next dc, ch1] x1, [dc, ch1] x3 in next dc, [dc in next dc, ch1] x1, [dc, ch1] x3 in next dc; sl st to 3rd ch of ch4 (16 dc, 16 ch1 sps)
Round 3 :
ch4 (counts as dc and ch1), skip first dc, [dc in next dc, ch1] x1, [dc, ch1] x3 in next dc, [dc in next dc, ch1] x3, [dc, ch1] x3 in next dc, [dc in next dc, ch1] x3, [dc, ch1] x3 in next dc, [dc in next dc, ch1] x3, [dc, ch1] x3 in next dc, [dc in next dc, ch1] x1; sl st to 3rd ch of ch4 (24 dc, 24 ch1 sps)
Round 4 :
ch4 (counts as dc and ch1), skip first dc, [dc in next dc, ch1] x2, [dc, ch1] x3 in next dc, [dc in next dc, ch1] x5, [dc, ch1] x3 in next dc, [dc in next dc, ch1] x5, [dc, ch1] x3 in next dc, [dc in next dc, ch1] x5, [dc, ch1] x3 in next dc, [dc in next dc, ch1] x2; sl st to 3rd ch of ch4 (32 dc, 32 ch1 sps)
Round 5 :
ch4 (counts as dc and ch1), skip first dc, [dc in next dc, ch1] x3, [dc, ch1] x3 in next dc, [dc in next dc, ch1] x7, [dc, ch1] x3 in next dc, [dc in next dc, ch1] x7, [dc, ch1] x3 in next dc, [dc in next dc, ch1] x7, [dc, ch1] x3 in next dc, [dc in next dc, ch1] x3; sl st to 3rd ch of ch4 (40 dc, 40 ch1 sps)
Round 6 :
ch4 (counts as dc and ch1), skip first dc, [dc in next dc, ch1] x4, [dc, ch1] x3 in next dc, [dc in next dc, ch1] x9, [dc, ch1] x3 in next dc, [dc in next dc, ch1] x9, [dc, ch1] x3 in next dc, [dc in next dc, ch1] x9, [dc, ch1] x3 in next dc, [dc in next dc, ch1] x4; sl st to 3rd ch of ch4 (48 dc, 48 ch1 sps)
Round 7 :
ch4 (counts as dc and ch1), skip first dc, [dc in next dc, ch1] x5, [dc, ch1] x3 in next dc, [dc in next dc, ch1] x11, [dc, ch1] x3 in next dc, [dc in next dc, ch1] x11, [dc, ch1] x3 in next dc, [dc in next dc, ch1] x11, [dc, ch1] x3 in next dc, [dc in next dc, ch1] x5; sl st to 3rd ch of ch4 (56 dc, 56 ch1 sps)
Round 8 :
ch4 (counts as dc and ch1), skip first dc, [dc in next dc, ch1] x6, [dc, ch1] x3 in next dc, [dc in next dc, ch1] x13, [dc, ch1] x3 in next dc, [dc in next dc, ch1] x13, [dc, ch1] x3 in next dc, [dc in next dc, ch1] x13, [dc, ch1] x3 in next dc, [dc in next dc, ch1] x6; sl st to 3rd ch of ch4 (64 dc, 64 ch1 sps)
Round 9 :
ch4 (counts as dc and ch1), skip first dc, [dc in next dc, ch1] x7, [dc, ch1] x3 in next dc, [dc in next dc, ch1] x15, [dc, ch1] x3 in next dc, [dc in next dc, ch1] x15, [dc, ch1] x3 in next dc, [dc in next dc, ch1] x15, [dc, ch1] x3 in next dc, [dc in next dc, ch1] x7; sl st to 3rd ch of ch4 (72 dc, 72 ch1 sps)
Round 10 :
ch4 (counts as dc and ch1), skip first dc, [dc in next dc, ch1] x8, [dc, ch1] x3 in next dc, [dc in next dc, ch1] x17, [dc, ch1] x3 in next dc, [dc in next dc, ch1] x17, [dc, ch1] x3 in next dc, [dc in next dc, ch1] x17, [dc, ch1] x3 in next dc, [dc in next dc, ch1] x8; sl st to 3rd ch of ch4 (80 dc, 80 ch1 sps)
Round 11 :
ch4 (counts as dc and ch1), skip first dc, [dc in next dc, ch1] x9, [dc, ch1] x3 in next dc, [dc in next dc, ch1] x19, [dc, ch1] x3 in next dc, [dc in next dc, ch1] x19, [dc, ch1] x3 in next dc, [dc in next dc, ch1] x19, [dc, ch1] x3 in next dc, [dc in next dc, ch1] x9; sl st to 3rd ch of ch4 (88 dc, 88 ch1 sps)
Round 12 :
ch4 (counts as dc and ch1), skip first dc, [dc in next dc, ch1] x10, [dc, ch1] x3 in next dc, [dc in next dc, ch1] x21, [dc, ch1] x3 in next dc, [dc in next dc, ch1] x21, [dc, ch1] x3 in next dc, [dc in next dc, ch1] x21, [dc, ch1] x3 in next dc, [dc in next dc, ch1] x10; sl st to 3rd ch of ch4 (96 dc, 96 ch1 sps)
Round 13 :
ch4 (counts as dc and ch1), skip first dc, [dc in next dc, ch1] x11, [dc, ch1] x3 in next dc, [dc in next dc, ch1] x23, [dc, ch1] x3 in next dc, [dc in next dc, ch1] x23, [dc, ch1] x3 in next dc, [dc in next dc, ch1] x23, [dc, ch1] x3 in next dc, [dc in next dc, ch1] x11; sl st to 3rd ch of ch4 (104 dc, 104 ch1 sps)
Round 14 :
ch4 (counts as dc and ch1), skip first dc, [dc in next dc, ch1] x12, [dc, ch1] x3 in next dc, [dc in next dc, ch1] x25, [dc, ch1] x3 in next dc, [dc in next dc, ch1] x25, [dc, ch1] x3 in next dc, [dc in next dc, ch1] x25, [dc, ch1] x3 in next dc, [dc in next dc, ch1] x12; sl st to 3rd ch of ch4 (112 dc, 112 ch1 sps)
Round 15 :
ch4 (counts as dc and ch1), skip first dc, [dc in next dc, ch1] x13, [dc, ch1] x3 in next dc, [dc in next dc, ch1] x27, [dc, ch1] x3 in next dc, [dc in next dc, ch1] x27, [dc, ch1] x3 in next dc, [dc in next dc, ch1] x27, [dc, ch1] x3 in next dc, [dc in next dc, ch1] x13; sl st to 3rd ch of ch4 (120 dc, 120 ch1 sps, 30 sps along each side)
Round 16 :
ch1, sc in same st, then sc in the next ch1 sp and in each following dc and ch1 sp around, working 3 sc in the middle dc of each of the 4 corner triples; sl st to first sc and fasten off (248 sc, with 59 sc between each pair of corner centers and 3 sc in each corner)
— 2. Leaf (make 120, four for each bedspread square) :
Round 1 :
ch21, 3 sc in 2nd ch from hook, sc in next 2 ch, hdc in next 3 ch, dc in next 8 ch, hdc in next 3 ch, sc in next 2 ch, 3 sc in last ch. Working along the other side of the foundation ch, sc in next 2 ch, hdc in next 3 ch, dc in next 8 ch, hdc in next 3 ch, sc in next 2 ch; sl st to first sc (42)
Round 2 :
ch1, sc in first st, 3 sc in next st, sc in next st, sc in next 18 sts, sc in next st, 3 sc in next st, sc in next st, sc in next 18 sts; sl st to first sc (46)
Vein :
Fasten off, leaving a 40 cm (16 in) tail for sewing. With RS facing, join yarn at the pointed tip and make 20 surface sl st down the center of the leaf to the base, inserting the hook between the sc of the two sides. Fasten off and weave in the vein ends on the WS. The leaf measures about 15 cm (6 in) long.
— 3. Large Leaf (make 8, four for each pillow sham) :
Round 1 :
ch31, 3 sc in 2nd ch from hook, sc in next 3 ch, hdc in next 3 ch, dc in next 16 ch, hdc in next 3 ch, sc in next 3 ch, 3 sc in last ch. Working along the other side of the foundation ch, sc in next 3 ch, hdc in next 3 ch, dc in next 16 ch, hdc in next 3 ch, sc in next 3 ch; sl st to first sc (62)
Round 2 :
ch1, sc in first st, 3 sc in next st, sc in next st, sc in next 28 sts, sc in next st, 3 sc in next st, sc in next st, sc in next 28 sts; sl st to first sc (66)
Vein :
Fasten off, leaving a 50 cm (20 in) tail for sewing. With RS facing, join yarn at the pointed tip and make 30 surface sl st down the center of the leaf to the base. Fasten off and weave in the ends on the WS. The large leaf measures about 22 cm (8.5 in) long.
— 4. Joining the Bedspread :
Info :
Sew the leaves onto every square and block them before joining (see assembly). Each square edge runs from one corner center sc to the next corner center sc and measures 63 sts. Use the same seam for every join.
Strip :
Hold 2 squares with WS together, corners matching. Starting in the center sc of one corner and ending in the center sc of the next corner, sl st through the back loops of both squares across all 63 sts. Add 3 more squares the same way to make a strip of 5 squares. Make 6 strips in total.
Joining Strips :
Join the strips with the same seam, 63 sts along each square edge. Where four corners meet, end the seam in the shared corner centers and carry straight on into the next edge, so the crossing stays flat. Finish with a panel 5 squares wide and 6 squares long.
— 5. Scalloped Border :
Info :
To make the spread wider or longer, add squares in whole units. For each extra square on a side, add one more [sc3tog over next 3 sts, sc in next 59 sts] to that side in Round 1 (60 more sc), 30 more [ch1, skip next sc, dc in next sc] repeats in Round 2, and 6 more [skip next 4 sts, 9 dc in next st, skip next 4 sts, sc in next st] repeats in Round 3. The 5-square side is the short side and the 6-square side is the long side.
Round 1 :
Join yarn in the center sc of any outer corner. ch1, (sc, ch2, sc) in same st. Along the 5-square side: sc in next 60 sts, [sc3tog over next 3 sts, sc in next 59 sts] x3, sc3tog over next 3 sts, sc in next 60 sts (301 sc). Work (sc, ch2, sc) in the next corner center sc. Along the 6-square side: sc in next 60 sts, [sc3tog over next 3 sts, sc in next 59 sts] x4, sc3tog over next 3 sts, sc in next 60 sts (361 sc). Corner. Repeat the 5-square side (301 sc), corner, and the 6-square side (361 sc); sl st to first sc (1332 sc and 4 ch2 corner sps)
Round 2 :
sl st into the first corner ch2 sp, ch3 (counts as dc), ch3, dc in same sp. Along the 5-square side: dc in next sc, [ch1, skip next sc, dc in next sc] x150 (151 dc). Work (dc, ch3, dc) in the next corner ch2 sp. Along the 6-square side: dc in next sc, [ch1, skip next sc, dc in next sc] x180 (181 dc). Corner. Repeat the 5-square side, corner, and the 6-square side; sl st to top of beginning ch3 (672 dc, 660 ch1 sps, 4 ch3 corner sps)
Round 3 :
ch1, sc in same st (first corner dc), 7 dc in the ch3 sp, sc in next dc. Along the 5-square side: sc in next dc, [skip next 4 sts, 9 dc in next st, skip next 4 sts, sc in next st] x30 (301 sts). Corner: sc in next dc, 7 dc in the ch3 sp, sc in next dc. Along the 6-square side: sc in next dc, [skip next 4 sts, 9 dc in next st, skip next 4 sts, sc in next st] x36 (361 sts). Corner. Repeat the 5-square side, corner, and the 6-square side; sl st to first sc and fasten off (1360 sts in total, 30 scallops on each short side and 36 on each long side)
— 6. Pillow Sham (make 2) :
Info :
Each sham front is a panel of 4 squares in a 2 x 2 block, topped with 4 large leaves and finished with the same scalloped border. The sham fronts finish at about 70 x 70 cm (27.5 in). Because each side is 2 squares long, every side has 121 sts in Round 1.
Panel :
Join 4 squares in a 2 x 2 block using the same 63 st back loop seam as the bedspread, ending each seam in the corner centers and carrying through the middle crossing.
Round 1 :
Join yarn in the center sc of any outer corner. ch1, (sc, ch2, sc) in same st. Along each side: sc in next 60 sts, sc3tog over next 3 sts, sc in next 60 sts (121 sc). Work (sc, ch2, sc) in each of the next 3 corner center sc, with a side before each; sl st to first sc (492 sc and 4 ch2 corner sps)
Round 2 :
sl st into the first corner ch2 sp, ch3 (counts as dc), ch3, dc in same sp. Along each side: dc in next sc, [ch1, skip next sc, dc in next sc] x60 (61 dc). Work (dc, ch3, dc) in each next corner ch2 sp, with a side before each; sl st to top of beginning ch3 (252 dc, 240 ch1 sps, 4 ch3 corner sps)
Round 3 :
ch1, sc in same st (first corner dc), 7 dc in the ch3 sp, sc in next dc. Along each side: sc in next dc, [skip next 4 sts, 9 dc in next st, skip next 4 sts, sc in next st] x12 (121 sts). Corner: sc in next dc, 7 dc in the ch3 sp, sc in next dc. Repeat for all 4 sides and corners; sl st to first sc and fasten off (520 sts in total, 12 scallops per side)
Your finished spread is going to be the piece people run their hands over when they walk into the room. Take your time, enjoy each square as it comes off the hook, and don't be surprised if you start planning a second set in another shade before the first one is even blocked. Gift it to someone you love or keep it all for yourself. Either way, you've made something that will be around for years. Happy hooking! 🧶✨🧵