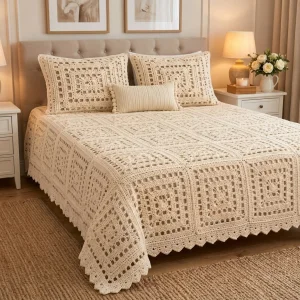
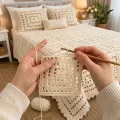
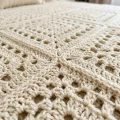
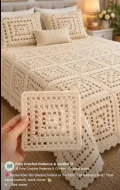
Imagine a bed dressed in soft ivory lace, every square worked in cotton with open mesh bands around a snug solid center. This crochet bedspread pattern builds one motif at a time, so you can stitch it on the sofa, on a train, or wherever your day takes you. You’ll join the squares into a generous cover, finish the edges with a row of pointed edging, and then make the matching pillow shams and a ribbed lumbar cushion with pom-pom ends. A whole bedroom set made by your own hands.
Progress Tracker
0% Complete
— 1. Square Motif (make 60) :
Info :
Each motif measures approximately 25 cm (10 in) square after blocking. Make 60 in total: 48 for the bedspread, laid out 6 across by 8 down for a finished size of approximately 150 x 200 cm (59 x 79 in), and 12 for the two sham fronts. Work every round with the right side facing and do not turn. Every round after round 2 starts with a sl st into the next ch-2 sp. To make the bedspread bigger or smaller, add or remove motifs two rows or two columns at a time, so the edging repeat still fits. Each extra pair of motifs adds 52 sts along that edge, which is 13 extra edging arches.
Round 1 :
ch 4, join with sl st in the first ch to form a ring. ch 3 (counts as first dc), 2 dc in the ring, ch 2, *3 dc in the ring, ch 2; rep from * 2 more times, join with sl st to the top of the starting ch 3. (12 dc and four ch-2 sps)
Round 2 :
sl st in each of the next 2 dc and in the next ch-2 sp. ch 3 (counts as first dc), ch 2, dc in the same sp. *dc in each of the next 3 dc, (dc, ch 2, dc) in the next ch-2 sp; rep from * 2 more times, dc in each of the last 3 dc, join with sl st to the top of the starting ch 3. (20 dc; 5 sts along each side between the corner sps)
Round 3 :
sl st in the next ch-2 sp. ch 3 (counts as first dc), ch 2, dc in the same sp. *dc in each of the next 5 dc, (dc, ch 2, dc) in the next ch-2 sp; rep from * 2 more times, dc in each of the last 5 dc, join with sl st to the top of the starting ch 3. (28 dc; 7 sts along each side)
Round 4 :
sl st in the next ch-2 sp. ch 3 (counts as first dc), ch 2, dc in the same sp. *[dc in next dc, ch 1, sk next dc] 3 times, dc in next dc, (dc, ch 2, dc) in the next ch-2 sp; rep from * 2 more times, [dc in next dc, ch 1, sk next dc] 3 times, dc in the last st, join with sl st to the top of the starting ch 3. (24 dc and 12 ch-1 sps; 9 sts along each side)
Round 5 :
sl st in the next ch-2 sp. ch 3 (counts as first dc), ch 2, dc in the same sp. *dc in each of the next 9 sts (one dc in each dc and in each ch-1 sp), (dc, ch 2, dc) in the next ch-2 sp; rep from * 2 more times, dc in each of the last 9 sts, join with sl st to the top of the starting ch 3. (44 dc; 11 sts along each side)
Round 6 :
sl st in the next ch-2 sp. ch 3 (counts as first dc), ch 2, dc in the same sp. *[ch 1, sk next st, dc in next st] 5 times, ch 1, sk next st, (dc, ch 2, dc) in the next ch-2 sp; rep from * 2 more times, [ch 1, sk next st, dc in next st] 5 times, ch 1, sk the last st, join with sl st to the top of the starting ch 3. (28 dc and 24 ch-1 sps; 13 sts along each side)
Round 7 :
sl st in the next ch-2 sp. ch 3 (counts as first dc), ch 2, dc in the same sp. *[dc in next dc, ch 1, sk next ch-1 sp] 6 times, dc in next dc, (dc, ch 2, dc) in the next ch-2 sp; rep from * 2 more times, [dc in next dc, ch 1, sk next ch-1 sp] 6 times, dc in the last dc, join with sl st to the top of the starting ch 3. (36 dc and 24 ch-1 sps; 15 sts along each side)
Round 8 :
sl st in the next ch-2 sp. ch 3 (counts as first dc), ch 2, dc in the same sp. *dc in each of the next 15 sts (one dc in each dc and in each ch-1 sp), (dc, ch 2, dc) in the next ch-2 sp; rep from * 2 more times, dc in each of the last 15 sts, join with sl st to the top of the starting ch 3. (68 dc; 17 sts along each side)
Round 9 :
sl st in the next ch-2 sp. ch 3 (counts as first dc), ch 2, dc in the same sp. *dc in each of the next 17 dc, (dc, ch 2, dc) in the next ch-2 sp; rep from * 2 more times, dc in each of the last 17 dc, join with sl st to the top of the starting ch 3. (76 dc; 19 sts along each side)
Round 10 :
sl st in the next ch-2 sp. ch 3 (counts as first dc), ch 2, dc in the same sp. *[ch 1, sk next st, dc in next st] 9 times, ch 1, sk next st, (dc, ch 2, dc) in the next ch-2 sp; rep from * 2 more times, [ch 1, sk next st, dc in next st] 9 times, ch 1, sk the last st, join with sl st to the top of the starting ch 3. (44 dc and 40 ch-1 sps; 21 sts along each side)
Round 11 :
sl st in the next ch-2 sp. ch 3 (counts as first dc), ch 2, dc in the same sp. *[dc in next dc, ch 1, sk next ch-1 sp] 10 times, dc in next dc, (dc, ch 2, dc) in the next ch-2 sp; rep from * 2 more times, [dc in next dc, ch 1, sk next ch-1 sp] 10 times, dc in the last dc, join with sl st to the top of the starting ch 3. (52 dc and 40 ch-1 sps; 23 sts along each side)
Round 12 :
sl st in the next ch-2 sp. ch 3 (counts as first dc), ch 2, dc in the same sp. *dc in each of the next 23 sts (one dc in each dc and in each ch-1 sp), (dc, ch 2, dc) in the next ch-2 sp; rep from * 2 more times, dc in each of the last 23 sts, join with sl st to the top of the starting ch 3. Fasten off and weave in ends. (100 dc; 25 dc along each side between the corner sps)
— 2. Joining the Bedspread :
Info :
Lay out the 48 blocked motifs in 6 columns of 8, with every motif turned the same way. Join the motifs into 6 strips of 8, then join the strips side by side. Keep your joining stitches loose and even, and use the same yarn and hook as the motifs.
Join Motifs :
Hold two motifs with wrong sides together, matching the corner sps and the 25 dc along the edge. Join yarn with a sc worked through the corner sp of both motifs at once, sc through the back loops only of each pair of dc across (25 sc), then sc through the pair of corner sps at the far end. (27 sc along each seam) Join 8 motifs this way to make one strip, and make 6 strips.
Join Strips :
Place two strips side by side with wrong sides together and join them with the same seam: sc through the corner sps, 25 sc through the back loops of the dc pairs, then sc at the next junction. At every spot where four motifs meet, work one sc through all four corner sps at once so the junction lies flat. Join all 6 strips this way.
— 3. Bedspread Edging :
Info :
The edging is worked all the way around the finished bedspread in three rounds. The counts below assume 8 motifs along each long side and 6 along each short side, so check your motif edges each have 25 dc before you begin.
Round 1 :
Join yarn with sl st in any outer corner sp, with the right side facing and a long side ahead of you. ch 1, (sc, ch 2, sc) in the same sp. *sc in each dc and each joining st along the long side (207 sc), (sc, ch 2, sc) in the next corner sp, sc in each dc and each joining st along the short side (155 sc), (sc, ch 2, sc) in the next corner sp; rep from * once more, but at the end of the last short side join with sl st to the first sc instead of working another corner. (732 sc and four ch-2 corner sps)
Round 2 :
sl st in the ch-2 corner sp, ch 1, sc in the same sp. Long side: ch 3, sc in next st, [ch 3, sk 3 sts, sc in next st] 52 times, ch 3, sc in the next ch-2 corner sp. Short side: ch 3, sc in next st, [ch 3, sk 3 sts, sc in next st] 39 times, ch 3, sc in the next ch-2 corner sp. Work a second long side and a second short side the same way, but after the last arch of the last short side, ch 3 and join with sl st to the first corner sc instead of working a corner sc. (190 ch-3 sps)
Round 3 :
sl st in the next ch-3 sp, ch 1, (sc, dc, tr, dc, sc) in the same sp. Work (sc, dc, tr, dc, sc) in each remaining ch-3 sp around, join with sl st to the first sc. Fasten off and weave in ends. (190 points, 950 sts)
— 4. Sham Front (make 2) :
Info :
Each sham front is 2 motifs across by 3 down and measures approximately 50 x 75 cm (20 x 30 in), sized for a standard bed pillow. Use the 12 remaining motifs, 6 for each front.
Join Motifs :
Join 3 motifs in a strip using the same seam as the bedspread (27 sc per seam), and make a second strip. Then join the two strips along the long edge, working one sc through all four corner sps where the motifs meet.
Round 1 :
Join yarn with sl st in any outer corner sp, with a 3-motif side ahead of you. ch 1, (sc, ch 2, sc) in the same sp. *sc in each dc across the first motif, 2 sc in the joining st, sc in each dc across the second motif, 2 sc in the next joining st, sc in each dc across the third motif (79 sc), (sc, ch 2, sc) in the next corner sp, sc in each dc across the first motif, sc in the joining st, sc in each dc across the second motif (51 sc), (sc, ch 2, sc) in the next corner sp; rep from * once more, but at the end of the last short side join with sl st to the first sc. (268 sc and four ch-2 corner sps)
Round 2 :
sl st in the ch-2 corner sp, ch 1, sc in the same sp. Long side: ch 3, sc in next st, [ch 3, sk 3 sts, sc in next st] 20 times, ch 3, sc in the next ch-2 corner sp. Short side: ch 3, sc in next st, [ch 3, sk 3 sts, sc in next st] 13 times, ch 3, sc in the next ch-2 corner sp. Work a second long side and a second short side the same way, but after the last arch of the last short side, ch 3 and join with sl st to the first corner sc. (74 ch-3 sps)
Round 3 :
sl st in the next ch-3 sp, ch 1, (sc, dc, tr, dc, sc) in the same sp. Work (sc, dc, tr, dc, sc) in each remaining ch-3 sp around, join with sl st to the first sc. Fasten off and weave in ends. (74 points, 370 sts)
— 5. Sham Back (make 2) :
Info :
The back is a plain dc rectangle that is sewn to the front, so the lace stays the star. It should measure approximately 52 x 77 cm (20.5 x 30.5 in). Measure it against your finished front and add or remove rows until the length matches.
Row 1 :
ch 78, dc in the 4th ch from hook (the first 3 ch count as a dc) and in each ch across. (76 sts)
Row 2-70 :
ch 3 (counts as first dc), turn, dc in each dc across, dc in the top of the turning ch. (76 sts) Fasten off after the last row and weave in ends.
— 6. Lumbar Cushion Panels (make 2) :
Info :
Each panel is worked lengthwise in blo sc rows, which makes fine ribs that run along the long side of the cushion. A panel measures approximately 45 x 22 cm (18 x 9 in) when worked in the lighter ecru cream yarn.
Row 1 :
ch 73, sc in the 2nd ch from hook and in each ch across. (72 sc)
Row 2-36 :
ch 1, turn, sc blo in each st across. (72 sc) Fasten off after row 36 and weave in ends.
— 7. Pom-poms (make 12) :
Info :
You need 12 small pom-poms, each approximately 2.5 cm (1 in) across, made with the ecru cream yarn. Six go along each short end of the cushion.
Pom-pom :
Wrap the yarn about 30 times around a piece of cardboard 3 cm (1.2 in) wide. Slide the loops off carefully, tie a long strand tightly around the middle and knot it twice, leaving two tails about 20 cm (8 in) long. Cut through all the loops, fluff the pom-pom, and trim it into a neat round, keeping the two tails for sewing.
Your bedroom is about to feel a whole lot calmer! 🧶 Once the last point of the edging is blocked and the shams are plumped against the headboard, you’ll have a set that looks like it came from a boutique, only it carries every hour of care you put in. Take your time, enjoy the rhythm of each square, and save the finished set for the best morning light. ✨ Happy stitching, and may your tension stay even and your tea stay hot! 🧵