About This Crochet Christmas Tree Table Runner Pattern
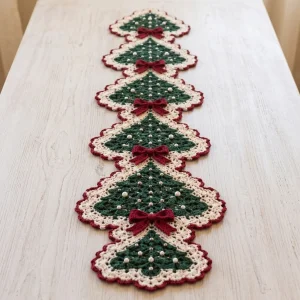
Lay it down the middle of a dinner table, run it along a mantel or sideboard, or wrap it up as a hostess gift for someone who loves handmade holiday decor.
Ideal for those with basic crocheting experience, featuring slightly more advanced stitches and techniques to expand your skills.
Requires 8-10 hours, ideal for a full day of immersive crocheting.
Festive fun for the season, bringing handmade magic to celebrations and creating new family traditions.
Lay it down the middle of a dinner table, run it along a mantel or sideboard, or wrap it up as a hostess gift for someone who loves handmade holiday decor.
I adore how forgiving the tree is. Once you’ve found the rhythm of those increase rows, you can nearly stitch it while chatting with a friend. The bit that makes me smile most is the border, because those cream fans ruffle out just enough to look like piped frosting. And the bows? I always save them for last as a little reward after all the sewing is done.
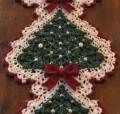
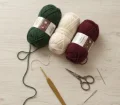
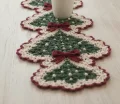
The first time I made one of these trees, I was convinced the stepped sides would be fiddly. They weren’t. The rhythm is simple: a few rows of single increases, then one row where you double up at both ends, and the branch tier pops out like magic. I stitched my first tree on a rainy Sunday and had the border done before the kettle went cold for the second time.
My best tip is to pick your pearl placement before you start sewing. I lay all of them out on the finished tree with pins first, nudging them until the pattern looks scattered but balanced, then stitch them down one by one. It takes patience, but it makes the trees look sparkly rather than lumpy.
I also love swapping colors. A deep navy tree with silver beads and a pale blue edge feels wintery, and a cream tree with gold beads and a soft pink border is lovely for a gentler holiday table. Whatever you choose, keep the three colors clearly different so the lace border stays crisp against the tree.
Picture your holiday table dressed in a parade of little green trees, each one wrapped in a lacy cream frame and finished with a ruffled red edge. You’ll crochet six matching tree motifs, stitch them into one long runner, and tie each tree off with a plump crocheted bow. Pearl beads scattered across the branches catch the candlelight beautifully. It’s a project that rewards you at every stage, from the first tiny tip to the very last bead.
Each finished motif measures approximately 12 cm (4.7 in) wide and 13 cm (5.1 in) tall, and the joined runner is approximately 68 cm (26.8 in) long. To lengthen it, make one extra motif for every 11.5 cm (4.5 in) you want to add. The foundation stays at ch 2, so no chain adjustment is needed. Chain 1 at the start of each row does not count as a stitch. The tree is worked in rows and turned at the end of every row.
With green, ch 2. Work 3 sc in the 2nd ch from hook (3).
Ch 1, turn. 2 sc in first st, sc in next st, 2 sc in last st (5).
Ch 1, turn. 2 sc in first st, sc in next 3 sts, 2 sc in last st (7).
Ch 1, turn. 2 sc in first st, sc in next 5 sts, 2 sc in last st (9).
Ch 1, turn. 2 sc in each of first 2 sts, sc in next 5 sts, 2 sc in each of last 2 sts (13). This starts the second tier.
Ch 1, turn. 2 sc in first st, sc in next 11 sts, 2 sc in last st (15).
Ch 1, turn. 2 sc in first st, sc in next 13 sts, 2 sc in last st (17).
Ch 1, turn. 2 sc in first st, sc in next 15 sts, 2 sc in last st (19).
Ch 1, turn. 2 sc in each of first 2 sts, sc in next 15 sts, 2 sc in each of last 2 sts (23). This starts the third tier.
Ch 1, turn. 2 sc in first st, sc in next 21 sts, 2 sc in last st (25).
Ch 1, turn. 2 sc in first st, sc in next 23 sts, 2 sc in last st (27).
Ch 1, turn. 2 sc in first st, sc in next 25 sts, 2 sc in last st (29).
Ch 1, turn. 2 sc in each of first 2 sts, sc in next 25 sts, 2 sc in each of last 2 sts (33). This starts the wide bottom tier.
Ch 1, turn. 2 sc in first st, sc in next 31 sts, 2 sc in last st (35).
Ch 1, turn. 2 sc in first st, sc in next 33 sts, 2 sc in last st (37).
Ch 1, turn. 2 sc in first st, sc in next 35 sts, 2 sc in last st (39).
Ch 1, turn. Sc in each st across (39). Do not turn. Fasten off green, leaving a short tail to weave in.
Hold the tree with the wide bottom edge facing you. Join cream with a sl st in the last st of Row 17, which becomes the first bottom corner. The tip of the tree is the point where Row 1 begins, so work the 3 sc there into that point itself. If the tip feels a little unclear to you, any firm spot at the very top works fine, as the border hides it.
Ch 1, 3 sc in same st (corner), sc in next 37 sts along the bottom, 3 sc in the last st of Row 17 (corner), then sc in each of the 16 row-ends up the side from Row 16 to Row 1, 3 sc in the tip, sc in each of the 16 row-ends down the other side from Row 1 to Row 16. Sl st to first sc to join (78).
Ch 1, sc in next st, ch 3, sk 2 sts, repeat from * to * 26 times in total. Sl st to first sc to join (26 sc and 26 ch-3 sps).
Sl st into the first ch-3 sp. Ch 3 (counts as first dc), 3 dc in same sp, sc in next sc, 4 dc in next ch-3 sp, sc in next sc, repeat until you have worked into all 26 ch-3 sps, ending with an sc in the first sc of Round 2. Sl st to top of the starting ch 3 to join. Fasten off cream (130 sts, made of 26 dc fans and 26 sc).
Join red with a sl st in any sc. Ch 1, sc in same st and in each st around. Sl st to first sc to join. Fasten off and weave in ends (130).
With red, ch 25. Sc in 2nd ch from hook and in each ch across (24).
Ch 1, turn. Sc in each st across (24). Fasten off, leaving a 30 cm (12 in) tail for sewing.
With red, ch 5. Sc in 2nd ch from hook and in each ch across (4).
Ch 1, turn. Sc in each st across (4). Fasten off, leaving a 20 cm (8 in) tail for sewing.
With red, ch 7. Sc in 2nd ch from hook and in each ch across (6).
Ch 1, turn. Sc in each st across (6).
Ch 1, turn. Sc2tog, sc in next 2 sts, sc2tog (4).
Ch 1, turn. Sc2tog twice (2). Fasten off, leaving a 15 cm (6 in) tail for sewing.
Your finished runner is a little Christmas forest you can pull out year after year 🎄 Every tree you finish is a tiny win, and by the time the sixth bow is stitched on you’ll have a piece that looks like it came from a boutique craft fair. Pour something warm, put on your favorite carols, and let the rows pile up one cozy evening at a time. Happy hooking, and may your holidays be full of thread ends and good company! 🧶✨
You can, but the sizing changes quickly. With DK or worsted weight, each tree becomes much wider and taller, so six motifs would make a very long runner. Make one tree first, measure it, and decide whether to reduce the number of motifs to fit your table.
Each motif adds about 11.5 cm (4.5 in) to the length when joined, so make as many trees as you like. The foundation chain stays at ch 2 for every tree, so you never need to change the starting chain.
Yes. On Round 4 of each new tree, you can sl st through the red edge of the motif above at the center 20 sts instead of working sc there. Sewing is neater, though, and lets you adjust the overlap before committing.
The step-out rows 5, 9, and 13 are the only places where you add four stitches instead of two. Just remember 2 sc in each of the first two and last two stitches, and check your count against the number in brackets after each row.
About 10 to 12 beads per tree, so around 70 in total with a few spares. Scatter them over the green section only, in loose diagonal lines, and keep a few stitches away from the border so the lace stays clean.
