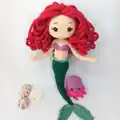
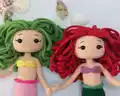
Dive into an enchanting underwater world with this magical mermaid and jellyfish crochet pattern! Create your own adorable sea creatures with detailed instructions for a beautiful mermaid complete with flowing hair, a shimmering tail, and delicate accessories, plus a charming jellyfish companion with graceful tentacles. Perfect for gift-giving or adding a touch of ocean magic to your home decor. This pattern features customizable color options including classic Ariel-inspired shades or sweet pink tones, making each creation uniquely yours.
Progress Tracker
0% Complete
— ARM x 2 :
Info :
I did not fill it because I used electrical wire. Fill fiberfill every 5 rows/turns if you are not going to use it.
Round 1 :
5 sc in a magic ring (5)
Round 6 :
Bobble-3 dc (After making the bobble, switch to the side stitch without making a chain), 9 sc (10)
Round 8 :
(1dec 3sc) x 2 repeat times (8)
Round 10 :
(1inc 3 sc) x 2 repeat times (10)
Round 11-19 :
10 sc (9 row) (10)
Round 20 :
(1 dec 3sc) x 2 repeat times (8)
Round 21 :
(1inc 3sc) x 2 repeat times (10)
Round 22-32 :
10 sc (11 row) (10) (sew the last remaining loop into the loop next to it with the help of a needle.)
— HEAD :
Round 1 :
6 sc in a magic ring (6)
Round 3 :
(1sc 1 inc) x 6 repeat times (18)
Round 4 :
(2sc 1inc) x 6 repeat times (24)
Round 5 :
(1sc 1 inc), (3sc 1 inc) x 5 repeat times, 2sc (30)
Round 6 :
(4sc 1inc) x 6 repeat times (36)
Round 7 :
(2sc 1inc), (5 sc 1 inc) x 5 repeat times, 3sc (42)
Round 8 :
(6sc 1 inc) x 6 repeat times (48)
Round 9 :
(3sc 1inc), (7sc 1 inc) x 5 repeat times, 4sc (54)
Round 10 :
(8sc 1inc) x 6 repeat times (60)
Round 11-24 :
60 sc (14row) (60)
Info :
Place 8 mm safety lock eyes 9sc apart between 17th and 18th rounds.
Round 25 :
(8sc 1dec) x 6 repeat times (54)
Round 26 :
(3sc 1dec), (7sc 1dec) x 5 repeat times, 4sc (48)
Round 27 :
(6sc 1dec) x 6 repeat times (42)
Round 28 :
(2sc 1dec) x 10 repeat times, 2 sc (32) (start adding fiberfill)
Round 29 :
(1dec 2sc) x 8 repeat times (24)
Round 30 :
(2sc 1dec) x 6 repeat times (18)
Round 31 :
(1sc 1dec) x 6 repeat times (12) cut the yarn long to sew
Info :
See pictures to embroider eyelashes and nose
— HAIR BASE :
Info :
Red color or green color
Round 1 :
6 sc in magic ring (6)
Round 3 :
as BLO (1sc 1inc) x 6 repeat times (18)
Round 5 :
as BLO ((5sc 1 inc) x 6 repeat times (42)
Round 6 :
(6sc 1inc) x 6 repeat times (48)
Info :
Continue without cutting the yarn
— HAIR STRAND.1 (24 hair strands) :
Hair strand 1-24 :
62 ch. from the 3rd chain, 60 hdc, fasten into new loop with slip stitch, 1 sc switch to new loop, and start new strand of hair. Continue this process until you have 24 hair strands and cut the yarn
— HAIR STRAND.2 (18 hair strands) :
Hair strands 1-18 :
Go back to round 5 at the base of the hair and attach the yarn as the FLO, 62 ch. from the 3rd chain, 60 hdc, fasten into new loop with slip stitch, 1 sc switch to new loop, and start new strand of hair. Continue this process until you have 18 hair strands and cut the yarn
— HAIR STRAND.3 (6 hair strands) :
Hair strands 1-6 :
Go back to round 3 at the base of the hair and attach the yarn as the FLO, 62 ch. from the 3rd chain, 60 hdc, fasten into new loop with slip stitch, 1 sc switch to new loop, and start new strand of hair. Continue this process until you have 6 hair strands and cut the yarn.
Infos :
I chose to sew the wig on the doll's head myself. You can use a strong glue if you wish. If you fasten it with pins first, your job will be easier. See pictures for sewing. Separate 6 strands of hair from the front. Just sew the hair in the round you made 24 hairs
— TAIL and BODY :
Info :
Start green or light pink
Round 1 :
6 sc in a magic ring (6)
Info :
start filling fiberfill
Round 11 :
9sc, 1 inc (11)
Round 13 :
10 sc, 1 inc (12)
Round 15 :
10 sc, 2inc (14)
Round 17 :
10sc, (1 sc 1 inc) x 2 repeat times (16)
Round 19 :
(7sc 1inc) x 2 repeat times (18)
Round 22 :
(8 sc 1inc) x 2 repeat times (20)
Round 24 :
19 sc, 1inc (21)
Round 26 :
20sc, 1inc (22)
Round 28 :
(10 sc 1 inc) x 2 repeat times (24)
Round 30 :
23 sc, 1 inc (25)
Round 32 :
24 sc, 1 inc (26)
Round 34 :
25 sc, 1 inc (27)
Round 36 :
26sc, 1 inc (28)
Round 38 :
(6sc 1 inc) x 4 repeat times (32)
Round 40 :
(7sc 1 inc) x 4 repeat times (36)
Round 42 :
(8sc 1inc) x 4 repeat times (40)
Round 44 :
(9 sc 1 inc) x 4 repeat times (44)
Round 49 :
(9sc 1dec) x 4 repeat times (40)
Round 51 :
(8sc 1dec) x 4 repeat times (36)
Round 53 :
(7 sc 1 dec) x 4 repeat times (32)
Round 55 :
32 sc (change yarn with skin color in last sc)
Round 56 :
as BLO 32 sc (32)
Round 57-70 :
32 sc (14 row) (32)
— ADDING ARMS :
Round 71 :
10sc, 3sc (with arm), 13sc, 3sc (with arm), 3sc, marker here (32)
Round 72 :
10 sc (body), 7sc (to the outside of the arm), 13sc (body), 7 sc (to the outside of the arm), 3 sc (body) (40)
Round 74 :
(3 sc 1dec) x 8 repeat times (32)
Info :
if you are going to add electrical wire, review the pictures. Cut 23 cm of electrical wire and twist the ends.
Round 75 :
(2sc 1dec) x 8 repeat times (24)
Round 76 :
(2sc 1dec) x 6 repeat times (18)
Round 77 :
(1sc 1dec) x 6 repeat times (12)
Round 80 :
12sc cut the yarn.
Infos :
Cut 16 cm of electrical wire and fold it in half. Wrap some tape and attach it to the doll's neck as a support. Sew the doll's head to the body
— WAIST DETAIL :
Info :
for the detail on the mermaid's waist, Go back to round 56 and fasten the light green thread from the back of the toy as FLO; 2ch, (2dc 1 incdc) x 4 repeat times, 2 dc, 1 sc, (2dc 1 incdc) x 5 repeat times, 2 dc, sl st. Cut the yarn.
— MERMAID FISH TAIL (2 pieces) :
Round 1 :
16 ch, from the 2nd chain, 15 sc, 5 ch, turn crochet (15)
Round 2 :
from the 2nd chain, 4 sc into chain, as BLO 15sc, 1 ch, turn crochet (19)
Round 3 :
as BLO 19sc, 5 ch, turn crochet (19)
Round 4 :
from the 2nd chain, 4 sc into chain, as BLO 19 sc, 1 ch turn crochet (23)
Round 5 :
as BLO 23 sc, 1 ch, turn crochet (23)
Round 6 :
as BLO 23 sc, 1 ch, turn crochet (23)
Round 7 :
as BLO 19 sc, 1 ch, turn crochet (19)
Round 8 :
as BLO 19 sc, 1 ch, turn crochet (19)
Round 9 :
as BLO 15 sc, 1 ch, turn crochet (15)
Round 10 :
as BLO 15 sc, cut the yarn leaving long for sewing
Info :
see pictures to shape
— BRA :
Round 1 :
16 ch, from the 2nd chain, 15 sc, 1 ch turn crochet (15)
Round 2 :
as BLO 15 sc, 1 ch, turn crochet (15)
Round 3 :
as BLO 15 sc, 1 ch, turn crochet (15)
Round 4 :
as BLO 1sc, 2 hdc, 2 dc, 2 hdc, 1sc, 2 hdc, 2dc, 2 hdc, 1sc, cut the yarn (15)
Infos :
Yarn the needle and tighten in the middle. You can hide the yarns inside the bra. To tie yarn from edge and make 30 chains then cut yarn
— JELLYFISH HEAD :
Round 1 :
6 sc in a magic ring (6)
Round 3 :
(1sc 1 inc) x 6 repeat times (18)
Round 4 :
(2sc 1inc) x 6 repeat times (24)
Round 5 :
(1sc 1 inc), (3sc 1 inc) x 5 repeat times, 2sc (30)
Round 6 :
(4sc 1inc) x 6 repeat times (36)
Round 7 :
(2sc 1inc), (5 sc 1 inc) x 5 repeat times, 3sc (42)
Round 8-16 :
42 sc (9 row) (42)
Round 17 :
(5 sc 1 dec) x 6 repeat times (36)
Round 18 :
as BLO 36 sc. Cut the yarn (36)
Info :
6mm safety lock eyes, placed 6 sc apart between rounds 13 and 14th
— JELLYFISH LOWER BASE :
Round 1 :
8sc in magic ring (8)
Round 3 :
as BLO (1 sc 1 inc) x 8 repeat times (24)
Round 4 :
(1sc 1inc) x 12 repeat times cut the yarn long for sewing
— JELLYFISH TENTACLES (8 pieces) :
Info :
for tentacles go back to round 3 and fasten yarn as FLO; Make 21 chains, from chain 2, 20 sc, fasten into new loop with slip stitch, 1 sc switch to new loop, and start new tentacle.
— JELLYFISH FINISHING :
Info :
go back to round 18 of jellyfish's head and fasten yarn as FLO, 36 incdc, sl st.
This enchanting Mermaid and Jellyfish pattern brings the magic of the ocean into your hands with intricate details that truly bring these characters to life! From the flowing cascading hair with 48 individual strands to the posable arms created with electrical wire, every element has been thoughtfully designed to create a stunning finished piece. The pattern includes complete instructions for both an adorable mermaid with customizable color options and a charming jellyfish companion with graceful flowing tentacles. Whether you're creating a gift for someone special or adding to your own collection of handmade treasures, this pattern offers a rewarding challenge that results in a truly magical keepsake. 🧜♀️🪼✨