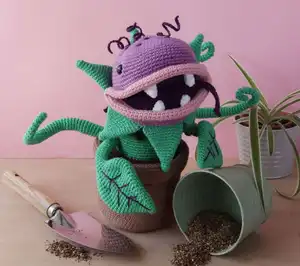
Bring this adorable carnivorous companion to life with Clarence the Peckish Plant! This charming amigurumi features a cheeky smile, posable wire-reinforced leaves and vines, and personality-packed details like protective spikes and wispy hair. Standing at 27cm tall, Clarence is crafted with bendable pipe cleaners throughout, allowing you to pose his mouth, leaves, and twirly vines for endless expressions. The pattern includes detailed instructions for creating his cozy plant pot with a reinforced lip, grippy leaves, fangs, and even a stingy purple tongue. Perfect for plant lovers and amigurumi enthusiasts who want a project with character and charm!
Progress Tracker
0% Complete
— 1. Cozy Plant Pot :
Info :
Make 1 in light brown
Round 1 :
start 7sc in a magic ring [7]
Round 2 :
inc in all 7 sts [14]
Round 3 :
(1sc, inc in next st) repeat 7 times [21]
Round 4 :
(2sc, inc in next st) repeat 7 times [28]
Round 5 :
(3sc, inc in next st) repeat 7 times [35]
Round 6 :
(4sc, inc in next st) repeat 7 times [42]
Round 7 :
(5sc, inc in next st) repeat 7 times [49]
Round 8 :
(6sc, inc in next st) repeat 7 times [56]
Round 9 :
(7sc, inc in next st) repeat 7 times [63]
Round 10 :
(8sc, inc in next st) repeat 6 times, 9sc [69]
Round 11 :
working in BLO, slst in all 69 sts [69]
Round 12 :
working into the same back loops and over the slip stitches, sc in all 69 sts [69] - This creates a more defined, firmer round at the base of the pot
Round 13-17 :
sc in all 69 sts - 5 rounds
Round 18 :
(22sc, inc in next st) repeat 3 times [72]
Round 19-22 :
sc in all 72 sts - 4 rounds
Round 23 :
(23sc, inc in next st) repeat 3 times [75]
Round 24-27 :
sc in all 75 sts - 4 rounds
Round 28 :
(24sc, inc in next st) repeat 3 times [78]
Round 29-32 :
sc in all 78 sts - 4 rounds
Info :
Next round starts the lip of the pot
Round 33 :
working in FLO, (12sc, inc in next st) repeat 6 times [84]
Round 34-45 :
sc in all 84 sts - 12 rounds
Round 46 :
(12sc, inv dec) repeat 6 times [78]
Infos :
To add more structure to the lip of the pot cut a strip of thick felt or foam fabric stabiliser and place into the lip of the pot. The strip should be half the height of the lip when measured from Rnd 33 to Rnd 46, and long enough to go all around the circumference of the top of the pot. Tip: If you don't have thick felt or stabiliser try using some corrugated card instead. Fold over the last 13 rounds down to Rnd 33 to form the lip of the pot
Round 47 :
working in both loops of current round and free back loops from left over from Rnd 33, slst in all 78 sts to close the lip [78]
Info :
Fasten off, weave in the ends. Set the pot aside for now and move on to making the head
— 2. Inner Mouth :
Info :
Make 1 in purple. Ch13, start 2nd ch from hook, work in a round, along both sides of the chain
Round 1 :
3sc in next ch, 10sc, 3sc in last ch, carry on along the other side of the chain, 10sc, skip last ch [26]
Round 2 :
(inc in next 3 st, 10sc) repeat 2 times [32]
Round 3 :
(inc in next st, 1sc) repeat 3 times, 10sc, (inc in next st, 1sc) repeat 3 times, 10sc [38]
Round 4 :
(2sc, inc in next st) repeat 3 times, 10sc, (2sc, inc in next st) repeat 3 times, 10sc [44]
Round 5 :
(inc in next st, 3sc) repeat 3 times, 10sc, (inc in next st, 3sc) repeat 3 times, 10sc [50]
Round 6 :
(4sc, inc in next st) repeat 3 times, 10sc, (4sc, inc in next st) repeat 3 times, 10sc [56]
Round 7 :
(inc in next st, 5sc) repeat 3 times, 10sc, (inc in next st, 5sc) repeat 3 times, 10sc [62]
Round 8 :
(6sc, inc in next st) repeat 3 times, 10sc, (6sc, inc in next st) repeat 3 times, 10sc [68]
Round 9 :
(inc in next st, 7sc) repeat 3 times, 10sc, (inc in next st, 7sc) repeat 3 times, 10sc [74]
Round 10 :
(8sc, inc in next st) repeat 3 times, 10sc, (8sc, inc in next st) repeat 3 times, 10sc [80]
Round 11 :
(inc in next st, 9sc) repeat 3 times, 10sc, (inc in next st, 9sc) repeat 3 times, 10sc [86]
Round 12-13 :
sc in all 86 sts - 2 rounds
Round 14 :
3slst, 33sc, 10slst, 33sc, 7slst [86]
Info :
Fasten off, weave in the end. Note: the slip stitches will sit in the corners of the mouth when joining the pieces
— 3. Top of the Head :
Round 1 :
start 6sc in a magic ring [6]
Round 2 :
inc in all 6 sts [12]
Round 3 :
(1sc, inc in next st) repeat 6 times [18]
Round 4 :
(2sc, inc in next st) repeat 6 times [24]
Round 5 :
(3sc, inc in next st) repeat 6 times [30]
Round 6 :
(4sc, inc in next st) repeat 6 times [36]
Round 7 :
(5sc, inc in next st) repeat 6 times [42]
Round 8 :
(6sc, inc in next st) repeat 6 times [48]
Round 9 :
(7sc, inc in next st) repeat 6 times [54]
Round 10 :
(8sc, inc in next st) repeat 6 times [60]
Round 11 :
(9sc, inc in next st) repeat 6 times [66]
Round 12 :
(10sc, inc in next st) repeat 6 times [72]
Round 13-18 :
sc in all 72 sts - 6 rounds
Info :
Fasten off, weave in the end
— 4. Bottom of the Head + Joining the pieces :
Round 1-12 :
work the same way as Top of the Head
Round 13-15 :
sc in all 72 sts - 3 rounds
Infos :
Next join in the inner mouth to the bottom of the head. Pick up the Inner mouth and place it under the bottom of the head, wrong sides together, lining up the middle of the slip stitched section with the start of next round. Start joining the 2 pieces in middle of the slip stitch section from Rnd 14 of the Inner Mouth, working through both layers
Round 16 :
work 5sc along the head + slip stitches of the mouth, 33sc along head + mouth, 5sc along the head + slip stitches, next pick up the top half of the head so it rests over the remaining half of the inner mouth, work 5sc along the head + slip stitches, 33sc along head + mouth, 5sc along the head + slip stitches [86]
Infos :
Fasten off and weave in the ends. Now the head is joined together add in some safety eyes to the top half. Use the corners of the mouth as guides and add the eyes - count 5 sts away from the corner and 5 rounds up and place the eye there, poke a hole in the fabric with a knitting needle or a pencil first to make this easier
— 5. Lips :
Info :
Join pink yarn to the corner of the mouth
Round 1 :
work in FLO, sc in all 86 sts [86]
Round 2-8 :
sc in all 86 sts - 7 rounds
Info :
Add a ring of wire or pipe cleaners, enclosing it in the tube with the next round. I like to double them up for strength
Round 9 :
working in FLO + remaining free back loop of the mouth - sc in all 86 sts [86]
Infos :
Fasten off and weave in the ends. Add stuffing to the top and bottom half of the head, keeping the roof of the mouth flat. With the top of the head towards you, join lilac to the corner of the remaining free stitches of two halves of the head, and close the gap with a row of single crochet, working the stitches through both layers. Tip: Alternatively sew up with a tail of yarn instead
— 6. Top Fangs :
Info :
Make 2 or more in white
Round 1 :
start 6sc in a magic ring [6]
Round 2 :
sc in all 6 sts [6]
Round 3 :
(inc in next st, 2sc) repeat 2 times [8]
Round 4 :
sc in all 8 sts [8]
Round 5 :
(inc in next st, 3sc) repeat 2 times [10]
Info :
Fasten off, leave a tail for sewing
— 7. Bottom Fangs :
Info :
Make 2 or more in white
Round 1 :
start 6sc in a magic ring [6]
Round 2 :
sc in all 6 sts [6]
Round 3 :
(inc in next st, 2sc) repeat 2 times [8]
Info :
Fasten off, leave a tail for sewing
Infos :
Sew the fangs to the inside seam of the lips in your preferred spot. On the sample the top fangs are sitting further apart than the bottom ones. Press the corners of the mouth up into a cheeky smile and move on to making the body
— 8. Stem Petals :
Round 1 :
start 6sc in a magic ring [6]
Round 2-3 :
sc in all 6 sts - 2 rounds
Round 4 :
(1sc, inc in next st) repeat 3 times [9]
Round 5 :
sc in all 9 sts [9]
Round 6 :
(2sc, inc in next st) repeat 3 times [12]
Round 7 :
sc in all 12 sts [12]
Round 8 :
(3sc, inc in next st) repeat 3 times [15]
Round 9 :
sc in all 15 sts [15]
Round 10 :
(4sc, inc in next st) repeat 3 times [18]
Round 11 :
sc in all 18 sts [18]
Round 12 :
(5sc, inc in next st) repeat 3 times [21]
Round 13 :
sc in all 21 sts [21]
Round 14 :
(6sc, inc in next st) repeat 3 times [24]
Round 15 :
sc in all 24 sts [24]
Round 16 :
do not stuff, fold the piece flat and work next sts through both layers, 12 sc [12]
Info :
Fasten off the first 5 petals. Do not fasten off the last petal, carry on to join them into the stem, trapping the leftover yarn tails as you work
— 9. Joining the Stem :
Info :
Carry on work from the 6th petal. Join all the petals together to make 1 round, make sure they are all facing right way up when joining, with the wrong side of Rnd 16 down
Round 1 :
(bring next petal to the work, 12sc along the top) repeat 5 times, then work 12sc along the original (6th) petal [72]
Round 2-3 :
sc in all 72 sts - 2 rounds
Round 4 :
(5sc, inv dec, 5sc) repeat 6 times [66]
Round 5-6 :
sc in all 66 sts - 2 rounds
Round 7 :
(5sc, inv dec, 4sc) repeat 6 times [60]
Info :
Next group of rounds create a small bend in the stem. If you want the stem to point straight up instead of forward you can work Rnds 8-26 as single crochet rounds instead
Round 8 :
30slst in back loops only (BLO), 30sc in both loops [60]
Round 9 :
30slst in BLO of the slip stitches, 30sc in both loops [60]
Round 10 :
30sc in free front loops (FLO) from both last 2 rounds, 30sc in both loops [60] - You will be putting the hook under 2 loops like you would when working a regular single crochet stitch, this will minimise the jog when creating the bend
Round 11 :
30slst in BLO from Rnd 9 (behind the current round), 30sc in both loops [60] - These slip stitches will be hidden on the inside
Round 12 :
30slst in BLO of the slsts, 30sc in both loops [60]
Round 13 :
30sc in free stitches from Rnd 10, 30sc [60] - Notice how the stem now tilts forward a little
Round 14-17 :
sc in all 60 sts - 4 rounds
Info :
Now lets add another bend
Round 18 :
2sc, 26slst in BLO, 32sc in both loops [60]
Round 19 :
2sc, 26slst in BLO of the slsts, 32sc in both loops [60]
Round 20 :
2sc, 26sc in free FLO from last 2 rounds, then work in both loops: 2sc, inv dec, 12sc, inv dec, 12sc, inv dec [57]
Round 21 :
29sc, inv dec, 11sc, inv dec, 11sc, inv dec [54]
Round 22-26 :
sc in all 54 sts - 5 rounds
Round 27 :
slst in all 54 sts [54]
Info :
Fasten off and weave in the ends
— 10. Soil :
Info :
Join dark brown to any slip stitch from Rnd 27 of the stem
Round 1 :
sc in all 54 sts [54]
Round 2 :
(8sc, inc in next st) repeat 6 times [60]
Round 3 :
(9sc, inc in next st) repeat 6 times [66]
Round 4 :
(5sc, inc in next st, 5sc) repeat 6 times [72]
Round 5 :
(inc in next st, 11sc) repeat 6 times [78]
Infos :
Next round joins the soil to the pot. Fold back the brim of the pot so that the slip stitch round is easy to get to. Work the next round through both loops of the soil and Rnd 47 (the slip stitch round) of the pot, pulling the yarn from below the pots slip stitches
Round 6 :
slst in all 78 sts [78]
Info :
Fasten off and weave in the ends
— 11. Twirly Vines :
Round 1 :
start 5sc in a magic ring [5]
Round 2-6 :
sc in all 5 sts - 5 rounds
Round 7 :
inc in next st,4sc [6]
Round 8-12 :
sc in all 6 sts - 5 rounds
Round 13 :
inc in next st, 5sc [7]
Round 14-18 :
sc in all 7 sts - 5 rounds
Round 19 :
inc in next st, 6sc [8]
Round 20-24 :
sc in all 8 sts - 5 rounds
Round 25 :
inc in next st, 7sc [9]
Round 26-30 :
sc in all 9 sts - 5 rounds
Round 31 :
inc in next st, 8sc [10]
Round 32-36 :
sc in all 10 sts - 5 rounds
Round 37 :
inc in next st, 9sc [11]
Round 38-42 :
sc in all 11 sts - 5 rounds
Round 43 :
inc in next st, 10sc [12]
Round 44-55 :
sc in all 12 sts - 12 rounds
Info :
Fasten off, leave a tail for sewing
— 12. Grippy Leaves :
Round 1 :
start 6sc in a magic ring [6]
Round 2 :
sc in all 6 sts [6]
Round 3 :
(1sc, 3sc in next st, 1sc) repeat 2 times [10]
Round 4 :
sc in all 10 sts [10]
Round 5 :
(2sc, 3sc in next st, 2sc) repeat 2 times [14]
Round 6 :
sc in all 14 sts [14]
Round 7 :
(3sc, 3sc in next st, 3sc) repeat 2 times [18]
Round 8 :
sc in all 18 sts [18]
Round 9 :
(4sc, 3sc in next st, 4sc) repeat 2 times [22]
Round 10 :
sc in all 22 sts [22]
Round 11 :
(5sc, 3sc in next st, 5sc) repeat 2 times [26]
Round 12 :
sc in all 26 sts [26]
Round 13 :
(6sc, 3sc in next st, 6sc) repeat 2 times [30]
Round 14 :
sc in all 30 sts [30]
Round 15 :
(7sc, 3sc in next st, 7sc) repeat 2 times [34]
Round 16 :
sc in all 34 sts [34]
Round 17 :
(8sc, inc in next st, 8sc) repeat 2 times [36]
Round 18-20 :
sc in all 36 sts - 3 rounds
Round 21 :
(inv dec, 4sc) repeat 6 times [30]
Round 22 :
(3sc, inv dec) repeat 6 times [24]
Round 23 :
(inv dec, 2sc) repeat 6 times [18]
Round 24 :
(1sc, inv dec) repeat 6 times [12]
Round 25 :
sc in all 12 sts [12]
Round 26 :
inv dec, 10sc [11]
Round 27 :
inv dec, 9sc [10]
Round 28-32 :
sc in all 10 sts - 5 rounds
Round 33 :
inc in next st, 9sc [11]
Round 34-38 :
sc in all 11 sts - 5 rounds
Round 39 :
inc in next st, 10sc [12]
Round 40 :
sc in all 12 sts [12]
Infos :
Fasten off, leave a tail for sewing. Press leaves flat. Add wire or pipe cleaners to the leaves and vines, doubling them up for strength
— 13. Protective Spikes :
Info :
Make as many as you fancy in purple yarn. Ch4, start 2nd ch from hook
Row 1 :
1slst, 1sc, 1hdc [3]
Info :
Fasten off, leave a tail for sewing
— 14. Wispy Hair :
Info :
Make as many as you fancy in purple yarn
Infos :
Fasten off, leave a tail for sewing. Wrap the wispy hair around a thick straw or a knitting needle, cover in PVA glue or starch and leave to dry overnight. When completely dry take the hair off the straw and trim one of the tail ends
— 15. Stingy Tongue :
Info :
Make 1 in purple yarn. Ch26, start 2nd ch from hook, for neater edges work in third loop/back hump of the chains
Row 1 :
1slst in next ch, 2sc, 2hdc, ch6, start 2nd ch from hook, slst in next ch, 2sc, 2hdc, now carry on along the main chain, 21dc [21+forked tip]
Info :
Fasten off, leave a tail for sewing. Now all the elements are made it's time to put Clarence together
This delightfully mischievous Clarence the Peckish Plant pattern brings together creative construction techniques with playful personality! The combination of wire-reinforced posable elements, a sturdy reinforced pot, and character-driven details like fangs, spikes, and wispy hair creates an interactive amigurumi friend who's ready to strike a pose. With bendable vines, expressive lips, and that cheeky smile, every Clarence you create will have their own unique personality. Perfect for plant lovers and anyone who wants an amigurumi with serious character! 🪴🧶✨