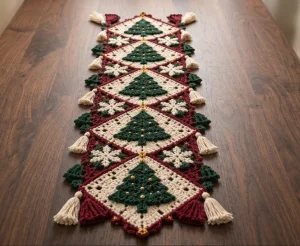
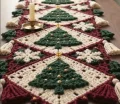
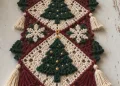
Picture your holiday table with a row of six cream diamonds, each one holding its own little green tree dotted with gold beads. That’s this runner. Burgundy borders frame every tree, snowflakes sparkle in the side gaps, and chunky cream tassels sway at the edges. It’s the kind of piece that makes guests ask where you bought it, and you get to say you made it yourself. The filet tree panels work up quickly once you find your rhythm, and the finishing touches turn a stack of motifs into a real centerpiece for Christmas dinner.
Progress Tracker
0% Complete
— 1. Diamond Panel (make 6) :
Info :
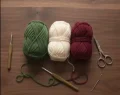
Each finished diamond measures about 11 cm (4.3 in) per side. Joined, the runner is approximately 93 cm (36.5 in) long and 16 cm (6.3 in) wide, plus about 4 cm (1.5 in) of tassel on each side. To lengthen it, add more diamonds: each one adds roughly 15.5 cm (6 in), uses the same ch 37 foundation, and needs its own border plus 2 side triangles, 2 snowflakes with backings, 2 mini trees, and 2 tassels. Work with cream and green on a 2.5 mm hook.
Info :
Every row has 17 spaces and 35 sts. A mesh uses 2 sts of the row below, and a bl uses 2 sts of the row below, so the count never changes. Row 1 is the top edge of the diamond once it’s turned on point.
Row 1 :
With cream, ch 37. Dc in 5th ch from hook, [ch 1, skip next ch, dc in next ch] 16 times. (17 sps, 35 sts)
Row 2 :
Ch 3 (counts as first dc), turn. 17 mesh. (17 sps, 35 sts)
Info :
The tree starts on Row 3. Use a separate bobbin of green for each tree section and twist the cream and green at every color change on the wrong side. Ch 3 at the start of each row counts as the first dc.
Row 3 :
Ch 3, turn. 8 mesh in cream, 1 bl in green, 8 mesh in cream. (17 sps, 35 sts)
Row 4 :
Ch 3, turn. 7 mesh in cream, 3 bl in green, 7 mesh in cream. (17 sps, 35 sts)
Row 5 :
Ch 3, turn. 6 mesh in cream, 5 bl in green, 6 mesh in cream. (17 sps, 35 sts)
Row 6 :
Ch 3, turn. 7 mesh in cream, 3 bl in green, 7 mesh in cream. (17 sps, 35 sts)
Row 7 :
Ch 3, turn. 6 mesh in cream, 5 bl in green, 6 mesh in cream. (17 sps, 35 sts)
Row 8 :
Ch 3, turn. 5 mesh in cream, 7 bl in green, 5 mesh in cream. (17 sps, 35 sts)
Row 9 :
Ch 3, turn. 6 mesh in cream, 5 bl in green, 6 mesh in cream. (17 sps, 35 sts)
Row 10 :
Ch 3, turn. 5 mesh in cream, 7 bl in green, 5 mesh in cream. (17 sps, 35 sts)
Row 11 :
Ch 3, turn. 4 mesh in cream, 9 bl in green, 4 mesh in cream. (17 sps, 35 sts)
Row 12 :
Ch 3, turn. 3 mesh in cream, 11 bl in green, 3 mesh in cream. (17 sps, 35 sts)
Row 13 :
Ch 3, turn. 7 mesh in cream, 3 bl in green for the trunk, 7 mesh in cream. (17 sps, 35 sts)
Row 14 :
Ch 3, turn. 7 mesh in cream, 3 bl in green for the trunk, 7 mesh in cream. (17 sps, 35 sts)
Row 15-17 :
Ch 3, turn. 17 mesh in cream. Repeat for 3 rows total. Fasten off after Row 17. (17 sps, 35 sts)
— 2. Diamond Border (make 6) :
Info :
The border is worked in burgundy in two rounds. After Round 2, each side measures 39 sc between corner sps, and that number is what the side triangles are built to match.
Round 1 :
Join burgundy in the corner to the left of the Row 17 edge. Ch 1, 35 sc across the Row 17 edge (1 sc in each st), ch 2 for the corner, 35 sc evenly down the next side (2 sc in each row end, with a third sc in one row end), ch 2, 35 sc along the foundation edge (1 sc in the base of each st), ch 2, 35 sc evenly up the last side the same way, ch 2, sl st to first sc. (140 sc, 4 corner sps)
Round 2 :
Ch 1, [sc in each of next 35 sc, (2 sc, ch 2, 2 sc) in corner sp] 4 times, sl st to first sc. Fasten off and weave in ends. (156 sc, 4 corner sps, 39 sc along each side between corners)
— 3. Side Triangle (make 10) :
Info :
These burgundy triangles fill the notches between diamonds. Each row increases by 4 sts (2 at each end), which keeps the legs straight at 45 degrees. Row 14 becomes the long outer edge and holds 55 sts.
Row 1 :
With burgundy, MR. Ch 3, 2 dc in ring, pull tight. (3 sts)
Row 2 :
Ch 3, turn, 2 dc in first st, dc in next st, 3 dc in last st. (7 sts)
Row 3 :
Ch 3, turn, 2 dc in first st, dc in next 5 sts, 3 dc in last st. (11 sts)
Row 4 :
Ch 3, turn, 2 dc in first st, dc in next 9 sts, 3 dc in last st. (15 sts)
Row 5 :
Ch 3, turn, 2 dc in first st, dc in next 13 sts, 3 dc in last st. (19 sts)
Row 6 :
Ch 3, turn, 2 dc in first st, dc in next 17 sts, 3 dc in last st. (23 sts)
Row 7 :
Ch 3, turn, 2 dc in first st, dc in next 21 sts, 3 dc in last st. (27 sts)
Row 8 :
Ch 3, turn, 2 dc in first st, dc in next 25 sts, 3 dc in last st. (31 sts)
Row 9 :
Ch 3, turn, 2 dc in first st, dc in next 29 sts, 3 dc in last st. (35 sts)
Row 10 :
Ch 3, turn, 2 dc in first st, dc in next 33 sts, 3 dc in last st. (39 sts)
Row 11 :
Ch 3, turn, 2 dc in first st, dc in next 37 sts, 3 dc in last st. (43 sts)
Row 12 :
Ch 3, turn, 2 dc in first st, dc in next 41 sts, 3 dc in last st. (47 sts)
Row 13 :
Ch 3, turn, 2 dc in first st, dc in next 45 sts, 3 dc in last st. (51 sts)
Row 14 :
Ch 3, turn, 2 dc in first st, dc in next 49 sts, 3 dc in last st. Fasten off, leaving a long tail. (55 sts)
— 4. Snowflake Backing (make 10) :
Info :
These small green discs peek out between the snowflake spokes, giving each flake a leafy shadow.
Round 1 :
With green, MR, ch 1, 12 sc in ring, sl st to first sc. (12 sts)
Round 2 :
Ch 1, 2 sc in each st around, sl st to first sc. (24 sts)
Round 3 :
Ch 1, [sc in next st, 2 sc in next st] 12 times, sl st to first sc. (36 sts)
Round 4 :
Ch 1, [sc in next 2 sts, 2 sc in next st] 12 times, sl st to first sc. Fasten off, leaving a tail for sewing. (48 sts)
— 5. Snowflake (make 10) :
Info :
Each snowflake has 6 spokes and measures about 5 cm (2 in) across. Use a snug tension on the spokes so they stand up crisply once blocked.
Round 1 :
With cream, MR, ch 1, 12 sc in ring, sl st to first sc. (12 sts)
Round 2 :
*Sc in next st, ch 7, sl st in 2nd ch from hook and in next ch, picot, sl st in each of next 4 ch, sc in next st of ring; repeat from * 5 more times, sl st to first sc. Fasten off, leaving a tail. (6 spokes)
— 6. Mini Tree (make 10) :
Info :
These little green cones sit on the outer edge of each side triangle. They are the same triangle shape as the burgundy ones, just much smaller.
Row 1 :
With green, MR. Ch 3, 2 dc in ring, pull tight. (3 sts)
Row 2 :
Ch 3, turn, 2 dc in first st, dc in next st, 3 dc in last st. (7 sts)
Row 3 :
Ch 3, turn, 2 dc in first st, dc in next 5 sts, 3 dc in last st. Fasten off, leaving a tail. (11 sts)
— 7. End Fan (make 4) :
Info :
These ribbed burgundy fans finish the two ends of the runner. Rows 2-5 are worked in the back loop only, which creates the vertical ribbing.
Row 1 :
With burgundy, MR. Ch 3, 2 dc in ring, pull tight. (3 sts)
Row 2 :
Ch 3, turn, 2 dc in first st, blo dc in next st, 3 dc in last st. (7 sts)
Row 3 :
Ch 3, turn, 2 dc in first st, blo dc in next 5 sts, 3 dc in last st. (11 sts)
Row 4 :
Ch 3, turn, 2 dc in first st, blo dc in next 9 sts, 3 dc in last st. (15 sts)
Row 5 :
Ch 3, turn, 2 dc in first st, blo dc in next 13 sts, 3 dc in last st. Fasten off, leaving a tail. (19 sts)
— 8. Tassel (make 12) :
Info :
Tassels are made from cream thread and finish at about 4 cm (1.5 in) long. You’ll need 12, one for each diamond tip.
Wrap :
Wrap cream thread 30 times around a 6 cm (2.4 in) piece of cardboard. Slide a 20 cm (8 in) strand under the wraps at the top and tie it tightly, then slip the bundle off the cardboard.
Cut :
Cut through the loops at the bottom of the bundle so you have an even fringe. Keep the long top strand free for attaching.
Bind :
Wrap a separate strand of cream around the bundle about 1 cm (0.4 in) below the top knot, wrapping 6 or 7 times. Tie off and thread the tails inside the tassel.
Trim :
Trim the fringe level, leaving the long top strands for attaching.
Once the last tassel is knotted and the final bead is stitched down, you’ll have a runner that turns an ordinary table into the one everyone gathers around. Take your time with the trees, enjoy the small wins as each diamond comes together, and don’t worry if your first block looks a little wonky; it’ll still look magical next to the gold. Pour something warm, put on your favorite carols, and let the thread do its thing. Happy stitching, and merry everything! 🧶✨🎄