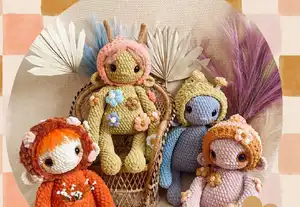
Create your own adorable Whimsy Folk with this charming amigurumi pattern! This delightful design features a whimsical character with customizable details including a sweet bonnet, antennae, decorative flowers, and optional mushroom embellishments. Perfect for crafters who love personality-filled projects, this pattern guides you through creating legs, body, and head all in one piece for seamless construction. Add your own creative touches with flower patches, hair styling options, and a cute belly pocket. Whether you choose the original 15-inch size or the modified 18-inch version with longer limbs, you'll end up with a unique companion that's bursting with handmade charm and character.
Progress Tracker
0% Complete
— Legs :
Info :
Make two using super bulky yarn and 7mm hook
Round 2 :
inc in each st (12)
Round 3 :
(sc, inc) x6 (18)
Round 4 :
sc2tog, 16sc (17)
Round 5 :
sc2tog, 15sc (16)
Round 6 :
sc2tog, 14sc (15)
Round 7 :
sc2tog, 13sc (14)
Round 8 :
sc2tog, 12sc (13)
Round 9 :
sc2tog, 11sc (12)
Round 10 :
sc2tog, 10sc (11)
Round 11-16 :
sc around (11)
Info :
LEG MOD: for long legs version, add extra 4 rounds after round 16. Note: the sc2tog on the legs is the front of the legs; make sure to place the front side facing forward
Info :
Fasten off; weave in the ends and continue working on body
— Body :
Info :
Working with super bulky yarn and 7mm hook. With a new piece of yarn, insert your hook in st number 6 or 5 of the last round of the right leg, ch9, sc into the last or first st of the last round of the left leg and continue working on round 1 of body
Round 1 :
ch9, 11sc into left leg, 9sc into ch9, 11sc into right leg, 9sc into ch9 (40)
Round 2-8 :
sc around (40)
Round 9 :
(3sc, sc2tog) x8 (32)
Round 10-15 :
sc around (32)
Round 16 :
(2sc, sc2tog) x8 (24)
Round 17-19 :
sc around (24)
Round 20 :
(sc, sc2tog) x8 (16)
Info :
Do not fasten off; continue on to head
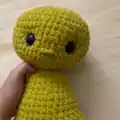
— Head :
Info :
Working with super bulky yarn and 7mm hook
Round 1 :
inc in each st (16)
Round 2 :
inc in each st (32)
Round 3 :
(3sc, inc) x8 (40)
Round 4 :
(4sc, inc) x8 (48)
Round 5-12 :
sc around (48)
Info :
If you are adding flower patches, follow instructions before attaching the eyes. Attach eyes between rounds 7-8, approximately 8-9 sts apart
Round 13 :
(4sc, sc2tog) x8 (40)
Round 14 :
(3sc, sc2tog) x8 (32)
Round 15 :
(2sc, sc2tog) x8 (24)
Round 16 :
(sc, sc2tog) x8 (16)
Info :
Fasten off; leave a long tail to sew the remaining 8 sts closed, using a darning needle, thread outside the remaining loops and pull tight to close and weave in the ends
— Arms :
Info :
Make two using super bulky yarn and 7mm hook
Round 2 :
inc in each st (14)
Round 4 :
sc2tog, 12sc (13)
Round 5 :
sc2tog, 11sc (12)
Round 6 :
sc2tog, 10sc (11)
Round 7 :
sc2tog, 9sc (10)
Round 9-25 :
sc around (9)
Info :
ARM MOD: for long arms version, add extra 3 rounds after round 25. Fasten off; leave a long tail to sew between rounds 17-18 of the body, approximately 7-8 sts apart
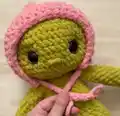
— Face Sculpting :
Info :
Cut a piece of yarn about 15 inches in main color and insert your darning needle into the back of the head. Pull yarn through to the front of the head, coming out at the left side of the left eye. Insert needle back into head at the right side of the left eye, and pull yarn through, coming out at the left side of the right eye. Insert needle back into head at the right side of the right eye and pull yarn into the head, coming out at the back where you first inserted the needle. You will have created two loops over each eye. Next, pull both ends gently (make sure the loops are on the top and behind both eyes). Tie a knot and weave in the ends
— Ears :
Info :
Make two using super bulky yarn and 7mm hook
Round 2 :
2sc, (inc) x4, 3sc (13)
Info :
Fasten off; leave a long tail to sew onto head between rounds 5-6, approximately 4 sts away from the eyes and weave in the ends
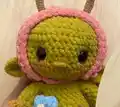
— Bonnet :
Info :
Working with super bulky yarn and 8mm hook. Note: turning ch2 does not count as a st, ch2 and turn at the end of each row
Row 1 :
ch30, starting in the 3rd ch from the hook, work 28dc, ch2, turn (28)
Row 2-7 :
repeat 28dc, ch2, turn (28)
Row 8 :
work 28 sl st, this will be the front of your bonnet (28)
Info :
Fasten off. Fold your bonnet in half, attach a new piece of yarn. Working through both layers of the bonnet, work sl sts across the back of the bonnet. Fasten off and weave in the ends. Working with a new piece of yarn, ch30 and fasten off. Thread your chain in and out of the bottom sts of the back of the bonnet. Gently pull the ears out in the second row of the front of the bonnet. Tie a knot, optional: hide the tails inside the bonnet
Info :
Mushroom MOD bonnet: randomly add 3-4 bo sts to rows 1, 3, 5 and 7
— Nose :
Info :
In round 6 of the head, working in the two sts between the eyes, use a darning needle and a new piece of super bulky yarn, insert the needle, pull the needle through the other side of the two sts space between the eyes and again insert the needle back in the first space you inserted the needle creating a loop. Wrap around the yarn in the loop 4 to 5 times, then tie a knot and weave in the ends
— Flowers :
Info :
Using worsted yarn in petal color and 4mm hook. Note: you can use different weight yarns and hook sizes, make many as you like and sew them onto the body randomly
Petal :
Work 5hdc in mr, sl st in the 1st hdc, *ch2, bo, ch2, sl st* in the same st, repeat ** 4 more times. Fasten off and weave in the ends
Center :
Using worsted yarn in center color and 4mm hook, ch4, starting in the 3rd ch from the hook, work one bo st, ch1 and fasten off, leaving a long tail to sew onto the center of the flower
— Antennae :
Info :
Make two using worsted yarn and 4mm hook
Round 2-15 :
sc around (6)
Info :
Fasten off; leave a long tail to sew to bonnet between row 3-4 of the front of the bonnet, approximately 4-5 sts apart and weave in the ends
— Hair :
Info :
Cut two pieces of wool yarn, approximately 6 inches long and fold in half. Insert your hook in round 13 of the head and pull the yarn halfway through creating a loop. Pull the strands through the loop and pull tight. Repeat this process one more time. For different hair styles you can add more pieces of yarn around the hairline
— Eye Flower Patch :
Info :
Using the patch template, trace two flowers on the felt and cut them out. Poke a small hole in the center of the felt with your scissors, then insert your safety eyes. Attach the eyes as you usually would. When working on the face sculpting, make sure to thread the yarn under the felt. Print and cut the eye flower patch template, the patch should measure approximately 1.8 inches
— Mushrooms :
Info :
Make two using worsted yarn and 4mm hook in top color
Round 2 :
inc in each st (12)
Round 3 :
(sc, inc) x6 (18)
Round 4-5 :
sc around (18)
Info :
Change to stem color
Round 6 :
(sc, sc2tog) x6 (12)
Round 8-11 :
sc around (6)
Info :
Fasten off; leave a long tail to sew onto the second round of the front of the bonnet and weave in the ends. Embroider french knots to the top of the mushrooms. Working with your darning needle embroider a French knot. Use a contrasting color yarn and insert your needle half way, wrap around the yarn in the needle 3-4 times and pull through, insert your needle back again in the same spot you started at, continue doing this throughout the whole top of the mushroom as many times as desired
— Belly Pocket :
Info :
Working with super bulky yarn and 7mm hook. Note: turning ch1 does not count as st, ch1 and turn at the end of each row
Row 1 :
ch8, starting in the 2nd ch from the hook, sc in each ch, ch1 and turn (7)
Row 2-6 :
repeat 7sc, ch1, turn (7)
Info :
Fasten off; leave a long tail to sew between rounds 6 and 12 of the body and weave in the ends
The Whimsy Folks pattern is a delightful journey into creating your very own enchanting companion with endless customization possibilities! From the adorable bonnet with optional mushroom bobbles to the sweet flower accents and personalized hair, every detail adds unique charm. The pattern's clever construction method works legs, body, and head seamlessly in one piece, making assembly easier while the super bulky yarn helps your project grow quickly. Whether you're making a gift or adding to your own collection, this whimsical friend will bring smiles and warmth wherever they go. Happy crocheting! 🧶✨