🧢 Beautiful ✨ Detailed πŸ’ Adorable

Crochet Cactus Pillow Pattern

Crochet Cactus Pillow Pattern
4.5β˜… Rating
4-5 Hours Time Needed
1.1K Made This
βœ‚οΈ

Intermediate Level

Ideal for those with basic knitting experience, featuring slightly more advanced stitches and techniques to expand your skills.

⏱️

Bite-Sized Project

Complete in under 2 hoursβ€”quick, fun, and perfect for a little creative escape.

🏑

Cozy Accent

A warm touch for your space that transforms ordinary corners into inviting nooks filled with handmade charm.

About This Crochet Cactus Pillow Pattern

Crochet Cactus Pillow Pattern crochet pattern - detailed view of completed project

Standing approximately 12 inches tall, this pillow makes a statement piece for any room. The arms are carefully constructed to mirror each other perfectly, ensuring proper alignment when assembled into the finished three-dimensional pillow.

Why You'll Love This Crochet Cactus Pillow Pattern

I absolutely love this cactus pillow pattern because it's the perfect blend of fun and functional home decor. There's something incredibly satisfying about watching the bobble stitches pop out to create that authentic cactus texture, and I enjoy how the rhythm of the pattern makes it easy to work on while watching TV or chatting with friends. The dimensional arms add such character and personality to the finished piece, making it look like a real potted cactus from across the room. I appreciate that it uses just one main color for most of the project, which means fewer ends to weave in and no stressful color changes. Plus, the finished pillow brings such a cheerful, modern vibe to any space, and everyone who sees it wants to know where I bought it. It's become one of my favorite quick gifts to make for plant-loving friends who struggle to keep real cacti alive!

Crochet Cactus Pillow Pattern step 1 - construction progress Crochet Cactus Pillow Pattern step 2 - assembly progress Crochet Cactus Pillow Pattern step 3 - details and accessories Crochet Cactus Pillow Pattern step 4 - final assembly and finishing

Switch Things Up

I love experimenting with this cactus pillow pattern to create my own unique desert garden. Try making multiple cacti in different sizes by using various yarn weights - a bulky yarn creates a statement floor pillow while fingering weight makes adorable mini desk cacti. You could also play with colors beyond traditional sage green; imagine a pastel pink or blue cactus for a modern, whimsical twist that fits trendy home decor aesthetics.

For the flowers, I enjoy making them in multiple colors and sizes. Try using variegated yarn for a multi-toned bloom, or create several small flowers instead of one large one to mimic a blooming cactus. You could even add French knots or small beads as tiny flower buds scattered across the arms. I've also experimented with adding embroidered details using a contrasting color to highlight certain areas or create patterns on the cactus body.

Another fun variation is to add a crocheted pot base! Work in brown or terracotta colors to create a flat circular base with sides, then attach your cactus to it for a complete potted plant look. You could even stuff the pot portion differently to make it more stable as a floor decoration. The possibilities are endless, and each variation creates a unique piece that reflects your personal style!

Common Mistakes & How to Fix Them

βœ— Not keeping track of which side is right or wrong when creating mirrored arms which causes alignment issues during assembly and mismatched arm placement βœ— Pulling bobble stitches too loosely or too tightly resulting in uneven texture that doesn't pop forward properly on the right side of the work βœ— Forgetting to count stitches carefully on increase rows leading to an incorrectly sized piece that won't match when sewn together with its mirror piece βœ— Starting the arms on the wrong stitch count from the bottom causing the arms to be positioned incorrectly and not align properly when assembling

Crochet Cactus Pillow Pattern

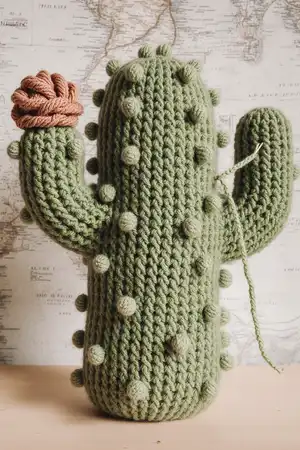
Bring the beauty of the desert indoors with this charming crochet cactus pillow pattern. This delightful home decor piece features realistic bobble stitch textures that mimic cactus spines, dimensional arms for authentic character, and a sweet crocheted flower on top. Perfect for adding a touch of southwestern style to your living space, this pillow is both decorative and functional. Whether you're creating it for yourself or as a thoughtful handmade gift, this cactus pillow will brighten any room with its playful personality and cozy appeal.

Intermediate 4-5 Hours

Materials Needed for Crochet Cactus Pillow Pattern

β€” Main Fabric

  • 01
    2 skeins Sage Green I Love This Cotton (worsted or sport weight yarn recommended)
  • 02
    1 partial skein Bruschetta I Love This Yarn Cotton for flower accent

β€” Tools Required

  • 01
    Size F (3.5 mm) crochet hook
  • 02
    Poly-Fil stuffing
  • 03
    Yarn sewing needle
  • 04
    Stitch markers (optional)

Progress Tracker

0% Complete

β€” Main Body of the Cactus :

Info :

Make 2

Row 1 :

Ch 41, hdc in 2nd ch from the hook and in next 38 ch, hdc 6 in the last stitch, moving to work along that back side of the ch, hdc 39. Ch 1, turn.

Row 2 :

Hdc 39, 2 hdc in next 6 st, hdc 39. Ch1, turn.

Row 3 :

Bobble row: sc 2, bobble [sc 3, bobble] repeat around to last 3 st, sc 3. Ch1, turn.

Row 4 :

Hdc 39, [hdc 2 in next st, hdc 1] 6 times, hdc 39. Ch1, turn.

Row 5 :

Hdc 39, [hdc 2 in next st, hdc 2] 6 times, hdc 39. Ch1, turn.

Row 6 :

Hdc 39 [hdc 2 in next st, hdc 3] 6 times, hdc 39. Ch1, turn.

Row 7 :

Bobble row: sc 2, bobble [sc 3, bobble] repeat around to last 5 st, sc 3, bobble, sc 1. Ch1, turn.

Row 8 :

Hdc 39 [hdc 2 in next st, hdc 4] 6 times, hdc 39. Ch1, turn.

Row 9 :

Hdc 39 [hdc 2 in next st, hdc 5] 6 times, hdc 39. Ch1, turn.

Row 10 :

Hdc 39 [hdc 2 in next st, hdc 6] 6 times, hdc 39. Ch1, turn.

Row 11 :

Bobble row: sc 2, bobble [sc 3, bobble] repeat around to last 3 st, sc 3. Finish off.

β€” Front Side Lower Arm :

Info :

With the right side facing, on the right side of the cacti, count 15 stitches up from the bottom, join your yarn in the 15th st.

Row 1 :

Hdc 14. Ch1 turn.

Row 2-11 :

Repeat row 1

Row 12 :

Turn the cacti to work along the row ends. Hdc 14 along the raw edge. Ch1, turn.

Row 13-20 :

Hdc 14. Ch1 turn.

Row 21 :

Hdc2tog, hdc 10, hdc2tog. Ch1, turn.

Row 22 :

Hdc2tog, hdc 8, hdc2tog. Ch1, turn.

Row 23 :

Hdc2tog, hdc 6, hdc2tog. Ch1, turn. Finish off.

β€” Front Side Upper Arm :

Info :

With the wrong side facing, on the right side, count 27 st up from the bottom, join your yarn in the 27th st.

Row 1 :

Ch1, Hdc 12. Ch1 turn.

Row 2-9 :

Repeat row 1

Row 10 :

Turn the cacti to work along the row ends. Hdc 12 along the raw edge. Ch1, turn.

Row 11-15 :

Hdc 12. Ch1 turn.

Row 16 :

Hdc2tog, hdc 8, hdc2tog. Ch1, turn.

Row 17 :

Hdc2tog, hdc6, hdc2tog. Ch1, turn.

Row 18 :

Hdc2tog, hdc 4, hdc2tog. Ch1, turn. Finish off.

Info :

You will now mirror the arms for the 2nd Cactus side so that when you go to put the right sides together and sew it up, the arms match!

β€” Back Side Lower Arm :

Info :

With the wrong side facing, on the right hand side, count 15 st up from the bottom, join your yarn in the 15th st.

Row 1 :

Hdc 14. Ch1 turn.

Row 2-11 :

Repeat row 1

Row 12 :

Turn the cacti to work along the row ends. Hdc 14 along the raw edge. Ch1, turn.

Row 13-20 :

Hdc 14. Ch1 turn.

Row 21 :

Hdc2tog, hdc 10, hdc2tog. Ch1, turn.

Row 22 :

Hdc2tog, hdc 8, hdc2tog. Ch1, turn.

Row 23 :

Hdc2tog, hdc6, hdc2tog. Ch1, turn. Finish off.

β€” Back Side Upper Arm :

Info :

With the right side facing, on the right hand side, count 27 st up from the bottom, join your yarn in the 27th st.

Row 1 :

Ch1, Hdc 12. Ch1 turn.

Row 2-9 :

Repeat row 1

Row 10 :

Turn the cacti to work along the row ends. Hdc 12 along the raw edge. Ch1, turn.

Row 11-15 :

Hdc 12. Ch1 turn.

Row 16 :

Hdc2tog, hdc 8, hdc2tog. Ch1, turn.

Row 17 :

Hdc2tog, hdc6, hdc2tog. Ch1, turn.

Row 18 :

Hdc2tog, hdc 4, hdc2tog. Ch1, turn. Finish off.

β€” Flower :

Instructions :

Ch 50, sc in 2nd ch from the hook, 3 dc in the next ch, [sc, 3 dc in the next ch] to the end. Your flower will begin to twist on its own. Cut your yarn leaving a long tail to sew the flower together and attach it to the cactus.

Info :

Next you're going to roll your flower by gently wrapping the petals around each other starting at the center. Sew securely together by going through all the rows on the back a couple times.

Assembly Instructions

  • Place the two cactus body pieces with right sides together, ensuring the arms align perfectly on both sides.
  • Slip stitch through both layers all the way around starting on the bottom, leaving approximately a 3-inch gap for turning and stuffing.
  • Carefully turn the cactus right side out through the gap, gently pushing out the arms and all corners for proper shape.
  • Stuff the cactus firmly with Poly-Fil, paying special attention to the arms and making sure they're well-filled for dimensional shape.
  • Sew up the opening on the bottom using your yarn needle and matching yarn, weaving in the ends securely.
  • Roll the crocheted flower starting from the center, gently wrapping the petals around each other to form a rose shape.
  • Sew the flower securely to the top cactus arm by going through all layers on the back, then weave in all remaining ends.

Important Notes

  • πŸ’‘Pay careful attention to which side is right or wrong when joining yarn for arms to ensure proper mirroring
  • πŸ’‘Use stitch markers to mark the 15th and 27th stitches when starting arms to ensure accurate placement
  • πŸ’‘Keep bobble stitches consistent in tension so they pop forward evenly on the right side of the work
  • πŸ’‘Work the bobble stitch on wrong side rows so they naturally pop to the front creating the cactus spine texture
  • πŸ’‘Leave a long enough gap when slip stitching pieces together to comfortably turn and stuff the pillow

This adorable crochet cactus pillow was designed to bring a touch of desert charm to any home without the worry of prickly spines or watering schedules. The combination of textured bobble stitches and dimensional arms creates a realistic cactus shape that's both decorative and huggable. Perfect for southwestern decor lovers or anyone who appreciates unique handmade home accents, this pattern works up quickly and makes a wonderful conversation-starting gift. Add your own creative touches with different colored flowers or multiple sizes for a whole cactus garden! 🌡 Happy crocheting! 🧢✨

You ask,

we answer.

FAQs

What is a bobble stitch and how do I make it pop forward correctly?

A bobble stitch is created by yarn over and pulling up a loop 6 times (13 loops on hook), then yarn over and pull through 12 loops, leaving 2 loops, then yarn over and pull through the remaining 2 loops. The pattern instructs you to work bobbles on the wrong side of the work so they naturally pop forward to the right side. Lock each bobble down with a tight single crochet in the next stitch.

Why do I need to mirror the arms for the second cactus piece?

The arms need to be mirrored so that when you place the right sides of the two cactus pieces together and sew them up, the arms align perfectly and match on both sides. If you don't mirror them, the arms will be facing opposite directions and won't line up properly during assembly.

Can I make this cactus in different sizes?

Yes! You can adjust the size by using different yarn weights and corresponding hook sizes. Using bulky yarn with a larger hook will create a bigger pillow, while using fingering weight yarn with a smaller hook will make a miniature version. Just maintain the same stitch counts and pattern structure.

How do I know which stitch to start the arms on?

The pattern specifies to count stitches up from the bottom of the cactus body. For the lower arm, count 15 stitches up and join in the 15th stitch. For the upper arm, count 27 stitches up and join in the 27th stitch. Using stitch markers to mark these positions before starting can be very helpful.

What if my flower doesn't want to curl naturally?

If your flower isn't curling on its own, you may need to adjust your tension slightly. The combination of single crochet and 3 double crochets in alternating stitches should create natural curl. When rolling it up, start from the center and wrap the petals around each other gently, securing with stitches through all layers on the back as you go.