About This Crochet Butterfly Granny Square Bedspread Pattern
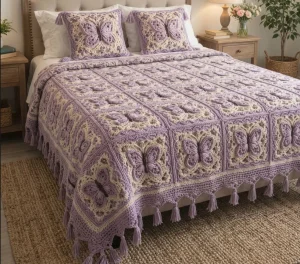
Made as a bedspread, it turns a plain guest room into a showpiece, and a single square works beautifully as a pillow front or a baby shower gift on its own.
Designed for experienced crocheters, these patterns involve intricate designs and complex techniques to challenge and inspire.
A 10-12 hour project—great for savoring the process over several sessions.
A comforting piece for home or gifts that brings handmade warmth to everyday moments and special occasions.
Made as a bedspread, it turns a plain guest room into a showpiece, and a single square works beautifully as a pillow front or a baby shower gift on its own.
I fell for this one because the butterflies look like they've really landed on the lace. The wings are small and quick, so you get a little hit of progress every few minutes. And the joins are my favorite part, since the seams turn into pretty ridges and there's nothing to hide. I made my first square on a rainy afternoon and had to start another straight away.

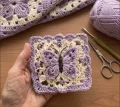
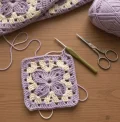
The first time I stitched one of these butterfly squares, I did the wings in the wrong order and had to rip back an hour of work. So here's my tip: crochet all four wings and the wing discs first, lay them on the finished lace, and play with the angles before you sew a single stitch. A tiny shift in how far the wings tilt changes the whole mood of the square.
The seams are where this project surprised me. I expected to hate joining dozens of squares, but working the slip stitch with wrong sides together builds that raised ridge on the front, and suddenly the grid looks intentional, almost like quilting. I joined mine in strips of four while watching old movies, which made the finish line feel closer.
Color-wise, I'm a lavender and cream person, but I've also pictured this in dusty rose with sage rosettes, or ink blue with soft gray wings for a winter bed. Whatever you pick, keep the body darker than the wings so the butterfly has something to anchor it. And save a little yarn for the tassels, because those finishing touches are the part everyone reaches out to touch first.
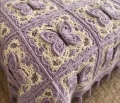
Picture a soft lavender bedspread where every square holds its own little butterfly, resting on a bed of creamy lace. That's what you'll be stitching here. Each square is a small project on its own, so you can crochet one on the sofa tonight and tuck the next into your bag tomorrow. When the squares come together with raised slip stitch seams, you get an heirloom-style cover that looks far more complicated than it feels while you work.
Each finished square is approximately 23 cm (9 in) wide after blocking. This pattern uses 6 squares across and 8 down, so the finished bedspread measures approximately 138 x 184 cm (54 x 72 in). To make it wider or longer, simply make more squares; each extra square adds about 23 cm (9 in). Work Rounds 1-4 in cream. Corner sps are the ch2 sps, and the butterfly, rosettes, and joins are added after the square is finished.
Make a MR. Ch3 (counts as dc), 2 dc in the ring, ch2, [3 dc in the ring, ch2] 3 times. Sl st to the top of the ch3 to join. (12 dc, 4 ch2 sps)
Sl st in each of the next 2 dc and into the first ch2 sp. Ch3 (counts as dc), 2 dc, ch2, 3 dc in the same sp, ch1. [3 dc, ch2, 3 dc in the next ch2 sp, ch1] 3 times. Sl st to the top of the ch3 to join. (24 dc, 4 ch1 sps, 4 ch2 sps)
Sl st in each of the next 2 dc and into the first ch2 sp. Ch3 (counts as dc), 2 dc, ch2, 3 dc in the same sp, ch1, 3 dc in the next ch1 sp, ch1. [3 dc, ch2, 3 dc in the next ch2 sp, ch1, 3 dc in the next ch1 sp, ch1] 3 times. Sl st to the top of the ch3 to join. (36 dc, 8 ch1 sps, 4 ch2 sps)
Sl st in each of the next 2 dc and into the first ch2 sp. Ch3 (counts as dc), 2 dc, ch2, 3 dc in the same sp, ch1. [3 dc in the next ch1 sp, ch1] 2 times. [3 dc, ch2, 3 dc in the next ch2 sp, ch1, [3 dc in the next ch1 sp, ch1] 2 times] 3 times. Sl st to the top of the ch3 to join. Fasten off cream. (48 dc, 12 ch1 sps, 4 ch2 sps)
The corner center st is the middle st of each 3 st corner group. Pop a stitch marker into it on every round so you can find it easily. Working Round 6 in the back loops only is what creates the raised ridge that frames the lace.
Join lavender with a sl st in any corner ch2 sp. Ch1, 3 sc in the same sp. [Sc in each of the next 3 dc, sc in the next ch1 sp] 3 times, sc in each of the next 3 dc, 3 sc in the next corner ch2 sp. Repeat the side and corner sequence 3 more times, ending with the last side, then sl st to the first sc to join. (72 sc: 15 sc on each side plus 3 sc in each corner)
Ch1 (does not count as a st). Working in BLO, hdc in each st around, working 3 hdc in the center st of each corner group. Sl st to the first hdc to join. (80 hdc)
Ch2 (does not count as a st). Dc in each st around, working 3 dc in the center st of each corner group. Sl st to the top of the first dc to join. (88 dc)
Ch1 (does not count as a st). Sc in each st around, working 3 sc in the center st of each corner group. Sl st to the first sc to join. Fasten off and weave in ends. (96 sc: 21 sc between corner centers on each side, plus 3 sc at each corner)
Each upper wing is an oval about 7 cm (2.75 in) long. Work in lavender. The BLO round on the outside gives the wing its soft, raised edge.
Ch7. 3 sc in the 2nd ch from the hook, sc in each of the next 4 ch, 4 sc in the last ch. Working along the opposite side of the foundation ch, sc in each of the next 4 ch. Sl st to the first sc to join. (15)
Ch1 (does not count as a st). 2 sc in each of the next 3 sts, sc in each of the next 4 sts, 2 sc in each of the next 4 sts, sc in each of the next 4 sts. Sl st to the first sc to join. (22)
Ch1 (does not count as a st). Working in BLO, [sc in the next st, 2 sc in the next st] 3 times, sc in each of the next 4 sts, [sc in the next st, 2 sc in the next st] 4 times, sc in each of the next 4 sts. Sl st to the first sc to join. Fasten off leaving a long tail for sewing. (29)
The lower wings are a little smaller, about 5.5 cm (2.25 in) long, so the butterfly looks balanced. Work in lavender.
Ch7. 3 sc in the 2nd ch from the hook, sc in each of the next 4 ch, 4 sc in the last ch. Working along the opposite side of the foundation ch, sc in each of the next 4 ch. Sl st to the first sc to join. (15)
Ch1 (does not count as a st). Working in BLO, 2 sc in each of the next 3 sts, sc in each of the next 4 sts, 2 sc in each of the next 4 sts, sc in each of the next 4 sts. Sl st to the first sc to join. Fasten off leaving a long tail for sewing. (22)
Make a MR. 6 sc in the ring. Do not join. (6)
2 sc in each st around. Sl st to the next st to join. Fasten off leaving a long tail for sewing. (12)
Make a MR. 6 sc in the ring. Do not join. (6)
Sc in each st around. (6)
Add a small pinch of fiberfill after Round 8 so the body stays slim, then top it up lightly before closing.
[Sc2tog] 3 times. Fasten off leaving a long tail, thread it through the remaining sts, and pull closed. (3)
Ch14. Sl st in the 2nd ch from the hook and in each of the next 12 ch. Fasten off leaving a 15 cm (6 in) tail for sewing. (13 sl sts)
Make a MR. 6 sc in the ring. Do not join. (6)
2 sc in each st around. Sl st to the next st to join. Fasten off leaving a tail for sewing. (12)
Join with lavender using slip stitch seams. Holding the squares with wrong sides together puts the ridge on the right side of the bedspread. Every seam runs from corner center st to corner center st and uses 23 sl sts.
Block all squares and add the butterflies first. Lay the squares out in 6 columns and 8 rows with every butterfly facing the same way.
Hold two squares wrong sides together with the corner centers lined up. Join lavender in the corner center st through both layers. Insert the hook through both loops of the matching sts on both squares and sl st across, working 23 sl sts in total, ending in the other corner center st. Fasten off.
Join the squares into 8 strips of 6 squares, working the seams in the same direction every time.
Join the strips together with the same 23 sl st seam, keeping the seam intersections neatly matched at the corners of the four squares.
For a bedspread that is W squares wide and L squares long, Round 1 uses 44W + 44L + 8 sts and Round 2 uses 44W + 44L + 16 sts. For this 6 x 8 version, that is 624 and 632 sts.
Join lavender with a sl st in the outer corner center st of any corner square. Ch1, 3 sc in the same st. Along each side, sc in each of the 21 side sts of a square, then sc2tog over the two corner center sts where that square meets the next one. Repeat to the next corner, ending the side with 21 sc, then 3 sc in the corner center st. Continue around all four sides. Sl st to the first sc to join. (624)
Ch1 (does not count as a st). Sc in each st around, working 3 sc in the center st of each corner group. Sl st to the first sc to join. Fasten off. (632)
The tassels hang along the foot of the bedspread and both long sides. Plan on one tassel in every 5th st of Round 2 of the edging, and adjust the spacing slightly near the corners so they look even.
Wrap lavender yarn around a cardboard strip about 10 cm (4 in) wide, 10 times.
Slide a 25 cm (10 in) strand under the wraps at the top of the cardboard and tie it very tightly in a double knot.
Slide the loops off the cardboard, then cut through the bottom of the loops.
Wrap a strand tightly around the bundle about 2 cm (0.75 in) below the top and knot it to form the tassel head.
Pull the top tie through the chosen st from the wrong side with the hook, thread the ends through the loop, and pull tight. Trim all strands level.
There's something deeply satisfying about watching a plain stack of squares turn into a bedspread full of butterflies. Take it one square at a time, keep a little basket of lavender and cream nearby, and let the rhythm of the rounds carry you along. By the time the last tassel is knotted, you'll have a cover that holds hours of your care in every stitch. Wrap it over your bed, share it with your crafting friends, and enjoy every cozy night under it. Happy stitching! 🧶✨🧵
You can, but the pattern was designed around DK weight cotton and a hook of about 3.5-4 mm, which gives squares of roughly 23 cm (9 in). Worsted makes each square noticeably larger, so you'd need fewer squares, and the lace gets less delicate. Make one test square and measure it before buying all your yarn.
This pattern uses 48 squares (6 x 8) for about 138 x 184 cm (54 x 72 in). For a queen size cover, 7 x 9 squares gives roughly 161 x 207 cm (63 x 81 in), which needs 63 squares. Plan on about 30 percent more yarn than the 48 square version, and use the stitch formulas in the Edging section for the border.
The stitches are simple (sc, hdc, dc), but there are many parts to keep organized: lace rounds, a ridged border, four wings, discs, a body, antennae, and rosettes. If you can already crochet in the round and follow a granny square, you can do it. Work one square slowly first and the rest will feel familiar.
Yes, one finished square is about 23 cm (9 in) wide, so it makes a lovely small cushion front. Make two squares, add the butterfly to one, and join them with the same slip stitch seam on three sides. Insert a pillow form and close the fourth side. The tassel trim looks lovely on pillows too.
Yes, blocking is what makes the seams meet cleanly. The lace and the BLO ridge relax into a flat square, so all 23 sts of each seam line up with the next square. Pin each one to about 23 cm (9 in), steam lightly without pressing on the butterfly, and let it dry fully before joining.
Sew each wing along its starting end and about a third of the way along its sides, leaving the outer edge free. The BLO round gives it a soft ridge, and the wing center disc adds a little weight and structure. Blocking the butterfly with a damp cloth and gentle steam also helps the wings keep their shape.
