🧢 Beautiful ✨ Detailed πŸ’ Adorable

Fruit Stacking Toy Crochet Pattern

Fruit Stacking Toy Crochet Pattern
4.3β˜… Rating
15-20 Hours Time Needed
2.6K Made This
βœ‚οΈ

Advanced Level

Designed for experienced knitters, these patterns involve intricate designs and complex techniques to challenge and inspire.

⏱️

Slow & Steady

A 10-12 hour projectβ€”great for savoring the process over several sessions.

🧸

Cute Companion

An adorable friend to cherish, handcrafted with love to bring comfort and joy for years to come.

About This Fruit Stacking Toy Crochet Pattern

This stacking toy pattern is a masterclass in jacquard crochet technique, where you'll work with multiple colors to create realistic fruit patterns. Each of the six fruit rings features unique construction methods from shell stitches for the pineapple texture to careful color changes for the watermelon's distinctive stripes. The sturdy base includes a reinforced core with wooden sticks for stability and cellulose sponge layers for weight, ensuring your finished toy stands proud and ready for playtime.

Fruit Stacking Toy Crochet Pattern crochet pattern - detailed view of completed project

The pattern includes detailed instructions for embroidering seeds, creating dimensional leaves, and assembling decorative elements that make each fruit recognizable and charming. This is more than just a toy it's a keepsake piece that showcases advanced crochet skills.

Why You'll Love This Fruit Stacking Toy Crochet Pattern

I absolutely love how this pattern challenges you to master jacquard colorwork while creating something genuinely useful and beautiful. The satisfaction of watching each fruit ring come together with its distinctive colors and textures is incredible, and seeing them all stacked on the finished base is truly rewarding. I appreciate how the pattern teaches multiple techniques shell stitches, color changes, embroidery, and sculptural shaping all in one project. The end result is a toy that's not only adorable but also durable enough for actual play, and knowing that children will learn and grow while using something I've made with my own hands brings me so much joy.

Fruit Stacking Toy Crochet Pattern step 1 - construction progress Fruit Stacking Toy Crochet Pattern step 2 - assembly progress Fruit Stacking Toy Crochet Pattern step 3 - details and accessories Fruit Stacking Toy Crochet Pattern step 4 - final assembly and finishing

Switch Things Up

I absolutely love experimenting with different fruit combinations for this stacking toy! Instead of the traditional fruits, I've tried making a tropical version with mango, papaya, dragon fruit, and passion fruit using vibrant pinks, oranges, and yellows that really pop. You could also create a berry-themed set with blueberry, raspberry, blackberry, and cherry rings in deep purples and reds.

For a more educational twist, I've made seasonal fruit sets where children can learn about what grows in different times of the year. A fall set might include pumpkin, pear, apple, and grape rings, while a summer version could feature peach, plum, watermelon, and strawberry. Each seasonal set teaches kids about nature's cycles while they play.

I've also experimented with adding sensory elements by crocheting small bells or crinkle material into some rings (always securely enclosed for safety), creating different sounds and textures that engage babies and toddlers in multiple ways. The watermelon ring with a gentle rattle inside became my grandson's favorite piece.

Another variation I love is making mini versions of this toy using finer yarn and smaller hooks, creating a portable stacking toy that's perfect for diaper bags and travel. These petite versions work up faster and make wonderful baby shower gifts. You could also enlarge the pattern with bulky yarn for an oversized floor toy that becomes a colorful room decoration when not in use.

Common Mistakes & How to Fix Them

βœ— Not changing yarn colors at the correct stitch stage when crocheting jacquard patterns can create messy color transitions and uneven stripes throughout your fruit rings βœ— Stuffing the fruit rings too firmly will distort their circular shape and prevent them from stacking properly on the core during assembly βœ— Forgetting to leave long yarn tails for sewing can make assembly extremely difficult requiring you to reattach yarn and creating visible knots βœ— Skipping the cellulose sponge layers in the base results in a lightweight unstable toy that tips over easily when children try to stack the rings

Fruit Stacking Toy Crochet Pattern

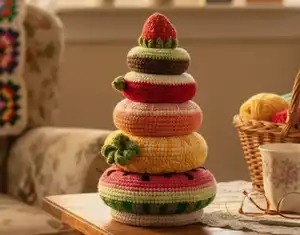
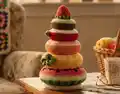
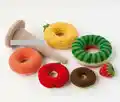
Create an adorable educational toy with this delightful Fruit Stacking Toy pattern! Standing at 22 cm tall with a sturdy base, this interactive project features six colorful fruit rings including watermelon, pineapple, grapefruit, apple, kiwi, and strawberry. Perfect for little hands to stack and play, this pattern combines beautiful jacquard techniques with detailed embroidery work to bring each fruit to life. The weighted base with a tapered core ensures stability during play, making it both a charming decoration and a functional learning toy for children.

Advanced 15-20 Hours

Materials Needed for Fruit Stacking Toy Crochet Pattern

β€” Main Fabric

  • 01
    Yarn Art Jeans (55% cotton 45% acrylic, 160m/50g) in colors: 03, 11, 26, 23, 35, 40, 52, 53, 69, 78, 86, 87, 88, 90
  • 02
    Alize Cotton Baby (50% cotton, 50% acrylic, 270g/100m) in colors: 113, 145
  • 03
    Gazzal Jeans (58% cotton, 42% acrylic, 170m/50g) in color: 1136

β€” Tools Required

  • 01
    2.25 mm crochet hook
  • 02
    2 mm crochet hook
  • 03
    Synthetic fiberfill stuffing
  • 04
    3 mm cellulose sponge for cleaning
  • 05
    15 cm manicure wood stick
  • 06
    Big eyed needle
  • 07
    Scissors
  • 08
    Black yarn for embroidery

Progress Tracker

0% Complete

β€” Watermelon :

Info :

Chain 42 with green yarn (G) and 1 sl st in the first loop. Then crochet spiral rounds without turning ch.

Round 1 :

42 sc

Round 2 :

Join dark green (DG) yarn. (G: 4 sc, DG: 1 sc, inc, 1 sc)*6

Round 3 :

(G: 2 sc, DG: 1 sc, G: inc, DG: 4 sc)*6

Round 4 :

(G: 2 sc, DG: inc, G: 2 sc, DG: 4 sc)*6

Round 5 :

(G: 2 sc, DG: 2 sc, G: 2 sc, DG: 2 sc, G: 1 sc, DG: inc)*6

Round 6 :

(G: 2 sc, DG: 2 sc, G: 2 sc, DG: 2 sc, G: inc, DG: 2 sc)*6

Round 7 :

(G: inc, 1 sc, DG: 2 sc, G: 2 sc, DG: 2 sc, G: 2 sc, DG: 2 sc)*6

Round 8 :

(G: 3 sc, DG: 2 sc, G: inc, 1 sc, DG: 2 sc, G: 2 sc, DG: 2 sc)*6

Round 9 :

(G: 3 sc, DG: inc, 1 sc, G: 3 sc, DG: 2 sc, G: 2 sc, DG: 2 sc)*6

Round 10 :

(G: 3 sc, DG: 3 sc, G: 3 sc, DG: 2 sc, G: inc, 1 sc, DG: 2 sc)*6

Round 11-12 :

(G: 3 sc, DG: 3 sc, G: 3 sc, DG: 2 sc, G: 3 sc, DG: 2 sc)*6

Round 13 :

1 round straight with light green YAJ 11

Info :

Join Gazzal Jeans 1136 to the beginning chain

Round 1 :

42 sc

Round 2 :

(6 sc, inc)*6

Round 3 :

3 sc, inc, (7 sc, inc)*5, 4 sc

Round 4 :

(8 sc, inc)*6

Round 5 :

4 sc, inc, (9 sc, inc)*5, 5 sc

Round 6 :

(10 sc, inc)*6

Round 7 :

5 sc, inc, (11 sc, inc)*5, 6 sc

Round 8 :

(12 sc, inc)*6

Round 9 :

6 sc, inc, (13 sc, inc)*5, 7 sc

Round 10 :

(14 sc, inc)*6

Round 11 :

1 round straight

Round 12 :

1 round straight with YAJ 78

Round 13 :

1 round straight with YAJ 11, leave a long end

Info :

Turn on the front side through the central hole and sew with the end of the thread, gradually stuffing. Embroider seeds with black yarn: 5 stitches converging at one point, stitch height 2 rows. For symmetry, embroider the seeds along the inc lines.

β€” Pineapple :

Info :

Chain 36 with light yellow (LY), 1 sl st in the first loop

Round 1 :

36 sc

Round 2 :

Join yellow (Y) yarn. (LY: 2 sc, Y: 1 sc, LY: 2 sc, Y: inc)*6

Round 3 :

(LY: 2 sc, Y: inc, LY: 2 sc, Y: 2 sc)*6

Round 4 :

(LY: 2 sc, Y: 2 sc, LY: 2 sc, Y: inc, 1 sc)*6

Round 5 :

(LY: 2 sc, Y: 2 sc, LY: inc, 1 sc, Y: 1 sc, LY: 1 sc, Y: 1 sc)*6

Round 6 :

(LY: inc, 1 sc, Y: 2 sc, LY: 3 sc, Y: 1 sc, LY: 1 sc, Y: 1 sc)*6

Round 7 :

(LY: 3 sc, Y: 2 sc, LY: 3 sc, Y: 1 sc, LY: inc, Y: 1 sc)*6

Round 8 :

(LY: 3 sc, Y: 1 sc, inc, LY: 3 sc, Y: 1 sc, LY: 2 sc, Y: 1 sc)*6

Round 9 :

(LY: 3 sc, Y: 1 sc, LY: 1 sc, Y: 1 sc, LY: 3 sc, Y: 1 sc, LY: 1 sc, inc, Y: 1 sc)*6

Round 10 :

(LY: 3 sc, Y: 1 sc, LY: inc, Y: 1 sc, LY: 3 sc, Y: 1 sc, LY: 3 sc, Y: 1 sc)*6

Round 11 :

(LY: 10 sc, Y: 1 sc, LY: 3 sc, Y: 1 sc)*6

Info :

Join Alize Cotton Baby 113 to the beginning chain. Crochet more tightly, as the pattern itself is loose.

Round 1 :

36 sc

Round 2 :

(Skip 1 st, 4 htr in the 2d st, skip 1 st, 1 sc in the 4th st)*9

Info :

To go to the next round climb to the top of the first shell with sl st. Crochet the shells of the second round in the sc, which is between the shells. The transition to all next rounds is done in the same way.

Round 3 :

Crochet the shells of 5 htr in the sc of the previous round, and between them 1 sc at the tops of the shells of the previous round. The shells are arranged in a checkerboard pattern.

Round 4 :

Move on to the next round with sl st. Crochet shells of 6 dc in the sc of the previous round, and sc between them into the tops of the shells.

Round 5 :

Shells of 7 dc

Round 6 :

Shells of 8 dc

Round 7 :

Shells of 9 dc

Round 8 :

Shells of 9 dc

Round 9 :

(1 sc, 2 htr, 3 dc, 2 htr, 2 sc)*9. Note: the central double crochet should get into the lowest point - sc of the previous round.

Info :

Stuff, sew around. If you have large gaps between the shells, sew them with 1-2 stitches to fix.

Green tail :

Chain 35. 1 sl st, 1 sc, 1 htr, 4 dc. Skip 2 ch, 1 sl st in the 3d ch and crochet the second angle right from here: 8 ch, 1 sl st, 1 sc, 1 htr, 4 dc. Repeat till the end of the chain. Leave a long end. Twist into a spiral, sew with the end of the thread. Sew on the pineapple ring.

β€” Grapefruit :

Info :

Chain 30 of orange yarn, 1 sl st in the first ch

Round 1 :

30 sc

Round 2 :

(4 sc, inc)*6

Round 3 :

2 sc, inc, (5 sc, inc)*5, 3 sc

Round 4 :

(6 sc, inc)*6

Round 5 :

3 sc, inc, (7 sc, inc)*5, 4 sc

Round 6 :

(8 sc, inc)*6

Round 7 :

4 sc, inc, (9 sc, inc)*5, 5 sc

Round 8 :

(10 sc, inc)*6

Round 9 :

5 sc, inc, (11 sc, inc)*5, 6 sc

Round 10-11 :

2 rounds straight

Info :

Join Alize Cotton Baby 145 to the beginning chain. Crochet in the same way as an orange part from the 1st to the 9th rounds.

Round 10 :

1 round straight YAJ 03

Round 11 :

1 round straight YAJ 23. Leave a long end.

Info :

Turn to the right side and sew with an orange yarn, stuffing in the process. Embroider slices with ivory yarn.

β€” Apple :

Info :

Chain 24 of red yarn, sl st in the first ch

Round 1 :

24 sc

Round 2 :

(3 sc, inc)*6

Round 3 :

2 sc, inc, (4 sc, inc)*5, 2 sc

Round 4 :

(5 sc, inc)*6

Round 5 :

3 sc, inc, (6 sc, inc)*5, 3 sc

Round 6 :

(7 sc, inc)*6

Round 7 :

4 sc, inc, (8 sc, inc)*5, 4 sc

Round 8 :

(9 sc, inc)*6

Round 9 :

5 sc, inc, (10 sc, inc)*5, 5 sc

Round 10 :

1 round straight

Info :

Join YAJ 86 to the beginning chain and crochet in the same way as the red part from the 1st to the 9th rounds.

Round 10 :

Crochet last round of red, leave a long end

Info :

Turn to the right side, sew and stuff. Make a tightening on top of the apple. From the outside make a stitch 2-3 rows long, and from the inside there should be no stitch, in and out the needle in the same hole between the stitches. This will leave the central hole unchanged, while the outer contour of the ring will take on the shape of an apple. Make 2-3 stitches at this point and secure the thread. Do the same at the opposite side.

Green leaf :

11 ch, 1 sl st, 1 sc, 2 htr, 2 dc, 2 htr, 1 sc, 1 sl st. 1 turning ch and crochet in the same way along the lower side of the chain. Leave a long end. Sew the leaf to the apple groove. Embroider seeds with black yarn around the edges of the hole.

Info :

Take 2 pieces of brown yarn and use a needle to feed them into the bottom groove of the apple. The ends of one thread should come out from different points, and from the side of the hole, insert the needle into the same point so that the stitches cannot be seen. Tie the ends of the threads in pairs. Cut off, leaving short ends.

β€” Kiwi :

Info :

Chain 18 of brown yarn

Round 1 :

18 sc

Round 2 :

(2 sc, inc)*6

Round 3 :

1 sc, inc, (3 sc, inc)*5, 2 sc

Round 4 :

(4 sc, inc)*6

Round 5 :

2 sc, inc, (5 sc, inc)*5, 3 sc

Round 6 :

(6 sc, inc)*6

Round 7 :

3 sc, inc, (7 sc, inc)*5, 4 sc

Round 8 :

(8 sc, inc)*6

Round 9 :

1 round straight

Info :

Join ivory yarn to the beginning chain and crochet following the first and the second rounds. Crochet light green from the 3d to the 8th rounds. Crochet the 9th round in brown. Leave a long end.

Info :

Embroider kiwi center with ivory yarn. Alternate short (2-3 rounds) and long (2-4 rounds) rays. Embroider seeds with black yarn. Turn to the right side, sew and stuff.

β€” Strawberry :

Info :

Crochet with red yarn

Round 1 :

6 sc in AR

Round 2 :

inc*6

Round 3 :

(3 sc, inc)*3

Round 4 :

(4 sc, inc)*3

Round 5 :

(5 sc, inc)*3

Round 6 :

(6 sc, inc)*3

Round 7 :

(7 sc, inc)*3

Round 8 :

(8 sc, inc)*3

Round 9-11 :

3 rounds straight

Round 12 :

(3 sc, dec)*6

Round 13 :

(2 sc, dec)*6

Info :

Embroider seeds with yellow yarn. Put in some filler and spread it over the sides, leaving the middle empty.

Round 14-18 :

5 rounds straight

Round 19 :

(1 sc, dec)*6

Round 20 :

dec*6. Leave a long end.

Info :

Push the narrow part inside. Sew through the top. Do not tighten too much, just fix.

Green tail :

Chain 24, 1 sl st in the first loop. 4 ch, 1 sl st, 2 sc. Skip 1 ch, 1 sl st in the next ch. Chain 4 for the next angle right here. Repeat around. Sew around the strawberry hole. Sew every tip.
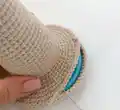
β€” Base :

Info :

Use 2 mm crochet hook for higher density

Round 1 :

6 sc in AR

Round 2 :

inc*6

Round 3 :

(1 sc, inc)*6

Round 4 :

1 sc, inc, (2 sc, inc)*5, 1 sc

Round 5 :

(3 sc, inc)*6

Round 6 :

2 sc, inc, (4 sc, inc)*5, 2 sc

Round 7 :

(5 sc, inc)*6

Round 8 :

3 sc, inc, (6 sc, inc)*5, 3 sc

Round 9 :

(7 sc, inc)*6

Round 10 :

4 sc, inc, (8 sc, inc)*5, 4 sc

Round 11 :

(9 sc, inc)*6

Round 12 :

5 sc, inc, (10 sc, inc)*5, 5 sc

Round 13 :

(11 sc, inc)*6

Info :

Cut 2 circles from cellulose sponge a little bit smaller than the crocheted one. Unpack the sponge in advance, it will dry out and become denser.

Round 14-15 :

2 rounds straight. Put aside for now.

Core :

Crochet the core and stuff it tightly while crocheting.

Round 1 :

6 sc in AR

Round 2 :

inc*6

Round 3-8 :

12 sc

Round 9 :

(3 sc, inc)*3

Round 10-12 :

15 sc

Round 13 :

(4 sc, inc)*3

Round 14-16 :

18 sc

Round 17 :

(5 sc, inc)*3

Round 18-20 :

21 sc

Round 21 :

(6 sc, inc)*3

Round 22-24 :

24 sc

Round 25 :

(7 sc, inc)*3

Round 26-30 :

27 sc

Round 31 :

(8 sc, inc)*3

Round 32-34 :

30 sc

Round 35 :

(9 sc, inc)*3

Round 36-38:

33 sc

Round 39 :

(10 sc, inc)*3

Round 40-42 :

36 sc

Round 43 :

(11 sc, inc)*3

Round 44-46 :

39 sc

Round 47 :

(12 sc, inc)*3

Round 48-55 :

42 sc

Info :

Insert a manicure stick, or better even 2 pieces, into the core, directly into the filler. This will help the core hold its shape better.

Round 56 :

Crochet only this round through back loops: (6 sc, inc)*6

Round 57 :

3 sc, inc, (7 sc, inc)*5, 4 sc

Round 58 :

(8 sc, inc)*6

Round 59 :

4 sc, inc, (9 sc, inc)*5, 5 sc

Round 60 :

(10 sc, inc)*6

Round 61 :

5 sc, inc, (11 sc, inc)*5, 6 sc

Info :

Join the upper part to the lower one putting in 2 layers of a sponge. Sew through around the base of the core.

Assembly Instructions

  • Complete all six fruit rings (watermelon, pineapple, grapefruit, apple, kiwi, strawberry) ensuring each is properly stuffed and sewn closed
  • Crochet the circular base and the tapered core separately, stuffing the core firmly as you work
  • Insert 1-2 manicure wooden sticks into the center of the core through the stuffing to provide structural support
  • Cut two circles from cellulose sponge slightly smaller than the base diameter and allow them to dry completely for added weight
  • Join the core to the base by placing the two sponge layers between them and sewing around the base of the core securely
  • Stack the completed fruit rings onto the core from largest (watermelon) to smallest (strawberry) ensuring they slide on smoothly
  • Test the stability of your finished stacking toy and adjust stuffing if any rings do not sit properly on the core

Important Notes

  • πŸ’‘When working jacquard patterns, always change yarn colors at the final stage of the stitch by pulling through the new color
  • πŸ’‘Keep non-working yarn threads laid under your single crochet stitches to avoid visible color changes on the right side
  • πŸ’‘Use a smaller 2mm hook for the base to create tighter, denser fabric that will support the weight of stacked rings
  • πŸ’‘Unpack and allow cellulose sponges to dry completely before inserting into base as they become denser and provide better stability
  • πŸ’‘Leave long yarn tails when finishing each fruit ring to make sewing and assembly much easier
  • πŸ’‘Stuff fruit rings moderately firm but not overly tight to maintain their circular shape and allow proper stacking
  • πŸ’‘Work shell stitches for the pineapple more tightly than usual as this stitch pattern naturally creates a looser fabric

This Fruit Stacking Toy pattern brings together vibrant colors, multiple techniques, and educational play value into one stunning project! From the intricate jacquard stripes of the watermelon to the textured shell stitches of the pineapple, each fruit showcases different crochet skills while creating a sturdy, functional toy that children will love. The weighted base with its reinforced core ensures stability during play, and the attention to detail in embroidered seeds and decorative elements makes this truly special. Whether you're making it as a treasured gift or adding to your own collection of handmade toys, this pattern will challenge your skills while bringing endless joy to little ones learning to stack and sort. πŸ‰πŸπŸ“

You ask,

we answer.

FAQs

What makes this pattern advanced level?

This pattern requires mastery of jacquard colorwork techniques where you change colors within rounds while carrying the non-working yarn, shell stitch patterns for texture, precise embroidery work for details, and complex assembly with structural elements like wooden sticks and cellulose sponges. It also involves creating a tapered core that gradually increases in diameter, which requires careful counting and construction skills.

Can I substitute different yarn brands or colors?

Yes, you can use any DK weight cotton or cotton blend yarn with similar yardage. The key is maintaining consistent gauge throughout all pieces so the rings fit properly on the core. Choose vibrant colors that clearly represent each fruit, and make sure your yarn has good stitch definition for the detailed colorwork patterns.

Why do I need cellulose sponges in the base?

The cellulose sponges add weight and stability to the base, preventing the toy from tipping over when children stack the rings. Two layers of dried sponge create enough heft to counterbalance the stacked fruit rings. You can find these inexpensive cleaning sponges at most grocery or hardware stores.

How do I keep my jacquard color changes neat?

Always change colors at the last stage of completing a stitch by pulling the new color through the final two loops. Lay the non-working yarn underneath your working stitches so it gets crocheted over and hidden inside the fabric. Practice tension control to avoid puckering or loose stitches where colors meet.

What if my fruit rings don't fit on the core properly?

Check your gauge first - if your stitches are too tight, the center holes will be too small. You may need to go up a hook size. Also ensure you're not stuffing the rings too firmly, which can distort the circular shape. The rings should slide on with gentle pressure but not be so loose they wobble.

Is this toy safe for babies and toddlers?

Yes, when properly constructed with secure stitching and embroidery, this toy is safe for supervised play. The wooden sticks are completely enclosed in the core, and there are no small parts that can detach. However, always supervise young children during play and regularly inspect the toy for any loose threads or damage.