🧢 Beautiful ✨ Detailed πŸ’ Adorable

Adorable Bunny Rabbit Amigurumi Pattern

Adorable Bunny Rabbit Amigurumi Pattern
4.2β˜… Rating
3-4 Hours Time Needed
1.2K Made This
βœ‚οΈ

Beginner Friendly Level

Perfect for those just starting their sewing journey, with clear instructions and simple techniques

⏱️

Bite-Sized Project

Complete in under 2 hoursβ€”quick, fun, and perfect for a little creative escape.

🐰

Whimsical Buddy

Playful characters full of personality, designed to spark imagination and become cherished playtime favorites.

About This Adorable Bunny Rabbit Amigurumi Pattern

This adorable bunny pattern combines classic amigurumi techniques with charming details that bring personality to every stitch. The rounded body and sweet proportions create a huggable companion that's both sturdy and soft. With clearly written instructions for the head, body, ears, arms, legs, and tail, you'll enjoy watching your bunny come together piece by piece. The simple color palette makes it beginner-friendly while leaving room for creative customization with your favorite yarn shades.

Adorable Bunny Rabbit Amigurumi Pattern crochet pattern - detailed view of completed project

Working in continuous rounds, this pattern builds your confidence with repetitive stitches and gradual shaping. The result is a timeless bunny friend that captures the essence of handmade charm and becomes a beloved addition to any collection.

Why You'll Love This Adorable Bunny Rabbit Amigurumi Pattern

I absolutely love this bunny pattern because it strikes the perfect balance between simplicity and charm! The straightforward construction means you can complete it in just one sitting, making it ideal when you need a quick handmade gift or want that satisfying feeling of finishing a project. I find the repetitive rounds meditative and relaxing, while the final assembly brings everything together in such a rewarding way. What really makes my heart happy is seeing how each bunny develops its own personality through small variations in stuffing, ear positioning, and facial features. It's a pattern I return to again and again because it never fails to bring smiles!

Adorable Bunny Rabbit Amigurumi Pattern step 1 - construction progress Adorable Bunny Rabbit Amigurumi Pattern step 2 - assembly progress Adorable Bunny Rabbit Amigurumi Pattern step 3 - details and accessories Adorable Bunny Rabbit Amigurumi Pattern step 4 - final assembly and finishing

Switch Things Up

I love experimenting with this bunny pattern because it's such a versatile foundation for creativity! One of my favorite variations is making long-eared lop bunnies by simply adding extra rounds to the ear pattern and letting them drape down the sides. You can create a whole bunny family by adjusting hook sizesβ€”use a 2.5mm hook for baby bunnies and a 4mm for parent bunnies.

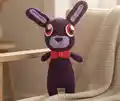
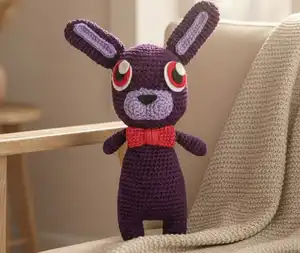
I've also had wonderful results adding accessories like tiny crocheted bow ties, flower crowns, or even little carrot props that fit perfectly in their arms. For seasonal versions, I love making pastel Easter bunnies with floral embellishments, or winter bunnies with tiny scarves. Color variations open up endless possibilities tooβ€”I've created brown cottontails, gray wild rabbits, and even fantasy bunnies in purple and blue.

Another fun twist I enjoy is altering the facial expressions by changing eye placement and adding embroidered details like closed sleepy eyes or little smiles. You can even stuff the body with dried lavender for a calming sensory element that makes them perfect gifts for relaxation. The basic pattern is your canvasβ€”let your imagination hop wild!

Common Mistakes & How to Fix Them

βœ— Forgetting to stuff the head and body firmly enough before closing, resulting in a floppy bunny that loses its adorable rounded shape over time βœ— Placing safety eyes too far apart or too close together, which dramatically changes the bunny's expression and overall cuteness factor βœ— Not counting stitches carefully during decrease rounds, causing the head or body to become lopsided or misshapen with uneven proportions βœ— Attaching ears and limbs without pinning first to check placement, leading to an off-balance bunny that won't sit properly or looks asymmetrical

Adorable Bunny Rabbit Amigurumi Pattern

Create your own charming bunny companion with this delightful amigurumi pattern! This sweet rabbit features a rounded body, floppy ears, and an adorable little tail that will melt hearts. Perfect for Easter gifts, nursery decor, or as a cuddly friend for children and collectors alike. The pattern uses simple stitches and basic shaping techniques to bring this lovable bunny to life. Whether you're crafting for yourself or creating handmade gifts, this bunny will become a treasured keepsake that spreads joy wherever it hops.

Beginner Friendly 3-4 Hours

Materials Needed for Adorable Bunny Rabbit Amigurumi Pattern

β€” Main Fabric

  • 01
    Cotton or acrylic yarn in white, cream, or your choice of bunny color
  • 02
    Small amount of pink yarn for inner ears and nose (optional)
  • 03
    Medium weight (worsted/aran) yarn recommended for best results

β€” Tools Required

  • 01
    Crochet hook size 3mm (C/2) or 3.5mm (E/4)
  • 02
    Safety eyes 8mm or 10mm
  • 03
    Yarn needle for sewing
  • 04
    Scissors
  • 05
    Stitch markers
  • 06
    Polyester fiberfill stuffing
  • 07
    Pins for assembly
  • 08
    Pink embroidery thread for nose (optional)

Progress Tracker

0% Complete

β€” Head :

Round 1 :

6 sc in MR (6)

Round 2 :

6 inc (12)

Round 3 :

(1 sc, 1 inc) x 6 (18)

Round 4 :

(2 sc, 1 inc) x 6 (24)

Round 5 :

(3 sc, 1 inc) x 6 (30)

Round 6 :

(4 sc, 1 inc) x 6 (36)

Round 7-11 :

1 sc in each st (36)

Round 12 :

(4 sc, 1 dec) x 6 (30)

Round 13 :

(3 sc, 1 dec) x 6 (24)

Info :

Insert safety eyes between rounds 9-10, spaced about 6-7 stitches apart

Round 14 :

(2 sc, 1 dec) x 6 (18)

Info :

Stuff head firmly with fiberfill

Round 15 :

(1 sc, 1 dec) x 6 (12)

Round 16 :

6 dec (6)

Info :

Fasten off and close opening

β€” Body :

Round 1 :

6 sc in MR (6)

Round 2 :

6 inc (12)

Round 3 :

(1 sc, 1 inc) x 6 (18)

Round 4 :

(2 sc, 1 inc) x 6 (24)

Round 5 :

(3 sc, 1 inc) x 6 (30)

Round 6-10 :

1 sc in each st (30)

Round 11 :

(3 sc, 1 dec) x 6 (24)

Round 12 :

(2 sc, 1 dec) x 6 (18)

Info :

Stuff body firmly

Round 13 :

(1 sc, 1 dec) x 6 (12)

Round 14 :

6 dec (6)

Info :

Fasten off leaving long tail for sewing

β€” Ears :

Info :

Make 2 pieces

Round 1 :

6 sc in MR (6)

Round 2 :

(1 sc, 1 inc) x 3 (9)

Round 3 :

(2 sc, 1 inc) x 3 (12)

Round 4-8 :

1 sc in each st (12)

Round 9 :

(2 sc, 1 dec) x 3 (9)

Round 10-11 :

1 sc in each st (9)

Info :

Fasten off leaving long tail for sewing. Do not stuff ears.

β€” Arms :

Info :

Make 2 pieces

Round 1 :

6 sc in MR (6)

Round 2 :

(1 sc, 1 inc) x 3 (9)

Round 3-8 :

1 sc in each st (9)

Info :

Stuff lightly at paw end only

Info :

Flatten opening and sl st both sides together. Fasten off leaving long tail.

β€” Legs :

Info :

Make 2 pieces

Round 1 :

6 sc in MR (6)

Round 2 :

6 inc (12)

Round 3-4 :

1 sc in each st (12)

Round 5 :

(2 sc, 1 dec) x 3 (9)

Round 6-9 :

1 sc in each st (9)

Info :

Stuff firmly

Info :

Flatten opening and sl st both sides together. Fasten off leaving long tail.

β€” Tail :

Round 1 :

6 sc in MR (6)

Round 2 :

6 inc (12)

Round 3 :

(1 sc, 1 inc) x 6 (18)

Round 4 :

1 sc in each st (18)

Round 5 :

(1 sc, 1 dec) x 6 (12)

Info :

Stuff lightly to create fluffy pom-pom effect

Round 6 :

6 dec (6)

Info :

Fasten off leaving long tail for sewing

Assembly Instructions

  • Sew the head to the body securely, making sure it's centered and tilted slightly forward for a natural bunny posture.
  • Attach ears to the top of the head, spacing them evenly and angling them slightly outward for that classic floppy-eared look.
  • Position and sew arms to the sides of the body around rounds 3-4, ensuring they hang naturally at the bunny's sides.
  • Attach legs to the bottom of the body, positioning them so the bunny can sit upright when placed on a flat surface.
  • Sew the tail to the back of the body, centered and positioned slightly upward for maximum cuteness.
  • Embroider a small pink nose using satin stitch between and slightly below the safety eyes.
  • Optional: Add pink inner ear details by crocheting small ovals and sewing them inside the ear pieces before attaching to head.

Important Notes

  • πŸ’‘Use stitch markers to mark the beginning of each round to avoid losing your place in the pattern
  • πŸ’‘Stuff all body parts firmly but not overly tight to maintain smooth, even shapes without lumps
  • πŸ’‘Insert safety eyes before stuffing the head completely, as they cannot be added later
  • πŸ’‘Pin all pieces in place before sewing to ensure proper positioning and symmetrical appearance
  • πŸ’‘Keep tension consistent throughout to ensure all pieces are uniform in size and shape
  • πŸ’‘When attaching limbs, sew through both the body and limb multiple times for secure attachment

This sweet bunny pattern brings together timeless charm and simple construction to create an adorable companion that's perfect for any occasion. Whether you're making it for Easter, a baby shower, or just because you love bunnies, this pattern delivers heartwarming results every time. The basic techniques and clear instructions make it accessible for beginners while offering experienced crocheters a quick and satisfying project. Your finished bunny will radiate handmade love and become a treasured keepsake! 🐰🧢✨

You ask,

we answer.

FAQs

What size will my finished bunny be?

Using worsted weight yarn and a 3.5mm hook, your bunny will measure approximately 6-7 inches tall when sitting. Size may vary depending on your tension and yarn choice.

Can I make the bunny larger or smaller?

Absolutely! Use a thicker yarn with a larger hook for a bigger bunny, or thinner yarn with a smaller hook for a mini version. Just maintain the same stitch counts.

Do I need to stuff the ears?

No, the ears should remain flat and floppy for that classic bunny look. Only stuff the head, body, and lightly stuff the paws and tail.

Can I use different colors?

Yes! Feel free to get creative with colors. Make a brown bunny, gray bunny, or even a rainbow bunny. The pattern works beautifully with any color combination.

Is this bunny safe for babies?

If making for babies under 3 years, replace safety eyes with embroidered eyes and ensure all parts are very securely attached to prevent choking hazards.

How do I make the bunny sit upright?

Proper leg positioning is key! Attach the legs slightly forward on the body bottom and stuff them firmly so they can support the bunny's weight when sitting.