🧢 Beautiful ✨ Detailed πŸ’ Adorable

Roza Crocheted Top Version B Pattern

Roza Crocheted Top Version B Pattern
4.7β˜… Rating
12-20 Hours Time Needed
3.9K Made This
βœ‚οΈ

Advanced Level

Designed for experienced knitters, these patterns involve intricate designs and complex techniques to challenge and inspire.

⏱️

Slow & Steady

A 10-12 hour projectβ€”great for savoring the process over several sessions.

πŸ‘•

Casual Chic

Relaxed style with a modern twist, perfect for everyday wear while maintaining that handcrafted uniqueness.

About This Roza Crocheted Top Version B Pattern

The Roza Top Version B is a sophisticated crocheted garment that showcases beautiful ribbed texture throughout. This racerback design offers a sporty yet feminine silhouette that's both comfortable and flattering. The pattern uses a unique combination of half double crochet and yarn over slip stitches to create distinctive ribbing that adds visual interest and stretch. With careful shaping through strategic increases and decreases, this top hugs your curves in all the right places while remaining breathable and perfect for layering.

Roza Crocheted Top Version B Pattern crochet pattern - detailed view of completed project

This pattern includes comprehensive sizing from XS to 5XL with detailed stitch counts and measurements for each size. The construction method creates a seamless body that's seamed at the back, with customizable strap length and an optional elastic waistband for added security and comfort.

Why You'll Love This Roza Crocheted Top Version B Pattern

I absolutely love this pattern because it transforms simple stitches into something truly special and wearable. The ribbed texture creates such a professional-looking finish that people won't believe you made it yourself. I appreciate how the racerback design adds a modern athletic touch while still being elegant enough for casual outings. The customization options mean you can adjust the length, fit, and strap tightness to create your perfect top. What really excites me is how this pattern teaches you to shape a garment through strategic increases and decreases, building skills you'll use in countless future projects.

Roza Crocheted Top Version B Pattern step 1 - construction progress Roza Crocheted Top Version B Pattern step 2 - assembly progress Roza Crocheted Top Version B Pattern step 3 - details and accessories Roza Crocheted Top Version B Pattern step 4 - final assembly and finishing

Switch Things Up

I love how versatile this Roza Top pattern can be with just a few creative modifications! While the pattern provides fingering weight cotton recommendations, I've experimented with bamboo blend yarns for an even softer drape against the skin, and the result was absolutely luxurious for warm summer evenings.

For a bolder look, try working this pattern in color-blocked sections rather than solid colors - imagine transitioning from a deep burgundy at the bottom to a soft blush pink at the bust line. You could also add subtle stripe details by changing colors every few rows, which really emphasizes that beautiful ribbed texture.

If you want to make this top more modest or weather-appropriate, consider extending the starting chain significantly to create a tunic length version that hits at mid-thigh. I've also seen makers add delicate picot edging along the front neckline and armhole edges for a more feminine, vintage-inspired finish.

The racerback design is perfect as-is, but you could absolutely adapt the strap configuration - try making wider straps by adding more rows of hdc and yoslst, or create a braided strap effect by working three separate chains and braiding them together before attaching. Some makers even add small decorative buttons or beads where the straps connect at the back for extra detail.

For those who prefer more coverage, you could modify the front neckline by working additional rows before creating the front edge, essentially building up the bust area. This is also a fantastic pattern to practice your colorwork skills - imagine incorporating tapestry crochet motifs or fair isle-inspired patterns into the body panels for a truly unique statement piece!

Common Mistakes & How to Fix Them

βœ— Not making a gauge swatch before starting can result in a top that doesn't fit properly according to the size chart measurements βœ— Forgetting to work half double crochets in back loops only and yarn over slip stitches in front loops only disrupts the ribbed texture pattern βœ— Skipping the blocking step can leave your ribbed rows looking skewed and uneven instead of beautifully aligned and professional βœ— Miscounting stitches during increase and decrease rows throws off the entire shaping and creates an ill-fitting garment structure βœ— Making straps too tight or too loose without trying on first can result in uncomfortable wear or straps that slide off shoulders βœ— Not securing stitch markers at armpit locations makes it difficult to consistently place the same number of stitches for edges

Roza Crocheted Top Version B Pattern

Create your own stylish Roza Top with this comprehensive crochet pattern for Version B, featuring a flattering racerback design. This cropped top combines elegant ribbed texture with a close-fitting silhouette that's perfect for warmer weather. The pattern includes detailed written instructions, helpful photos, and video tutorial links to guide you through every step. With sizes ranging from XS to 5XL, you can customize the length and fit to suit your preferences. Whether you're looking for a fashionable summer staple or a unique handmade wardrobe piece, this pattern offers both style and versatility.

Advanced 12-20 Hours

Materials Needed for Roza Crocheted Top Version B Pattern

β€” Main Fabric

  • 01
    Cotton or cotton blend yarn in fingering weight, 100-300g depending on size
  • 02
    Rainbow 8/4 Cotton from Hobbii (suggested)
  • 03
    Mandarin from Sandnes Garn (suggested)

β€” Tools Required

  • 01
    Crochet hook 3.00 mm (or size needed to meet gauge)
  • 02
    Measuring tape
  • 03
    Scissors
  • 04
    Tapestry needle for weaving in ends
  • 05
    Blocking board or towel
  • 06
    Pins for blocking
  • 07
    Elastic band 5 mm width (optional)
  • 08
    Sewing needle and thread
  • 09
    4 stitch markers

Progress Tracker

0% Complete

β€” The Body :

Starting Chain :

Chain (41,45,49,53,57,61,65,69,73) depending on your size. This determines the length of the top in the back.

Row 1 :

In the second and third ch from hook, make one hdc (one decrease). In the next two chs, make one hdc (one decrease). Hdc once in each remaining ch. Ch 1 and turn.

Row 2 :

Yoslst into the front loop of each stitch until you have four stitches left. Make one yoslst in the first two stitches (one decrease) and one yoslst in the last two stitches (one decrease). Ch 1 and turn.

Row 3 :

Make one hdc in the first two stitches (one decrease) and another hdc in the following two stitches (one decrease). Hdc once in each remaining ch. Ch 1 and turn.

Info :

For sizes S-5XL: Repeat rows 2 and 3 until you've made (4,5,6,7,8,9,10,11) rows for your size. For size S, only repeat row 2. Ch 1 and turn after each row.

Rows (4,5,6,7,8,9,10,11,12) - (6,8,10,12,14,16,18,20,22) :

Continue alternating between a row of hdc in back loop and a row of yoslst in front loop but decrease one on every row. Decrease at the beginning of every hdc row and at the end of every yoslst row. Ch 1 and turn after each row.

Rows (7,9,11,13,15,17,19,21,23) - (11,14,17,20,23,26,29,32,35) :

Continue alternating between hdc and yoslst rows. Make no increases or decreases. Ch 1 and turn after each row.

Rows (12,15,18,21,24,27,30,33,36) - (26,30,35,42,46,51,56,61,66) :

Continue alternating between hdc and yoslst but make one increase on every row. Increase at the beginning of every hdc row and increase at the end of every yoslst row. Ch 1 and turn after each row.

Rows (27,31,36,43,47,52,57,62,67) - (40,48,56,64,72,80,88,96,104) :

Keep alternating between hdc and yoslst but increase two on every row.

Rows (41,49,57,65,73,81,89,97,105) - (42,50,58,66,74,82,90,98,106) :

Make one row of hdc and one row of yoslst. No increases or decreases.

Rows (43,51,59,67,75,83,91,99,107) - (48,58,68,76,87,97,106,116,126) :

Decrease one on every row.

Rows (49,59,69,77,88,98,107,117,127) - (52,62,72,82,93,103,114,124,134) :

No increases or decreases. You've now made it past the halfway point!

Rows (53,63,73,83,94,104,115,125,135) - (58,70,82,92,106,118,130,142,154) :

Increase one on every row.

Rows (59,71,83,93,107,119,131,143,155) - (60,72,84,94,108,120,132,144,156) :

No increases or decreases.

Rows (61,73,85,95,109,121,133,145,157) - (74,90,105,116,134,149,164,179,194) :

Decrease two on every row.

Rows (75,91,106,117,135,150,165,180,195) - (89,106,123,138,157,174,191,208,225) :

Decrease one on every row.

Rows (90,107,124,139,158,175,192,209,226) - (94,112,130,146,166,184,202,220,238) :

No increases or decreases.

Rows (95,113,131,147,167,185,203,221,239) - (97,116,135,152,173,192,211,230,249) :

Increase one on every row.

Rows (98,117,136,153,174,193,212,231,250) - (99,119,139,159,179,199,219,239,259) :

Increase two on every row.

Row (100,120,140,160,180,200,220,240,260) :

No increases or decreases. The body is now complete!

β€” Blocking :

Step 1 :

Make the last loop bigger to prevent unraveling. Submerge the top in lukewarm water for 15-20 minutes until completely wet.

Step 2 :

Carefully wring out excess water without unraveling any stitches. Place on blocking board or towel.

Step 3 :

Use pins to shape the top to the measurements in the size chart. Let it fully dry before continuing.

β€” Seaming :

Step 1 :

Fold the top in half with right sides (ribbed sides) facing each other.

Step 2 :

Insert hook into the first loop of both edges and make a slip stitch. Repeat along the entire edge until fully attached.

β€” Bottom Edge :

Option 1 - Simple Edge :

Turn top inside out so right sides face out. Make one sc for every row on the body. Sl st to first sc, cut yarn and fasten.

Option 2 - Elastic Band Edge :

Make one sc for every yoslst row and two scs for every hdc row. Sl st to first sc, then ch 1.

Step 1 (Option 2) :

Make additional sc rows until length is slightly over double the elastic band width (about 5 rows for 5mm band).

Step 2 (Option 2) :

Cut elastic band 7cm smaller than waist circumference. Sew ends together with sewing thread to create a closed circle.

Step 3 (Option 2) :

Fold bottom edge inward with elastic band inside. Sew the folded edge shut using hemming or overcast stitch. Fasten and cut yarn.

β€” Edges and Straps :

Step 1 :

Place top with back facing up. Locate approximate armpit position on the right side of the middle.

Step 2 :

Insert hook into top edge, yarn over and pull through. Sc along edge placing two sc for every hdc row and one sc for every yoslst row until reaching middle back seam.

Step 3 :

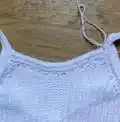
Chain approximately 80 chains (adjust for your size) to create the first strap. Sc into stitch marker on front and try on to check fit.

Step 4 :

Continue with sc toward armpit until back at starting point. Sl st to first sc made.

Step 5 :

Ch 2 without turning. Hdc into every stitch from previous round including the chains. Sl st to first ch 2.

Step 6 :

Ch 1 and turn. Make yoslst into front loop of every stitch from previous round. Sl st to first ch 1.

Step 7 :

Ch 2 and turn. Hdc into back loop of every stitch from previous round. Sl st to first ch 2.

Step 8 :

Repeat yoslst row from Step 6. Cut yarn and fasten the loose end.

Step 9 :

Locate opposite armpit and insert hook. Sc along edge until reaching the other front stitch marker. Place one sc into this stitch.

Step 10 :

Start chaining for the second strap. Subtract 15 from your first strap chain count. Count last 15 stitches on first strap and insert hook there.

Step 11 :

Slip stitch into each of the 15 stitches until reaching the middle seam, connecting the two straps at the bottom.

Step 12 :

Continue with sc along edge until back at armpit. Sl st to first sc.

Step 13 :

Repeat Steps 5-8 to complete the second strap edge.

β€” Front Edge :

Step 1 :

Lay top down with front facing up. Insert hook into top right corner next to where strap connects to body.

Step 2 :

Yarn over and pull through, then ch 1. Remove loop from hook, insert hook into first stitch of strap, grab loop and pull through.

Step 3 :

Sc along the front edge until reaching the strap on opposite side. Sl st to first stitch on strap, ch 1 and turn.

Step 4 :

Remove loop from hook, insert into next stitch on strap, grab loop and pull through. Make yoslst into each sc from previous row until reaching opposite strap.

Step 5 :

Sl st to next stitch on strap, ch 2 and turn. Remove loop, insert into next strap stitch, pull through.

Step 6 :

Hdc into back loop of each stitch until reaching other strap. Sl st to next stitch on strap, ch 1 and turn.

Step 7 :

For the final row, repeat the attachment process and make yoslst stitches across to the other side. Sl st to strap, cut yarn and fasten loose end.

Info :

Your Roza Top Version B is now complete!

Assembly Instructions

  • Block the completed body piece before seaming by soaking in lukewarm water for 15-20 minutes and pinning to measurements while drying
  • Fold the body in half with right sides together and slip stitch the back seam from top to bottom edge
  • Create the bottom edge by working single crochet around the opening, choosing either a simple single row or multiple rows with elastic band
  • If using elastic band, cut it 7cm smaller than your waist and sew the ends together before folding the crochet edge around it
  • Attach the first strap by working single crochet from armpit to middle back, then chaining across to the front stitch marker
  • Connect the second strap to the first by working chains that meet the first strap 15 stitches from the bottom, creating the racerback design
  • Complete all edges with alternating rows of half double crochet and yarn over slip stitches to match the body's ribbed texture

Important Notes

  • πŸ’‘Gauge is critical for this pattern - your 10x10cm swatch must equal 28 stitches by 20 rows or the sizing will be completely off
  • πŸ’‘Always work half double crochets in back loops only and yarn over slip stitches in front loops only to maintain the ribbed texture throughout
  • πŸ’‘Use stitch markers to mark armpit locations and front attachment points before starting the edges and straps
  • πŸ’‘Try on the top when determining strap length and write down your chain count for consistency on the second strap
  • πŸ’‘The Excel sheet mentioned in the pattern is essential for tracking stitch counts through all the increases and decreases
  • πŸ’‘Blocking is highly recommended as the ribbed texture can look skewed without proper shaping and drying
  • πŸ’‘Video tutorials are provided in the pattern for gauge swatching, seaming, bottom edge, and creating the edges and straps

This stunning Roza Top Version B pattern showcases the perfect blend of technical skill and wearable fashion! The racerback design adds a sporty, modern touch while the ribbed texture creates beautiful visual interest and flattering drape. With comprehensive sizing from XS to 5XL and detailed instructions including video tutorials, you'll have all the support you need to create a professional-looking garment. The customizable length and optional elastic waistband mean you can tailor this top to your exact preferences. 🧢 Happy crocheting and enjoy your handmade wardrobe staple! βœ¨πŸ‘•

You ask,

we answer.

FAQs

What does the gauge swatch mean and why is it so important for this pattern?

A gauge swatch is a test piece you crochet before starting the actual project to ensure your tension matches the pattern. For this top, your 10x10cm swatch should have exactly 28 stitches by 20 rows. If your gauge is off, your finished top won't match the size chart measurements, potentially making it too tight or too loose. The pattern provides a video tutorial showing how to make the gauge swatch using the specific hdc and yoslst stitch combination.

Can I adjust the length of the Roza Top to make it longer or shorter?

Yes! The starting chain number determines the length of the top, specifically the back length. You can modify this number in the Excel sheet above your size to make it longer or shorter. Just remember that changing the starting chain will affect measurements B and C in the size chart, and you should adjust your yarn quantity accordingly if making significant length changes.

What's the difference between Version B and the other Roza Top versions?

Version B has the same front as versions A and C, but it features a racerback design instead of regular straps. The racerback style has two straps that connect at the bottom center of the back, creating a sporty, athletic look. The front edge also differs - it's worked back and forth along just the front rather than continuing around to the back.

Do I really need to block the top, and what happens if I skip this step?

While blocking isn't absolutely necessary, it's highly recommended. The ribbed rows created by alternating hdc and yoslst stitches can look skewed without blocking. Blocking helps straighten the fabric, even out the stitches, and set the top to the correct measurements from the size chart. It involves soaking the piece, pinning it to shape while wet, and letting it dry completely.

How do I determine the correct strap length for my size?

The pattern suggests starting with approximately 80 chains for a size S, but this is highly individual. The best method is to chain your estimated number, then attach to the front stitch marker with a single crochet and try the top on before continuing. The straps shouldn't feel too tight or too loose. Write down your final chain count so you can calculate the correct number for the second strap, which connects to the first strap.

Should I choose the simple bottom edge or the elastic band option?

It depends on your preference and body type. The simple single crochet row creates a tighter, more fitted edge that works well if the top already fits snugly at your waist. The elastic band option provides more security and prevents the top from riding up, making it ideal if you want extra hold or plan to wear the top for active occasions. The elastic band does require additional materials and sewing.