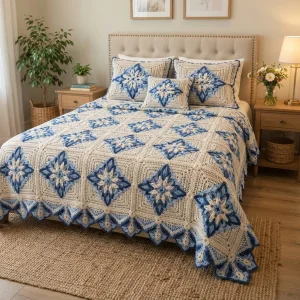
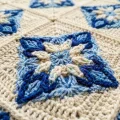
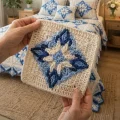
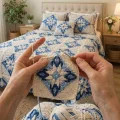
Picture a bed dressed in creamy, lace-like squares, each one holding a blue flower set on point like a little diamond. That’s what you’ll be making here: a full-size coverlet built from joined motifs, with a matching cushion and a pair of pillow shams so the whole bed looks pulled together. The result feels tailored and a bit old-fashioned in the best way, the kind of piece that makes a bedroom look finished the moment it’s smoothed over the mattress. If you love a project with real wow factor at the finish line, this one has your name on it.
Progress Tracker
0% Complete
— 1. Flower Center (make 42 for the bedspread) :
Info :
The finished bedspread measures approximately 180 x 210 cm (71 x 83 in) including the border, made of 42 motifs worked 6 across and 7 down. Each motif is approximately 29 cm (11.5 in) square after blocking. Rounds 1-7 should measure roughly 14 cm (5.5 in) across. Use a hook of about 3.5 mm and DK weight cotton. Colors are A cream, B light blue, C medium blue and D navy. To make the spread wider or longer, add one motif per extra column or row. In border Round 1 add one more repeat of (sc in each of the next 43 dc, sc2tog) on each affected side, and in border Round 2 add one more fan and one more peak per extra motif.
Round 1 :
With A, MR, ch 1 (does not count as a st), 16 sc in ring, sl st to first sc (16)
Round 2 :
Ch 1, sc in same st, ch 3, skip next st, [sc in next st, ch 3, skip next st] 7 times, sl st to first sc (8 sc, 8 ch-3 sps)
Round 3 :
Ch 1, [(sc, hdc, 3 dc, hdc, sc) in next ch-3 sp, sl st in next Round 2 sc] 8 times (8 petals, 56 sts). Fasten off A.
Round 4 :
Fold the petals forward and, working behind them, join B with a sl st in any Round 2 sc. [Ch 5, sl st in next Round 2 sc] 8 times (8 ch-5 sps)
Round 5 :
Ch 1, [(sc, hdc, dc, tr, dc, hdc, sc) in next ch-5 sp] 8 times, sl st to first sc (8 leaves, 56 sts). Fasten off B.
Round 6 :
Join C in the first sc of any leaf, ch 1 (does not count as a st). Corner leaf (leaves 1, 3, 5 and 7): sc in same st and in next 2 sts, (sc, ch 2, sc) in the tip tr, sc in next 3 sts. Side leaf (leaves 2, 4, 6 and 8): sc in each of next 7 sts. Work corner leaf then side leaf 4 times in total, sl st to first sc (60 sc, 4 ch-2 sps, 15 sc along each side). Fasten off C.
Round 7 :
Join D in any ch-2 sp, ch 3 (counts as dc), dc in same sp, dc in each of next 15 sc, [(2 dc, ch 2, 2 dc) in next ch-2 sp, dc in each of next 15 sc] 3 times, 2 dc in first corner sp, ch 2, sl st to top of beginning ch 3 (76 dc, 4 ch-2 sps, 19 dc between corner sps). Fasten off D.
— 2. Cream Filet Frame (continue each of the 42 motifs) :
Info :
Fasten off after every round in this section and rejoin A in any corner ch-2 sp. Move your joining corner around from round to round so the ends don’t pile up in one spot. On dc rounds, work one dc in every dc and one dc in every ch-1 sp.
Round 8 :
Join A in any ch-2 sp, ch 3 (counts as dc), dc in same sp, dc in next st, [ch 1, skip next st, dc in next st] 9 times, [(2 dc, ch 2, 2 dc) in next ch-2 sp, dc in next st, [ch 1, skip next st, dc in next st] 9 times] 3 times, 2 dc in first corner sp, ch 2, sl st to top of beginning ch 3 (56 dc, 36 ch-1 sps, 4 ch-2 sps, 23 sts between corner sps)
Round 9 :
Join A in any ch-2 sp, ch 3 (counts as dc), dc in same sp, dc in each of next 23 sts, [(2 dc, ch 2, 2 dc) in next ch-2 sp, dc in each of next 23 sts] 3 times, 2 dc in first corner sp, ch 2, sl st to top of beginning ch 3 (108 dc, 4 ch-2 sps, 27 dc between corner sps)
Round 10 :
Join A in any ch-2 sp, ch 3 (counts as dc), dc in same sp, dc in next st, [ch 1, skip next st, dc in next st] 13 times, [(2 dc, ch 2, 2 dc) in next ch-2 sp, dc in next st, [ch 1, skip next st, dc in next st] 13 times] 3 times, 2 dc in first corner sp, ch 2, sl st to top of beginning ch 3 (72 dc, 52 ch-1 sps, 4 ch-2 sps, 31 sts between corner sps)
Round 11 :
Join A in any ch-2 sp, ch 3 (counts as dc), dc in same sp, dc in each of next 31 sts, [(2 dc, ch 2, 2 dc) in next ch-2 sp, dc in each of next 31 sts] 3 times, 2 dc in first corner sp, ch 2, sl st to top of beginning ch 3 (140 dc, 4 ch-2 sps, 35 dc between corner sps)
Round 12 :
Join A in any ch-2 sp, ch 3 (counts as dc), dc in same sp, dc in next st, [ch 1, skip next st, dc in next st] 17 times, [(2 dc, ch 2, 2 dc) in next ch-2 sp, dc in next st, [ch 1, skip next st, dc in next st] 17 times] 3 times, 2 dc in first corner sp, ch 2, sl st to top of beginning ch 3 (88 dc, 68 ch-1 sps, 4 ch-2 sps, 39 sts between corner sps)
Round 13 :
Join A in any ch-2 sp, ch 3 (counts as dc), dc in same sp, dc in each of next 39 sts, [(2 dc, ch 2, 2 dc) in next ch-2 sp, dc in each of next 39 sts] 3 times, 2 dc in first corner sp, ch 2, sl st to top of beginning ch 3 (172 dc, 4 ch-2 sps, 43 dc between corner sps). Fasten off and weave in ends.
— 3. Joining Rosettes (make 30) :
Info :
One small rosette sits over every inside point where four squares meet. A 6 x 7 layout has 30 of them. Each rosette measures about 2.5 cm (1 in) across.
Round 1 :
With A, MR, ch 1 (does not count as a st), 6 sc in ring, sl st to first sc (6)
Round 2 :
Ch 1, 2 sc in each st around, sl st to first sc (12)
Round 3 :
Ch 1, [sc in next st, 2 sc in next st] 6 times, sl st to first sc (18). Fasten off, leaving a 25 cm (10 in) tail for sewing.
— 4. Border :
Info :
Work the border after all 42 squares are joined and blocked. The two ch-2 sps that sit side by side at each seam on the outer edge are worked together with sc2tog. The 6-square sides are the width and the 7-square sides are the length.
Round 1 :
With A, join in any outer corner ch-2 sp of a width side, ch 1, sc in the corner sp. Along the width side: [sc in each of next 43 dc, sc2tog over the next two ch-2 sps] 5 times, sc in each of next 43 dc, sc in corner sp. Along the length side: [sc in each of next 43 dc, sc2tog over the next two ch-2 sps] 6 times, sc in each of next 43 dc, sc in corner sp. Along the next width side: [sc in each of next 43 dc, sc2tog over the next two ch-2 sps] 5 times, sc in each of next 43 dc, sc in corner sp. Along the last length side: [sc in each of next 43 dc, sc2tog over the next two ch-2 sps] 6 times, sc in each of next 43 dc, sl st to first sc (1144 sc). Fasten off.
Round 2 :
Join B in any corner sc, ch 4 (counts as tr), tr in same st, ch 3, 2 tr in same st. Fan means: tr in next 9 sts, dc in next 5 sts, hdc in next 4 sts, sc in next 7 sts, hdc in next 4 sts, dc in next 5 sts, tr in next 9 sts (43 sts). Peak means: (2 tr, ch 2, 2 tr) in next st. Along the width side: [Fan, Peak] 5 times, Fan, then (2 tr, ch 3, 2 tr) in the corner st. Along the length side: [Fan, Peak] 6 times, Fan, then (2 tr, ch 3, 2 tr) in the corner st. Along the next width side: [Fan, Peak] 5 times, Fan, then (2 tr, ch 3, 2 tr) in the corner st. Along the last length side: [Fan, Peak] 6 times, Fan, sl st to top of beginning ch 4 (26 fans, 22 peaks, 4 corners, 1222 sts). Fasten off.
Round 3 :
Join D in the first st after any ch-3 corner sp, ch 1, sc in same st and in each st around, working 3 sc in each ch-2 peak sp and 5 sc in each ch-3 corner sp (including the one beside your starting st), sl st to first sc (1308 sc). Fasten off.
— 5. Cream Spikes (make 26) :
Info :
You need one spike for each of the 22 seam peaks and 4 corner peaks. Each spike is a little triangle about 6 cm (2.5 in) wide at the base and 4 cm (1.5 in) long.
Row 1 :
With A, ch 12, sc in 2nd ch from hook and in each ch across (11)
Row 2 :
Ch 1, turn, sc2tog, sc in next 7 sts, sc2tog (9)
Row 3 :
Ch 1, turn, sc2tog, sc in next 5 sts, sc2tog (7)
Row 4 :
Ch 1, turn, sc2tog, sc in next 3 sts, sc2tog (5)
Row 5 :
Ch 1, turn, sc2tog, sc in next st, sc2tog (3)
Row 6 :
Ch 1, turn, sc3tog (1). Fasten off, leaving a 25 cm (10 in) tail for sewing.
— 6. Small Cushion Front :
Info :
Make one motif exactly as written in Sections 1 and 2, working Rounds 1-13. Then add the two blue edging rounds below. The finished front is approximately 31 cm (12 in) square and fits a 30 cm (12 in) pillow form.
Round 14 :
Join B in any corner ch-2 sp, ch 1, 3 sc in same sp, sc in each of next 43 dc, [3 sc in next corner sp, sc in each of next 43 dc] 3 times, sl st to first sc (184 sc). Fasten off.
Round 15 :
Join D in the center sc of any 3-sc corner, ch 1, 3 sc in same st, sc in each of next 45 sts, [3 sc in next st, sc in each of next 45 sts] 3 times, sl st to first sc (192 sc). Fasten off.
— 7. Small Cushion Back :
Row 1 :
With A, ch 45, dc in 4th ch from hook and in each ch across (43 dc, counting the beginning ch 3 as a dc)
Row 2-26 :
Ch 3 (counts as dc), turn, dc in each st across (43). Fasten off after Row 26 and weave in ends.
— 8. Pillow Sham Front (make 2) :
Info :
Make each front as one motif, working Rounds 1-13 exactly as written in Sections 1 and 2. Then continue with the extra cream rounds below and two blue edging rounds. Each finished front is approximately 55 cm (21.5 in) square and fits a pillow form of about 50 cm (20 in) square. Fasten off and rejoin A in a corner ch-2 sp after every round.
Round 14 :
Join A in any ch-2 sp, ch 3 (counts as dc), dc in same sp, dc in next st, [ch 1, skip next st, dc in next st] 21 times, [(2 dc, ch 2, 2 dc) in next ch-2 sp, dc in next st, [ch 1, skip next st, dc in next st] 21 times] 3 times, 2 dc in first corner sp, ch 2, sl st to top of beginning ch 3 (104 dc, 84 ch-1 sps, 4 ch-2 sps, 47 sts between corner sps)
Round 15 :
Join A in any ch-2 sp, ch 3 (counts as dc), dc in same sp, dc in each of next 47 sts, [(2 dc, ch 2, 2 dc) in next ch-2 sp, dc in each of next 47 sts] 3 times, 2 dc in first corner sp, ch 2, sl st to top of beginning ch 3 (204 dc, 4 ch-2 sps, 51 dc between corner sps)
Round 16 :
Join A in any ch-2 sp, ch 3 (counts as dc), dc in same sp, dc in next st, [ch 1, skip next st, dc in next st] 25 times, [(2 dc, ch 2, 2 dc) in next ch-2 sp, dc in next st, [ch 1, skip next st, dc in next st] 25 times] 3 times, 2 dc in first corner sp, ch 2, sl st to top of beginning ch 3 (120 dc, 100 ch-1 sps, 4 ch-2 sps, 55 sts between corner sps)
Round 17 :
Join A in any ch-2 sp, ch 3 (counts as dc), dc in same sp, dc in each of next 55 sts, [(2 dc, ch 2, 2 dc) in next ch-2 sp, dc in each of next 55 sts] 3 times, 2 dc in first corner sp, ch 2, sl st to top of beginning ch 3 (236 dc, 4 ch-2 sps, 59 dc between corner sps)
Round 18 :
Join A in any ch-2 sp, ch 3 (counts as dc), dc in same sp, dc in next st, [ch 1, skip next st, dc in next st] 29 times, [(2 dc, ch 2, 2 dc) in next ch-2 sp, dc in next st, [ch 1, skip next st, dc in next st] 29 times] 3 times, 2 dc in first corner sp, ch 2, sl st to top of beginning ch 3 (136 dc, 116 ch-1 sps, 4 ch-2 sps, 63 sts between corner sps)
Round 19 :
Join A in any ch-2 sp, ch 3 (counts as dc), dc in same sp, dc in each of next 63 sts, [(2 dc, ch 2, 2 dc) in next ch-2 sp, dc in each of next 63 sts] 3 times, 2 dc in first corner sp, ch 2, sl st to top of beginning ch 3 (268 dc, 4 ch-2 sps, 67 dc between corner sps)
Round 20 :
Join A in any ch-2 sp, ch 3 (counts as dc), dc in same sp, dc in next st, [ch 1, skip next st, dc in next st] 33 times, [(2 dc, ch 2, 2 dc) in next ch-2 sp, dc in next st, [ch 1, skip next st, dc in next st] 33 times] 3 times, 2 dc in first corner sp, ch 2, sl st to top of beginning ch 3 (152 dc, 132 ch-1 sps, 4 ch-2 sps, 71 sts between corner sps)
Round 21 :
Join A in any ch-2 sp, ch 3 (counts as dc), dc in same sp, dc in each of next 71 sts, [(2 dc, ch 2, 2 dc) in next ch-2 sp, dc in each of next 71 sts] 3 times, 2 dc in first corner sp, ch 2, sl st to top of beginning ch 3 (300 dc, 4 ch-2 sps, 75 dc between corner sps)
Round 22 :
Join B in any corner ch-2 sp, ch 1, 3 sc in same sp, sc in each of next 75 dc, [3 sc in next corner sp, sc in each of next 75 dc] 3 times, sl st to first sc (312 sc). Fasten off.
Round 23 :
Join D in the center sc of any 3-sc corner, ch 1, 3 sc in same st, sc in each of next 77 sts, [3 sc in next st, sc in each of next 77 sts] 3 times, sl st to first sc (320 sc). Fasten off.
— 9. Pillow Sham Back (make 2) :
Row 1 :
With A, ch 77, dc in 4th ch from hook and in each ch across (75 dc, counting the beginning ch 3 as a dc)
Row 2-46 :
Ch 3 (counts as dc), turn, dc in each st across (75). Fasten off after Row 46 and weave in ends. The panel should measure about 52 cm (20.5 in) tall.
Your bed is about to get the kind of makeover people notice the second they walk in 🧶 Grab your cream and blues, settle in with a few squares at a time, and let the pattern grow at its own pace. Every flower you finish is one more step toward a spread you’ll be proud to hand down. Gift it, drape it over the foot of the bed, or keep every bit of it for yourself. Happy hooking, and enjoy every stitch! ✨