🧢 Beautiful ✨ Detailed πŸ’ Adorable

Butterfly Garden Crochet Toddler Dress Pattern

Butterfly Garden Crochet Toddler Dress Pattern
4.5β˜…Rating
10-12 HoursTime Needed
1.1KMade This
βœ‚οΈ

Intermediate Level

Ideal for those with basic crocheting experience, featuring slightly more advanced stitches and techniques to expand your skills.

⏱️

Slow & Steady

A 10-12 hour projectβ€”great for savoring the process over several sessions.

πŸŽ€

Playful Twist

Fun patterns meet timeless design in pieces that express personality while remaining wonderfully wearable.

About This Butterfly Garden Crochet Toddler Dress Pattern

Butterfly Garden Crochet Toddler Dress Pattern crochet pattern - detailed view

Perfect for a special first birthday gift or a treasured family heirloom, this dress is as fun to make as it is delightful to wear. It stands out in any wardrobe and makes for the most gorgeous holiday photos.

Why You'll Love This Butterfly Garden Crochet Toddler Dress Pattern

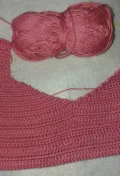
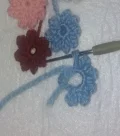
I absolutely adore how this pattern blends classic garment shaping with playful, three-dimensional details. Stitching the airy mesh skirt is incredibly relaxing once you get into the rhythm, and designing the tiny flowers and butterfly feels like adding your own little artistic touch to a canvas. It's the kind of project that keeps you excited at every stage.

Butterfly Garden Crochet Toddler Dress Pattern step 1 Butterfly Garden Crochet Toddler Dress Pattern step 2 Butterfly Garden Crochet Toddler Dress Pattern step 3 Butterfly Garden Crochet Toddler Dress Pattern step 4

Switch Things Up

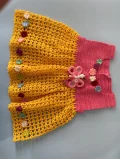
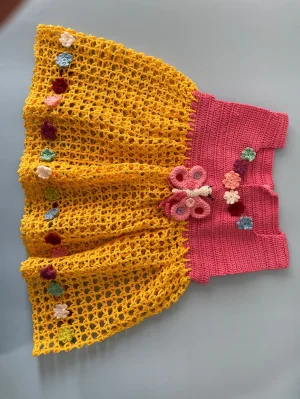
There's something incredibly magical about working on children's garments. As the yoke grows in your hands, you can already picture the sweet moments and laughter it will witness. When I was designing this dress, I wanted to capture that whimsical, carefree feeling of running through a meadow in springtime. The contrast between the structured pink bodice and the airy, lace-like golden skirt does exactly that.

If you want to put your own spin on this design, don't feel limited by the pink and yellow colorway! A soft sage green yoke paired with a cream skirt would create a gorgeous, earthy woodland vibe. Or, for a bold and cheerful look, try a lavender yoke with a sky-blue skirt. You can also play around with the placement of the flowersβ€”try scattering them randomly across the skirt like a wildflower field instead of lining them up along the hem. Whatever colors you choose, make sure to enjoy every single stitch. This is more than just a dress; it's a handmade hug that will be cherished for years to come.

Common Mistakes & How to Fix Them

βœ— When shaping the front yoke neck decrease, miscounting the stitches can lead to uneven shoulder straps, so always double-check your row counts before starting the second side.βœ— The buttonholes on the back yoke require skipping stitches; if you skip too many or too few, your buttons won't align or fit securely through the openings.βœ— If you work the skirt's mesh pattern too tightly, the fabric will lose its soft drape and flare, so try to maintain a relaxed, even tension throughout the yellow section.βœ— Securing the 36 tiny flowers to the hem requires careful spacing; pinning them all in place before sewing ensures an even distribution around the skirt's edge.

Butterfly Garden Crochet Toddler Dress Pattern

Dress your little one in pure sunshine with this adorable, vintage-inspired crochet frock! Combining a neat, structured pink bodice with an airy, flowing golden-yellow skirt, this piece is a joy to stitch. The cheerful floral embellishments and a whimsical butterfly detail make it perfect for birthday parties, spring outings, or everyday play. You'll love watching this sweet garment come together stitch by stitch.

Intermediate 10-12 Hours

Materials Needed for Butterfly Garden Crochet Toddler Dress Pattern

β€” Main Fabric

  • 01
    Sport weight or DK weight yarn in Pink (Main Color) for the yoke, approximately 150g
  • 02
    Sport weight or DK weight yarn in Yellow (Color A) for the skirt, approximately 150g
  • 03
    Small amounts of Cream, Light Pink, Red, and Lilac yarn for the butterfly and floral embellishments

β€” Tools Required

  • 01
    2.5 mm crochet hook (or size needed to obtain gauge)
  • 02
    Tapestry needle for weaving in ends and assembly
  • 03
    Sharp scissors
  • 04
    Stitch markers to keep track of rounds and rows
  • 05
    Straight pins for positioning the flowers and butterfly
  • 06
    A small amount of polyester fiberfill stuffing for the butterfly body
  • 07
    Buttons for the back yoke closure

Progress Tracker

0% Complete

β€” 1. Front Yoke :

Row 1 :

ch 91, turn. (91)

Row 2 :

sc in next 90 ch, ch 1, turn. (90)

Row 3 :

sc in next 90 sts, ch 1, turn. (90)

Row 4 :

sc in next 90 sts, ch 1, turn. (90)

Row 5 :

hdc in next 90 sts, ch 2, turn. (90)

Row 6 :

sc in next 85 sts, ch 1, turn. (85)

Row 7 :

sc in next 80 sts, ch 1, turn. (80)

Row 8 :

hdc in next 80 sts, ch 2, turn. (80)

Row 9 :

hdc in next 80 sts, ch 2, turn. (80)

Row 10 :

hdc in next 80 sts, ch 2, turn. (80)

Row 11 :

hdc in next 80 sts, ch 2, turn. (80)

Row 12 :

sc in next 40 sts, ch 1, turn. (40)

Row 13 :

dec, sc in next 37 sts, ch 1, turn. (38)

Row 14 :

sc in next 37 sts, ch 1, turn. (37)

Row 15 :

dec, sc in next 34 sts, ch 1, turn. (35)

Row 16 :

sc in next 34 sts, ch 1, turn. (34)

Row 17 :

dec, sc in next 31 sts, ch 1, turn. (32)

Row 18 :

sc in next 31 sts, ch 1, turn. (31)

Row 19 :

dec, sc in next 28 sts, ch 1, turn. (29)

Row 20 :

sc in next 28 sts, ch 1, turn. (28)

Row 21 :

dec, sc in next 25 sts, ch 1, turn. (26)

Row 22 :

sc in next 25 sts, ch 1, turn. (25)

Row 23 :

dec, sc in next 22 sts, ch 1, turn. (23)

Row 24 :

sc in next 22 sts, ch 1, turn. (22)

Row 25 :

dec, sc in next 19 sts, ch 1, turn. (20)

Row 26 :

sc in next 19 sts, ch 1, turn. (19)

Row 27 :

dec, sc in next 16 sts, ch 2, turn. (17)

Row 28 :

hdc in next 15 sts, ch 2, turn. (15)

Row 29 :

hdc in next 15 sts, ch 2, turn. (15)

Row 30 :

hdc in next 15 sts, ch 2, turn. (15)

Row 31 :

hdc in next 15 sts, ch 2, turn. (15)

Row 32 :

hdc in next 15 sts, ch 2, turn. (15)

Row 33 :

hdc in next 15 sts, ch 2, turn. (15)

Row 34 :

hdc in next 15 sts, ch 2, turn. (15)

Row 35 :

hdc in next 15 sts, ch 2, turn, fo. (15)

Info :

Join pink yarn to the remaining unworked stitches of Row 12 on the other side of the neckline and repeat Rows 13 to 35 in the same manner to complete the second shoulder strap.

β€” 2. Back Yoke - Part 1 :

Row 1 :

ch 46, turn. (46)

Row 2 :

sc in next 45 sts, ch 1, turn. (45)

Row 3 :

sc in next 45 sts, ch 2, turn. (45)

Row 4 :

hdc in next 45 sts, ch 2, turn. (45)

Row 5 :

hdc in next 45 sts, ch 2, turn. (45)

Row 6 :

hdc in next 3 sts, ch 3, skip 3 sts, hdc in next 39 sts, ch 2, turn. (45)

Row 7 :

hdc in next 40 sts, ch 2, turn. (40)

Row 8 :

hdc in next 40 sts, ch 2, turn. (40)

Row 9 :

hdc in next 40 sts, ch 2, turn. (40)

Row 10 :

hdc in next 40 sts, ch 2, turn. (40)

Row 11 :

hdc in next 40 sts, ch 2, turn. (40)

Row 12 :

hdc in next 40 sts, ch 2, turn. (40)

Row 13 :

hdc in next 40 sts, ch 2, turn. (40)

Row 14 :

hdc in next 40 sts, ch 2, turn. (40)

Row 15 :

hdc in next 40 sts, ch 2, turn. (40)

Row 16 :

hdc in next 40 sts, ch 2, turn. (40)

Row 17 :

hdc in next 40 sts, ch 2, turn. (40)

Row 18 :

hdc in next 40 sts, ch 2, turn. (40)

Row 19 :

hdc in next 40 sts, ch 2, turn. (40)

Row 20 :

hdc in next 40 sts, ch 2, turn. (40)

Row 21 :

hdc in next 40 sts, ch 2, turn. (40)

Row 22 :

hdc in next 15 sts, ch 2, turn. (15)

Row 23 :

hdc in next 15 sts, ch 2, turn. (15)

Row 24 :

hdc in next 15 sts, ch 2, turn, fo. (15)

β€” 3. Back Yoke - Part 2 :

Row 1 :

ch 46, turn. (46)

Row 2 :

sc in next 45 sts, ch 1, turn. (45)

Row 3 :

sc in next 45 sts, ch 2, turn. (45)

Row 4 :

hdc in next 45 sts, ch 2, turn. (45)

Row 5 :

hdc in next 45 sts, ch 2, turn. (45)

Row 6 :

hdc in next 3 sts, ch 3, skip 3 sts, hdc in next 34 sts, ch 2, turn. (40)

Row 7 :

hdc in next 34 sts, hdc in next 3 ch, hdc in next 3 sts, ch 2, turn. (40)

Row 8 :

hdc in next 40 sts, ch 2, turn. (40)

Row 9 :

hdc in next 40 sts, ch 2, turn. (40)

Row 10 :

hdc in next 40 sts, ch 2, turn. (40)

Row 11 :

hdc in next 40 sts, ch 2, turn. (40)

Row 12 :

hdc in next 40 sts, ch 2, turn. (40)

Row 13 :

hdc in next 40 sts, ch 2, turn. (40)

Row 14 :

hdc in next 3 sts, ch 3, skip 3 sts, hdc in next 34 sts, ch 2, turn. (40)

Row 15 :

hdc in next 34 sts, hdc in next 3 ch, hdc in next 3 sts, ch 2, turn. (40)

Row 16 :

hdc in next 40 sts, ch 2, turn. (40)

Row 17 :

hdc in next 40 sts, ch 2, turn. (40)

Row 18 :

hdc in next 40 sts, ch 2, turn. (40)

Row 19 :

hdc in next 40 sts, ch 2, turn. (40)

Row 20 :

hdc in next 3 sts, ch 3, skip 3 sts, hdc in next 34 sts, ch 2, turn. (40)

Row 21 :

hdc in next 40 sts, ch 2, turn. (40)

Row 22 :

hdc in next 40 sts, ch 2, turn. (40)

Row 23 :

hdc in next 15 sts, ch 2, turn. (15)

Row 24 :

hdc in next 15 sts, ch 2, turn, fo. (15)

β€” 4. Dress Skirt :

Round 1 :

Join yellow yarn to the lower edge of the completed yoke. *dc, ch 4, skip 1 st* repeat 88 times around. (88 spaces)

Round 2-21 :

*dc in the dc of the previous round, ch 3, sc in the middle of the ch-4 space, ch 3* repeat 88 times around.

Round 22-41 :

*dc in the dc of the previous round, ch 4* repeat 88 times around, fo.

β€” 5. Flowers :

Round 1 :

In a mr, *ch 6, sc* repeat 8 times, fo. Pull the yarn tail tight to close the ring and form the flower petals.

β€” 6. Butterfly - Head & Body :

Round 1 :

6 sc in a mr. (6)

Round 2 :

6 inc. (12)

Round 3 :

sc in each st around. (12)

Round 4 :

sc in each st around. (12)

Round 5 :

6 dec. (6)

Round 6 :

sc in each st around. (6)

Round 7 :

6 inc. (12)

Round 8 :

sc in each st around. (12)

Round 9 :

sc in each st around. (12)

Round 10 :

sc in each st around. (12)

Round 11 :

sc in each st around. (12)

Round 12 :

sc in each st around. (12)

Round 13 :

sc in each st around. (12)

Round 14 :

sc in each st around. (12)

Round 15 :

6 dec. (6)

Round 16 :

sc in each st around. (6)

Round 17 :

sc in each st around. (6)

Round 18 :

sc in each st around. (6)

Round 19 :

sc in each st around, fo. (6)

β€” 7. Butterfly - Wings :

Round 1 :

6 sc in a mr. (6)

Round 2 :

6 inc. (12)

Round 3 :

*sc, inc* repeat 6 times. (18)

Round 4 :

sc in each st around. (18)

Round 5 :

sc in each st around. (18)

Round 6 :

sc in each st around. (18)

Round 7 :

*sc, dec* repeat 6 times. (12)

Round 8 :

sc in each st around, fo. (12)

Info :

After making 4 individual wings, you will combine them in pairs to form the left and right wing sets.

Round 9 :

Join two wings together. *2 sc, dec* repeat 6 times around the combined edge. (18)

Round 10 :

sc in each st around. (18)

Round 11 :

sc in each st around, fo. Leave a long tail for sewing. (18)

β€” 8. Butterfly - Spots :

Round 1 :

8 sc in a mr, fo. Leave a long tail for sewing. (8)

β€” 9. Ribbon :

Row 1 :

ch 330, turn, sc in each ch across, fo. (330)

Assembly Instructions

  • Sew the front yoke and the two back yoke pieces together at the shoulder seams using a mattress stitch for a clean finish.
  • Overlap the back yoke pieces slightly where the buttonholes are located and secure the lower edges before attaching the skirt yarn.
  • Weave the pink ribbon through the waistline stitches to create an adjustable tie that cinches the dress gently.
  • Sew the red and lilac spots onto the pink butterfly wings, then stitch the wing sets securely to the cream butterfly body.
  • Center the completed butterfly on the front waistline of the dress, just below the yoke, and sew it firmly in place.
  • Evenly space the 36 small crochet blossoms along the lower hem of the yellow skirt and the neckline of the pink yoke, then sew them down securely.

Important Notes

  • πŸ’‘Block the yoke pieces before assembling the dress to ensure the edges are straight and the sizing is accurate.
  • πŸ’‘When working the skirt, use a slightly larger hook if you tend to have tight tension to keep the fabric light and flowing.
  • πŸ’‘Make sure to leave long tails on your flowers and butterfly parts, as these are incredibly useful for sewing them onto the garment later.
  • πŸ’‘You can easily customize the length of the skirt by adding or subtracting rounds from the mesh sections to fit your toddler perfectly.

There is nothing quite like seeing a little one twirl around in a dress you made with your own two hands! This sweet butterfly garden dress is bound to become a favorite piece, filled with memories of sunny afternoons and playground adventures. Take your time with the stitches, enjoy the colorful details, and celebrate the beautiful heirloom you are creating. Happy crocheting, my friends! 🧢✨

You ask,

we answer.

FAQs

Can I use a different yarn weight like worsted weight for this dress?

It's best to stick to a sport or light DK weight yarn. Using worsted weight will make the dress much larger and heavier, which might not fit a 12-18 month old comfortably.

How do I wash and care for the finished dress?

I highly recommend hand washing the dress in cold water with mild detergent, then laying it flat to dry. This protects the delicate mesh skirt and the hand-sewn flowers.

Is this pattern easy to adjust for a larger size?

Yes! You can increase the size by starting with a longer chain for the yoke (in multiples of 2) and adding more rows to the shoulders and length of the skirt.

What kind of buttons should I use for the back?

Small, lightweight plastic or wooden buttons (about 10-12mm) work best. Make sure they fit snugly through the ch-3 buttonholes on the back yoke before sewing them on.