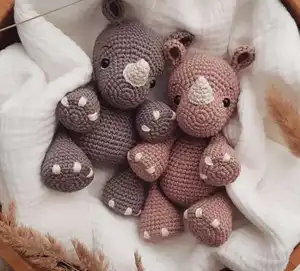
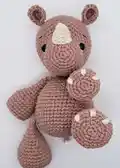
Create your own adorable baby rhino named Pino with this charming amigurumi pattern! This delightful project brings a sweet woodland friend to life with careful shaping and endearing details. Perfect for both display and cuddles, Pino features sturdy legs, a distinctive horn, and an expressive face that captures the gentle nature of these magnificent creatures. Whether you're crafting for yourself or creating a thoughtful handmade gift, this pattern guides you through every step to achieve a professional-looking result.
Progress Tracker
0% Complete
— Legs (Make 2) :
Round 1 :
6 sc into MR (6)
Round 3 :
(1 sc, inc) x 6 (18)
Round 4 :
(2 sc, inc) x 6 (24)
Round 5 :
(3 sc, inc) x 6 (30)
Round 10 :
(3 sc, dec) x 6 (24)
Round 12 :
(2 sc, dec) x 6 (18)
Info :
Stuff the leg with fiberfill up to round 11. Do not stuff too tightly, so that the leg will keep its shape.
Round 15 :
(1 sc, dec) x 6 (12)
Round 19 :
2 sc, this round is not crocheted until the end of the round
Info :
When folding the opening the joints of round 5 and 6 should be parallel. Adjust the number of stitches if needed. Fold the two sides together and crochet 2 sc across. Cut the yarn and weave in the yarn tail nicely.
— Arms (Make 2) :
Round 1 :
6 sc into MR (6)
Round 3 :
(1 sc, inc) x 6 (18)
Round 4 :
(2 sc, inc) x 6 (24)
Round 10 :
(2 sc, dec) x 6 (18)
Round 12 :
(1 sc, dec) x 6 (12)
Info :
Stuff the arm with fiberfill up to round 12. Do not stuff too tightly, so that the arm will keep its shape.
Round 15 :
(2 sc, dec) x 3 (9)
Round 18 :
(1 sc, dec) x 3 (6)
Round 19 :
2 sc, the round is not crocheted until the end of the round
Info :
When folding the opening the joints of round 5 and 6 should be parallel. Adjust the number of stitches if needed. Fold the two sides together and crochet 2 sc across. Cut the yarn and weave in the yarn tail nicely.
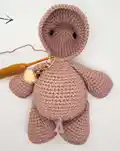
— Body :
Round 1 :
6 sc into MR (6)
Round 3 :
(1 sc, inc) x 6 (18)
Round 4 :
(2 sc, inc) x 6 (24)
Round 5 :
(3 sc, inc) x 6 (30)
Round 6 :
(4 sc, inc) x 6 (36)
Round 7 :
(5 sc, inc) x 6 (42)
Round 8 :
(6 sc, inc) x 6 (48)
Info :
The stitch marker is on the front. Make sure that the legs are crocheted in with the right side to the front and the joints of the rounds have to be at the backside.
Round 11 :
13 sc, crochet in the 1st leg with 2 sc, 24 sc, crochet in the 2nd leg with 2 sc, 7 sc (48)
Info :
At the front the legs have 20 sc in between and at the back there are 24 sc in between. Make sure that the legs are exactly symmetrically at each side of the body.
Round 15 :
(6 sc, dec) x 6 (42)
Round 18 :
(5 sc, dec) x 6 (36)
Round 19 :
(4 sc, dec) x 6 (30)
Round 22 :
(3 sc, dec) x 6 (24)
Info :
Now start stuffing the body with fiberfill.
Round 23 :
(2 sc, dec) x 6 (18)
Round 24 :
7 sc, crochet in the 1st arm with 2 sc, 7 sc, crochet in the 2nd arm with 2 sc (18)
Info :
The arms have 7 sc in between at the front and at the back. Make sure that the arms are exactly symmetrically at each side of the body.
Round 25 :
(1 sc, dec) x 6 (12)
Info :
Fold the two sides of the opening together and crochet 5 sc across. Cut the yarn and weave in the yarn tail nicely.
— Tail :
Info :
Mark the position of tail centered at the back in round 9 with pins. Thread in a piece of yarn about 20cm in length and make a knot. Cut it leaving approximately 1cm.
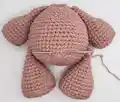
— Head :
Round 1 :
6 sc into MR (6)
Round 3 :
(1 sc, inc) x 6 (18)
Round 4 :
(2 sc, inc) x 6 (24)
Round 5 :
(3 sc, inc) x 6 (30)
Round 10 :
4 sc, (inc, 1 sc) x 6, 14 sc (36)
Info :
You can already mark the position of the safety eyes with two yarn remnants in round 11.
Round 11 :
5 sc, place first marker, (inc, 2 sc) x 5, inc, place second marker, 15 sc (42)
Round 12 :
6 sc, (inc, 3 sc) x 6, 12 sc (48)
Info :
Now insert the safety eyes 8mm diameter at the position you marked before.
Round 16 :
42 sc, crochet in the body with 5 sc, 1 sc (48)
Info :
Make sure that the head is attached upright.
Round 20 :
(6 sc, dec) x 6 (42)
Round 22 :
(5 sc, dec) x 6 (36)
Round 23 :
(4 sc, dec) x 6 (30)
Round 24 :
(3 sc, dec) x 6 (24)
Round 25 :
(2 sc, dec) x 6 (18)
Info :
Stuff the head with fiberfill.
Round 26 :
(1 sc, dec) x 6 (12)
Info :
Cut the yarn and weave in the yarn tail nicely.
— Ears (Make 2) :
Round 1 :
6 sc into MR (6)
Round 3 :
1 ch, 5 hdc, (2 dc in 1 st) x 2, 5 hdc (14)
Info :
Finish off with a sl st in the next st. Cut the yarn leaving a long tail for sewing. Fold the ear together and sew the two stitches at the bottom together. Insert the needle from above and withdraw it at the bottom.
Attachment :
The ears are sewn to the head centered at round 17 with 12 visible sc in between.
— Horn :
Round 1 :
6 sc into MR (6)
Round 3 :
(1 sc, inc) x 3 (9)
Round 4 :
inc x 3, 6 sc (12)
Info :
Join the round with a sl st. Cut the yarn leaving a long tail for sewing.
Attachment :
Stuff the horn slightly with fiberfill and attach it centered to rounds 3-9. Make sure that the 3 increases of the horn are above.
— Nails :
Info :
Mark the nail position with pins. Your reference point is the joint of the rounds from the arms and legs. The joint of the round is now on the bottom. Between each nail there are 4 visible sc. Embroider each nail with 4 stitches.
— Facial Features :
Eyebrows :
The eyebrows are embroidered slanted over round 13 with 2 sc in length using black embroidery thread.
Eye Lid :
Make a stitch twice from the upper to the lower part of the eye. One third of the lower part of the eye is embroidered with white cotton yarn.
This delightful Pino baby rhino pattern combines traditional amigurumi techniques with thoughtful construction details to create a truly special handmade companion. The carefully designed proportions and charming facial features give Pino an endearing personality that makes this project rewarding from start to finish. Whether displayed on a shelf or given as a heartfelt gift, your finished rhino will bring smiles and showcase your crochet craftsmanship beautifully. 🦏 Happy crocheting! 🧶✨