🧶 Beautiful ✨ Detailed 💝 Adorable

Striped Crochet Tunic Pattern

Striped Crochet Tunic Pattern
4.1★ Rating
8-12 Hours Time Needed
3.6K Made This
✂️

Beginner Friendly Level

Perfect for those just starting their sewing journey, with clear instructions and simple techniques

⏱️

All-Day Adventure

Requires 8-10 hours, ideal for a full day of immersive knitting.

👕

Casual Chic

Relaxed style with a modern twist, perfect for everyday wear while maintaining that handcrafted uniqueness.

About This Striped Crochet Tunic Pattern

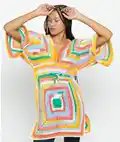
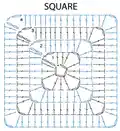
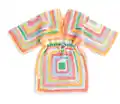
This striped crochet tunic pattern features a clever construction method that makes creating a full garment surprisingly simple. You'll work four identical squares using a basic double crochet stitch in alternating colors, then seam them together to form a comfortable, oversized tunic. The design includes thoughtful details like side slits for ease of movement, short kimono-style sleeves, and a custom drawstring waist that allows you to adjust the fit to your preference.

Striped Crochet Tunic Pattern crochet pattern - detailed view of completed project

The pattern is written for six different sizes ranging from XS/S to 4/5XL, ensuring a great fit for everyone. The stripe pattern creates visual interest while keeping the technique straightforward and perfect for confident beginners.

Why You'll Love This Striped Crochet Tunic Pattern

I absolutely love this tunic pattern because it proves that beautiful, wearable garments don't have to be complicated! The square-based construction takes all the intimidation out of garment-making, and watching those colorful stripes come together is incredibly satisfying. I appreciate how versatile this piece is—you can dress it up or down, and the adjustable drawstring means it flatters every body type. The fact that you can customize it with your favorite color combinations makes each tunic truly unique. Plus, those side slits and comfortable sleeves make this tunic as practical as it is pretty!

Striped Crochet Tunic Pattern step 1 - construction progress Striped Crochet Tunic Pattern step 2 - assembly progress Striped Crochet Tunic Pattern step 3 - details and accessories Striped Crochet Tunic Pattern step 4 - final assembly and finishing

Switch Things Up

I love experimenting with this pattern to make each tunic uniquely mine! Instead of the two-color stripe pattern, try working with three or four colors for a more vibrant, bohemian look—just adjust your stripe sequence to include all your chosen colors. You could also play with texture by substituting some rounds with half double crochet or treble crochet stitches to create interesting texture variations within your stripes.

For a more elegant version, work the entire tunic in a single luxurious color using a silk-blend or bamboo yarn for beautiful drape. I've also made this pattern with an ombre or gradient yarn for a stunning color-fade effect that requires zero color changes. Consider adding fringe along the bottom hem and sleeve edges for a festival-ready boho vibe, or sew decorative buttons along the shoulder seams for extra detail.

If you want more coverage, simply continue working rounds on your squares until they're larger—this will create a longer tunic or even a dress length. You could also adjust the sleeve opening to create cap sleeves or even sleeveless armholes for a summer-ready version. The square construction method is incredibly forgiving and makes modifications straightforward and stress-free!

Common Mistakes & How to Fix Them

✗ Not maintaining consistent gauge throughout can result in uneven squares that don't align properly during assembly—check your gauge regularly ✗ Forgetting to keep track of stripe pattern rounds can throw off your color changes—use a stitch marker to mark pattern repeats ✗ Sewing squares together too tightly creates puckering and restricts the drape—use a flat seam and keep tension relaxed ✗ Skipping the final single crochet round on squares makes seaming difficult and creates visible gaps—always complete all finishing rounds

Striped Crochet Tunic Pattern

Create a stylish and comfortable striped crochet tunic that's perfect for any season! This beginner-friendly pattern guides you through making a beautiful oversized tunic using a simple square construction method. Working with two contrasting colors in a classic stripe pattern, you'll create four squares that come together to form a flattering, loose-fitting garment with practical side slits and kimono-style sleeves. The pattern includes a waist drawstring for adjustable styling, making it both fashionable and functional for everyday wear.

Beginner Friendly 8-12 Hours

Materials Needed for Striped Crochet Tunic Pattern

— Main Fabric

  • 01
    Caron Cinnamon Swirl Cakes yarn (8 oz/227 g; 407 yds/372 m) in Contrast A: Sour Lime
  • 02
    Caron Cinnamon Swirl Cakes yarn (8 oz/227 g; 407 yds/372 m) in Contrast B: Tangerine Twist
  • 03
    2-5 balls of Contrast A depending on size
  • 04
    2-4 balls of Contrast B depending on size

— Tools Required

  • 01
    Size U.S. H/8 (5 mm) Susan Bates Silvalume crochet hook or size needed to obtain gauge
  • 02
    Susan Bates yarn needle
  • 03
    Safety pin
  • 04
    Scissors
  • 05
    Measuring tape

Progress Tracker

0% Complete

— Stripe Pattern :

Info :

With A, work 2 rnds. With B, work 2 rnds. These 4 rnds form Stripe Pat.

— Squares (Make 4) :

Starting Chain :

With A, ch 4. Join with sl st to first ch to form ring.

Round 1 :

Ch 2. [3 dc in ring. Ch 2] 3 times. 3 dc in ring. Ch 1. Join to first dc with a sc.

Round 2 :

Ch 2. 2 dc in same sp as join. [1 dc in each dc to next ch-2 sp. (2 dc. Ch 2. 2 dc) in ch-2 sp] 3 times. 1 dc in each st to next (ch 1. 1 sc) sp. 2 dc in sp. Ch 1. Join to first dc with a sc.

Info :

First 2 rnds of Stripe Pat are now in place. Keeping cont of Stripe Pat, rep 2nd rnd until work measures approx 19½ (21½-23½-25½-28½-31½)" [49.5 (54.5-59.5-65-72.5-80) cm] square, ending after a 2nd or 4th row of Stripe Pat. Fasten off B.

Next Round :

With A, ch 1. 1 sc in same sp as join. (1 sc in each dc to next ch-2 sp. 3 sc in ch-2 sp) 3 times. 1 sc in each st to next (ch 1. 1 sc) sp. 2 sc in sp. Join with sl st to first sc. Fasten off.

— Waist Drawstring :

Starting Chain :

Ch 175 (188-208-221-248-274).

Row 1 :

1 sc in 2nd ch from hook. 1 sc in each ch to end of chain. Fasten off.

Assembly Instructions

  • Using a flat seam, sew 2 Squares together along side seams to form Bottom of Tunic, leaving 8 (8-9-10-11-12)" open along bottom of seam at each side for side slit.
  • Using a flat seam and working vertically, sew first 4 (4-5-6-7-8)" of remaining 2 Squares together for Top of Tunic.
  • Leave the center section open, then seam the last 8 (9-10-11-12-15)" together using a flat seam.
  • Fold Top of Tunic in half horizontally and leave 4" open at each end.
  • Sew next 6 (7-8-9-10½-12)" closed for Sleeve using a flat seam, leaving the center 20 (22-24-26-29-32)" open.
  • With Top of Tunic centered along Bottom, seam Top to Bottom around entire circumference of Tunic using a flat seam.
  • Place end of Drawstring on safety pin and thread around waist approximately 3 (3½-4-4½-5-6)" below seam by weaving safety pin over and under groups of 2 dc around to opposite side of center front.

Important Notes

  • 💡Check your gauge before starting—13 sc and 14 rows should equal 4 inches to ensure proper sizing
  • 💡Ch 2 at beginning of rounds does not count as a stitch throughout this pattern
  • 💡When working squares, maintain consistent tension to ensure all four squares are identical in size
  • 💡Use flat seaming technique throughout for professional-looking, invisible seams that lay flat
  • 💡Pin pieces together before sewing to ensure proper alignment and prevent shifting during assembly
  • 💡Weave in ends securely as you go to make finishing easier and prevent them from working loose with wear

This versatile striped tunic brings together simplicity and style in one wearable project! The square-based construction method makes garment-making accessible to crocheters who might feel intimidated by traditional clothing patterns. With customizable colors, adjustable sizing, and comfortable design features, you'll create a piece you'll reach for again and again. Whether you're looking for a beach cover-up, casual layering piece, or cozy loungewear, this tunic pattern delivers beautiful results with beginner-friendly techniques. Get ready to fall in love with garment crocheting! 🧶✨

You ask,

we answer.

FAQs

Can I use different yarn weights for this pattern?

While the pattern is written for medium weight yarn, you can substitute different weights—just adjust your hook size accordingly and make a gauge swatch first. Keep in mind that changing yarn weight will affect the final measurements, so you may need to add or remove rounds to achieve your desired square size.

How do I know which size to make?

Choose your size based on your chest measurement and desired fit. This tunic is designed to be oversized with positive ease, so the finished chest measurement should be 6-12 inches larger than your actual chest measurement for a comfortable, relaxed fit. Refer to the sizing chart in the pattern for guidance.

What if my squares aren't coming out perfectly square?

Uneven squares usually indicate tension issues or miscounting stitches. Block each square before assembly to help even them out, and double-check that you're working the corner increases correctly with (2 dc, ch 2, 2 dc) in each corner chain space. Consistent tension throughout is key to achieving uniform squares.

Can I make the sleeves longer or shorter?

Absolutely! The sleeve length is determined by how much you seam closed after folding the top squares. To make longer sleeves, increase the measurement you seam closed for sleeves. For shorter sleeves, decrease this measurement. Just ensure you still leave enough open space in the center for the neck opening.

Do I have to use the drawstring, or can I skip it?

The drawstring is optional and serves both decorative and functional purposes. You can absolutely skip it if you prefer a completely loose-fitting tunic, or you could substitute it with a ribbon or purchased cord. The tunic will still be beautiful and wearable without it!