About This Adorable Plush Bunny Amigurumi Pattern
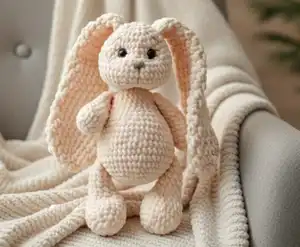
The finished bunny features safety eyes, embroidered details for personality, and plush texture that makes it irresistibly soft to hold and display.
Perfect for those just starting their sewing journey, with clear instructions and simple techniques
Complete in under 2 hours—quick, fun, and perfect for a little creative escape.
An adorable friend to cherish, handcrafted with love to bring comfort and joy for years to come.
The finished bunny features safety eyes, embroidered details for personality, and plush texture that makes it irresistibly soft to hold and display.
I absolutely love this bunny pattern because it's the perfect introduction to working with plush yarn and needle sculpting techniques. The long floppy ears give this bunny so much character, and watching the face come to life through simple embroidery is incredibly rewarding. I find the process meditative yet exciting, especially when adding those final touches like the sweet bow. Plus, the finished bunny is so huggable and makes people smile instantly!


I love experimenting with this bunny pattern to create unique variations! Try using different colors - a classic white bunny is timeless, or go bold with pastels like lavender, mint, or baby blue. You could even create a gradient effect by changing colors every few rows on the body.
For the ears, consider making them shorter for a lop-eared bunny look, or keep them extra long and floppy for maximum cuteness. I've also experimented with adding little paw pad details using felt circles or embroidered stitches on the bottom of the feet.
The bow can be replaced with so many fun accessories - try a crochet flower crown, a tiny scarf, or even a small vest. For holiday versions, add seasonal elements like bunny ears with holly for Christmas or pastel eggs for Easter.
You can also personalize the face by adjusting the eye placement for different expressions, or add rosy cheeks with fabric paint or embroidery. Some of my favorites include adding a fluffy pompom tail instead of a flat crocheted one, or embroidering little teeth peeking out for extra character.
For advanced crocheters, try creating jointed limbs using button joints for a poseable bunny, or add wire armature in the ears so they can be bent into different positions. The possibilities are endless!
Create your own cuddly companion with this charming bunny amigurumi pattern! Perfect for beginners, this pattern features soft plush yarn and detailed step-by-step instructions to craft a huggable 12-inch bunny with long floppy ears. Whether you're making a gift or adding to your handmade collection, this sweet bunny brings warmth and joy to any space.
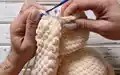
Take the 4mm hook. Crochet 5 CH.
From the 2nd loop from the hook 3 SC, 3 SC in 1, 2 SC, 1 Inc (=10)
Next crochet a spiral
1 Inc, 2 SC, 3 Inc, 2 SC, 2 Inc (=16)
Place the marker in the 1st SC of the row. Next rearrange the marker to the 1st SC of each subsequent row
1 SC, 1 Inc, 3 SC, 1 Inc, 3 SC, 1 Inc, 3 SC, 1 Inc, 2 SC (=20)
1 SC, 1 Inc, (4 SC, 1 Inc)*3, 3 SC (=24)
2 rows of 24 SC
6 SC, (1 Dec, 1 SC)*3, 1 Dec, 5 SC, 1 Dec (=19)
4 SC, 4 Dec, 5 SC, 1 Dec (=14)
6 rows of 14 SC
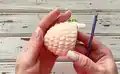
Take some stuffing. Take the same amount for the second paw to ensure they are equally filled. Gently stuff the lower part of the paw. Fold in half. Crochet 6 SC on both part. Cut the thread, pull out the end. Similarly crochet the 2nd paw.
Take the 4mm hook. Crochet 2 CH.
6 SC in the 2nd loop from the hook
Next crochet a spiral
6 Inc (=12)
Place the marker in the 1st SC of the row. Next rearrange the marker to the 1st SC of each subsequent row
(5 SC, 1 Inc)*2 (=14)
4 rows of 14 SC
10 SC, 2 Dec (=12)
5 rows of 12 SC
Take some stuffing. Take the same amount for the second paw to ensure they are equally filled. Gently stuff the lower 2/3 of the paw. Fold in half. Crochet 5 SC on both part. Cut the thread, pull out the end. Similarly crochet the 2nd paw.
Take the 6mm hook. Crochet 2 CH. Crochet the loops loosely to create a voluminous pattern.
6 HDC in the 2nd loop from the hook
Next crochet a spiral
6 Inc (=12)
Place the marker in the 1st HDC of the row. Next rearrange the marker to the 1st HDC of each subsequent row
(1 HDC, 1 Inc)*6 (=18)
5 rows of 18 HDC
(4 HDC, 1 Dec)*3 (=15)
3 rows of 15 HDC
(3 HDC, 1 Dec)*3 (=12)
3 rows of 12 HDC
(4 HDC, 1 Dec)*2 (=10)
10 HDC
(3 HDC, 1 Dec)*2 (=8)
3 rows of 8 HDC
Fold in half. Crochet 4 SlSt on both part. Cut the thread, pull out the end. Similarly crochet the 2nd ear.
Take the 4mm hook. Crochet 2 CH.
6 SC in the 2nd loop from the hook
Next crochet a spiral
6 Inc (=12)
Place the marker in the 1st SC of the row. Next rearrange the marker to the 1st SC of each subsequent row
12 Inc (=24)
(3 SC, 1 Inc)*6 (=30)
(4 SC, 1 Inc)*6 (=36)
(5 SC, 1 Inc)*6 (=42)
42 SC
(6 SC, 1 Inc)*6 (=48)
Crochet in the hind paw 7 SC, 15 SC, crochet in the 2nd hind paw 7 SC, 19 SC (=48)
4 rows of 48 SC
(6 SC, 1 Dec)*6 (=42)
5 SC, 1 Dec, 4 SC, 2 Dec, 4 SC, 1 Dec, (5 SC, 1 Dec)*3 (=35)
(5 SC, 1 Dec)*5 (=30)
(3 SC, 1 Dec)*6 (=24)
3 rows of 24 SC
Crochet in the front paw parallel to the hind paw 6 SC, 5 SC, crochet in the 2nd front paw parallel to the hind paw 6 SC, 7 SC (=24)
12 Dec. Don't cut the thread. Fill the body tightly.
Continue to crochet, 12 Inc (=24)
(1 SC, 1 Inc)*12 (=36)
(5 SC, 1 Inc)*6 (=42)
(6 SC, 1 Inc)*6 (=48)
5 rows of 48 SC
(6 SC, 1 Dec)*6 (=42)
(5 SC, 1 Dec)*6 (=36)
36 SC
(4 SC, 1 Dec)*6 (=30)
(3 SC, 1 Dec)*6 (=24)
Install the safety eyes between the 11th and 12th rows, at a distance 7 SC
Place 2 markers in the 8th and 16th loops. Here is the starting point for the left and right ears, respectively. 2 SC, 1 Dec, crochet in the ear 2 SC, Dec, 2 SC, 1 Dec, 2 SC, crochet in the 2nd ear Dec, 2 SC, Dec, 2 SC, Dec (=18). Strengthen the ends.
(1 SC, 1 Dec)*6 (=12)
Fill the head tightly, paying special attention to the neck to ensure the head stays upright and doesn't sag
6 Dec. Tighten the hole. Cut the thread. Strengthen and hide the end.
Take the 39 inches (1 meter) length of the main yarn and the plastic needle with the large eye. Insert the needle in the middle between the 2nd and 3rd rows of the head. Pull the needle out right next to the eye. Skip 3-4 stitches. Insert the needle, pull it out through the 1st stitch from the beginning of the tightening. Insert the needle in the middle, pull it out near the second eye. Skip 3-4 stitches. Insert the needle, pull it out through the 1st stitch from the beginning of the tightening on the other side. Tighten the threads to ensure even tightening. Tie a knot. Hide the ends inside the toy.
Take the 78 inches (2 meters) length of any embroidery yarn and the plastic needle with the large eye. Insert the needle in the middle between the 6th and 7th rows. Pull the needle through after 2 rows. Skip 3 stitches, insert the needle, pull it out at the point of the starting position. On this triangle, embroider the nose. All stitches should go from the top to the centre. Don't tighten the stitches. When all gaps are filled, make the last stitch from the top of the nose. Afterward, pass the needle a couple of times under the nose. Tighten slightly to form the muzzle.
Insert the needle at the bottom of the nose, pull it out above the eye. Skip 2 stitches and 1 row, then insert the needle. Pull it through 4 stitches above the second eye. Again, skip 2 stitches and 1 row, then insert the needle. Pull it out under the muzzle. Don't tighten the eyebrows. Tie the knot, hide the ends inside the toy. Shape with your hands, spread out the ears.
Take the 4mm hook. Make the magic ring.
Crochet 5 CH, 5 DTR, 5CH, SlSt in MR. Crochet 5 CH, 5 DTR, 5CH, SlSt in MR. Tighten the ring. Tie the knot. Secure the ends to the head at the base of the ear. Tie the knot. Hide the ends inside the toy.
This adorable plush bunny pattern brings together beginner-friendly techniques with professional-looking results. The combination of soft velvet yarn, expressive needle-sculpted features, and those signature long floppy ears creates an irresistibly huggable friend that measures 12 inches tall. Whether you're crafting for yourself or creating a heartfelt handmade gift, this sweet bunny is sure to become a cherished companion. The detailed photo tutorial and clear instructions make the process enjoyable from start to finish. Happy crocheting! 🧶🐰✨
Yes, you can substitute regular worsted weight yarn, but the finished bunny will be smaller and have a different texture. Adjust your hook size to match your yarn weight and expect a finished size of approximately 8-9 inches instead of 12 inches.
This is a common issue with plush yarn. Make sure to pull your working loop up to the level of your hook before completing each stitch, then tighten it back. This technique prevents gaps and creates a smooth, hole-free fabric.
Place markers in the 8th and 16th stitches of row 15 first. When you reach those marked positions, simply crochet through both the ear edge and the head stitches together. Work 2 SC and 1 decrease through both layers to securely attach each ear.
The bow is completely optional! Your bunny will be adorable with or without it. You can also substitute a ribbon bow, add a different accessory, or leave your bunny plain for a minimalist look.
This happens when the neck area isn't stuffed firmly enough. Make sure to pack stuffing tightly in the neck section (row 22 of the body and rows 1-3 of the head) to create a sturdy support structure that keeps the head upright.
Absolutely! Use a smaller hook (3mm) and thinner yarn for a mini version, or use a larger hook (8mm) and bulky yarn for a giant bunny. The proportions will remain the same, just scaled to your materials.
