🧢 Beautiful ✨ Detailed πŸ’ Adorable

Birds of Winter Chickadee Amigurumi Pattern

Birds of Winter Chickadee Amigurumi Pattern
4.3β˜… Rating
8-10 Hours Time Needed
2.3K Made This
βœ‚οΈ

Intermediate Level

Ideal for those with basic knitting experience, featuring slightly more advanced stitches and techniques to expand your skills.

⏱️

All-Day Adventure

Requires 8-10 hours, ideal for a full day of immersive knitting.

πŸ₯

Charming Critter

Delightful animal designs with sweet details that capture the essence of your favorite woodland and farmyard friends.

About This Birds of Winter Chickadee Amigurumi Pattern

This chickadee amigurumi is a detailed winter bird featuring a navy blue and mustard yellow color-blocked body, a snug berry red hat topped with a pompom, and a matching scarf wrapped cozily around its neck. The pattern includes separately crocheted wings, a tail, two little booted legs, rosy fuchsia cheeks, and a small olive green beak. Every piece is designed to come together into one charming, stuffed little bird that feels right at home on a shelf or under a Christmas tree.

Birds of Winter Chickadee Amigurumi Pattern crochet pattern - detailed view of completed project

With clear round-by-round instructions and handy color-change guides, this pattern keeps things organized even through the trickier sections like the multi-color head and the two-part wings.

Why You'll Love This Birds of Winter Chickadee Amigurumi Pattern

I absolutely fell in love with this chickadee the moment I saw how all the little details come together β€” the tiny pompom on the hat, those little rosy cheeks, and the way the mustard yellow belly pops against the navy blue cap. I love how the pattern gives you enough creative freedom to place the eyes and cheeks exactly where you feel they look best, which makes every single chickadee a little unique. The hat and scarf are such a fun bonus too β€” I loved stitching those up at the end and seeing the bird go from a plain little bird to a fully dressed winter character. This is the kind of project that just makes you smile while you work on it.

Birds of Winter Chickadee Amigurumi Pattern step 1 - construction progress Birds of Winter Chickadee Amigurumi Pattern step 2 - assembly progress Birds of Winter Chickadee Amigurumi Pattern step 3 - details and accessories Birds of Winter Chickadee Amigurumi Pattern step 4 - final assembly and finishing

Switch Things Up

I have to be honest β€” when I first started working on this little chickadee, I had no idea how much personality it would end up having. The moment I finished the hat and wrapped that tiny scarf around its neck, I just sat there smiling at it like it was a real bird staring back at me. There is something incredibly satisfying about watching all these separate little pieces β€” the wings, the cheeks, the boots β€” come together into one cohesive character.

What I loved most about this pattern is that it doesn't try to be overly complicated. Yes, there are color changes and a few tricky moments like joining the wing parts, but nothing that felt impossible or frustrating. I found myself actually looking forward to each new section instead of dreading it. The multi-color work on the head and body is where the real magic happens β€” seeing that navy blue cap and mustard yellow belly take shape round by round is genuinely fun.

I also really appreciated the little tips scattered throughout, like using a bamboo skewer to stuff tight spots or pinning everything before sewing. Those small details made the whole process feel way less stressful. If you are on the fence about whether this project is right for you, I promise it is worth giving a shot. Your little chickadee is waiting.

Common Mistakes & How to Fix Them

βœ— Not stuffing the head and body firmly enough β€” aim for a tennis ball stiffness to keep the shape round and full. βœ— Skipping the color change instructions β€” always cut or carry yarn exactly as written to avoid messy loops showing on the outside. βœ— Forgetting to work in BLO or FLO when the pattern calls for it β€” these loops create important texture and structure, especially on the legs and wings. βœ— Rushing the assembly step β€” always pin all parts in place and try on the hat and wings before sewing them down permanently. βœ— Using yarn that is too thick or too thin compared to what was tested β€” stick to cotton or cotton-blend worsted weight yarn for the best proportions and stitch definition.

Birds of Winter Chickadee Amigurumi Pattern

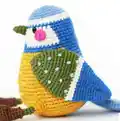
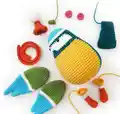
Bring the charm of a classic winter chickadee to life with this adorable amigurumi crochet pattern! Featuring a cozy knitted hat, a warm scarf, and those signature rosy cheeks, this little bird is pure handmade magic. The pattern walks you through every step β€” from the color-blocked head and body down to the tiny boots and detailed wings. Whether you're gifting it or adding it to your own collection, this chickadee is a heartwarming project for any season.

Intermediate 8-10 Hours

Materials Needed for Birds of Winter Chickadee Amigurumi Pattern

β€” Main Fabric

  • 01
    Baby Blue cotton or cotton-blend yarn for the tail and top of the head
  • 02
    Navy Blue yarn for the head cap, body sides, and wing accents
  • 03
    Off-white yarn for the face area and wing detail layer
  • 04
    Mustard Yellow yarn for the belly, leg boots, and wing stripe
  • 05
    Olive Green yarn for the beak and leg boots
  • 06
    Berry Red yarn for the hat and scarf
  • 07
    Brown yarn for the leg upper part
  • 08
    Fuchsia yarn for the cheek circles
  • 09
    Cream yarn for the wing base layer
  • 10
    Black yarn for the wing detail and beak option

β€” Tools Required

  • 01
    Crochet hooks suitable for your chosen yarn (typically 2.5mm-3mm for cotton)
  • 02
    Safety eyes (4x3 mm plastic eyes recommended)
  • 03
    Toy stuffing (polyester fiberfill)
  • 04
    Tapestry needle for sewing and weaving in ends
  • 05
    Scissors
  • 06
    Stitch markers
  • 07
    Pins for assembling parts
  • 08
    Hot glue gun (for securing safety eyes)
  • 09
    Bamboo skewer (for adding extra stuffing into tight areas)
  • 10
    Scraps of yarn or embroidery floss for decorating wings and belly

Progress Tracker

0% Complete

β€” Head and Body :

Infos :

This part is crocheted from the top down. Start in Baby Blue.

Round 1 :

6 sc in a MR (6)

Round 2 :

inc x 6 (12)

Round 3 :

[sc, inc] x 6 (18)

Round 4 :

[sc, inc, sc] x 6 (24)

Round 5 :

[3 sc, inc] x 6 (30)

Round 6 :

[2 sc, inc, 2 sc] x 6 (36)

Round 7 :

sc in each st around (36)

Info :

Change to Off-white, cut Baby Blue yarn.

Round 8-9 :

sc in each st around (36)

Info :

From now on, crochet alternating Navy Blue, Off-white and Mustard Yellow. The color currently in use is indicated in curly brackets.

Round 10 :

{navy blue} sc in each st around (36)

Round 11 :

{navy blue} 9 sc, {off-white} 18 sc, {navy blue} 9 sc (36)

Round 12 :

{navy blue} 9 sc, {off-white} [sc, inc, sc] x 6, {navy blue} 9 sc (42)

Round 13-14 :

{navy blue} 9 sc, {off-white} 24 sc, {navy blue} 9 sc (42)

Info :

If you are a safety eyes user, you may want to insert them between Rounds 10 and 11, approx. 8-10 sts apart from each other, but it is really recommended to do it after sewing the beak to the head.

Round 15 :

{navy blue} 9 sc, {off-white} 11 sc, {navy blue} 2 sc, {off-white} 11 sc, {navy blue} 9 sc (42)

Round 16 :

{navy blue} 9 sc, {off-white} 10 sc, {navy blue} 4 sc, {off-white} 10 sc, {navy blue} 9 sc (42)

Round 17 :

{navy blue} sc in each st around (42)

Round 18 :

{navy blue} 9 sc, [3 sc, inc] x 6, 9 sc (48)

Round 19 :

{navy blue} [8 sc, inc]; join Mustard Yellow yarn; {mustard yellow} [sc, inc, sc] x 10, {navy blue} [inc, 8 sc] (60)

Round 20-27 :

{navy blue} 10 sc, {mustard yellow} 40 sc, {navy blue} 10 sc (60)

Round 28 :

{navy blue} 4 sc, inc, 5 sc, {mustard yellow} 4 sc, inc, 9 sc, inc, 10 sc, inc, 9 sc, inc, 4 sc, {navy blue} 5 sc, inc, 4 sc (66)

Round 29-34 :

{navy blue} 11 sc, {mustard yellow} 44 sc, {navy blue} 11 sc (66)

Round 35 :

{navy blue} 4 sc, dec, 5 sc, {mustard yellow} 4 sc, dec, 9 sc, dec, 10 sc, dec, 9 sc, dec, 4 sc, {navy blue} 5 sc, dec, 4 sc (60)

Round 36 :

{navy blue} 4 sc, dec, 4 sc, {mustard yellow} 4 sc, [dec, 8 sc] x 3, dec, 4 sc, {navy blue} 4 sc, dec, 4 sc (54)

Round 37 :

{navy blue} 9 sc, {mustard yellow} [2 sc, dec, 2 sc] x 6, {navy blue} 9 sc (48)

Round 38 :

{navy blue} 3 sc, dec, 4 sc, {mustard yellow} 2 sc, [dec, 6 sc] x 3, dec, 2 sc, {navy blue} 4 sc, dec, 3 sc (42)

Round 39 :

{navy blue} 3 sc, dec, 3 sc, {mustard yellow} 2 sc, dec, 5 sc, dec, 4 sc, dec, 5 sc, dec, 2 sc, {navy blue} 3 sc, dec, 3 sc (36)

Info :

Stuff the upper part of your work (the head) firmly and keep stuffing the rest of the body as you go.

Round 40 :

{navy blue} 2 sc, dec, 3 sc, {mustard yellow} sc, [dec, 4 sc] x 3, dec, sc, {navy blue} 3 sc, dec, 2 sc (30)

Round 41 :

{navy blue} 3 sc, dec, sc, {mustard yellow} 2 sc, [dec, 2 sc] x 4, {navy blue} sc, dec, 3 sc (24)

Round 42 :

{navy blue} 2 sc, dec, sc, {mustard yellow} [sc, dec] x 2, 2 sc, [dec, sc] x 2, {navy blue} sc, dec, 2 sc (18)

Round 43 :

{navy blue} dec x 2, {mustard yellow} dec x 5, {navy blue} dec x 2 (9)

Info :

Check if the body is stuffed very firmly; it should be as stiff as a tennis ball. Add more stuffing using a bamboo skewer if needed. Finish off and cut the yarns leaving a 10 cm tail of any of the two colors, thread a tapestry needle and pass it through each of the 9 front loops of the last round; pull tight to close the hole and weave in the end.

β€” Wings (make 2) :

Infos :

The lower half of the wing consists of two parts that are crocheted separately and then joined together. Do not stuff.

β€” Wings β€” Part 1 (the smaller part) :

Info :

In Navy Blue.

Round 1 :

6 sc in a MR (6)

Round 2 :

inc, 5 sc (7)

Round 3 :

inc, 6 sc (8)

Round 4 :

sc in each st around (8)

Info :

Finish off, cut the yarn, weave in the end. Set aside.

β€” Wings β€” Part 2 (the bigger one) and Joining Parts :

Info :

In Navy Blue.

Round 1 :

6 sc in a MR (6)

Round 2 :

inc, 5 sc (7)

Round 3 :

sc in each st around (7)

Round 4 :

inc, 6 sc (8)

Round 5 :

sc in each st around (8)

Round 6 :

inc, 7 sc (9)

Round 7 :

sc in each st around (9)

Round 8 :

inc, 8 sc (10)

Round 9 :

Working on Part 2, sc; join Part 1 with a sc, sc in each of the remaining 7 sts of Part 1; 9 sc along Part 2. Now the parts are joined and there are 18 sts in total at the end of Round 9. Crochet additional 5 sc to move the beginning of the round to the side of the wing (18)

Round 10 :

[5 sc, inc] x 3 (21)

Round 11 :

sc in each st around (21)

Round 12 :

[3 sc, inc, 3 sc] x 3 (24)

Round 13 :

sc in each st around (24)

Round 14 :

[7 sc, inc] x 3 (27)

Round 15 :

sc in each st around (27)

Round 16 :

[4 sc, inc, 4 sc] x 3 (30)

Info :

Change to Off-white.

Round 17-18 :

sc in each st around (30)

Info :

Change to Olive Green.

Round 19-23 :

sc in each st around (30)

Round 24 :

[4 sc, dec, 4 sc] x 3 (27)

Round 25 :

sc in each st around (27)

Round 26 :

[7 sc, dec] x 3 (24)

Round 27 :

sc in each st around (24)

Round 28 :

[3 sc, dec, 3 sc] x 3 (21)

Round 29 :

[5 sc, dec] x 3 (18)

Round 30 :

[2 sc, dec, 2 sc] x 3 (15)

Round 31 :

[3 sc, dec] x 3 (12)

Round 32 :

[sc, dec, sc] x 3 (9)

Info :

Finish off and cut the yarn leaving a tail 10 cm long. Using a tapestry needle, pass it through the front loops of each of the nine stitches of the last round and pull tight to close the hole. Weave in the end. Decorate the upper part of the wing with French knots or any other way you like.

β€” Tail :

Info :

In Baby Blue. Do not stuff.

Round 1 :

Ch 12, start crocheting from the 2nd ch from hook. 10 sc, 3 sc in the bottom ch; don't turn your work, crochet along the opposite side of the foundation chain: 9 sc, inc in the last st (24)

Round 2-5 :

sc in each st around (24)

Round 6 :

[3 sc, dec, 3 sc] x 3 (21)

Round 7-10 :

sc in each st around (21)

Round 11 :

[5 sc, dec] x 3 (18)

Round 12-16 :

sc in each st around (18)

Info :

Make a sl st and finish off leaving a long tail for sewing.

β€” Legs (make 2) :

Info :

Start in Brown.

Round 1 :

Ch 4, start from the 2nd ch from hook. 2 sc, 3 sc in the bottom ch; don't turn your work, crochet along the opposite side of the foundation chain: sc, inc in the last st (8)

Round 2 :

inc, sc, inc x 3, sc, inc x 2 (14)

Round 3 :

Working in BLO, sc in each st around (14)

Round 4 :

4 sc, dec x 3, 4 sc (11)

Round 5 :

4 sc, dec x 2, 3 sc (9)

Round 6-8 :

sc in each st around (9)

Info :

Change to Olive Green, but don't cut the Brown yarn, leave it hanging on the outside as you're going to need it later. Stuff the lower part of the leg (the boot).

Round 9 :

BLO [dec, sc] x 3 (6)

Round 10-12 :

sc in each st around (6)

Info :

Change to Mustard Yellow, cut the Olive Green yarn.

Round 13 :

FLO inc x 6 (12)

Round 14 :

[inc, sc] x 6 (18)

Round 15 :

sc in each st around (18)

Info :

Make a sl st and finish off leaving a tail for sewing. Go back to Round 8 and crochet a sl st in each unworked front loop of the round. Finish off, cut the yarn and hide the tail inside the leg.

β€” Beak :

Info :

In Olive Green.

Round 1 :

4 sc in a MR (4)

Round 2 :

inc, 3 sc (5)

Round 3 :

inc, 4 sc (6)

Round 4 :

inc, 5 sc (7)

Info :

Make a sl st and finish off leaving a tail for sewing.

β€” Cheeks (make 2) :

Info :

In Fuchsia. 8 hdc in a MR; pull the ring tight (8). Finish off, cut the yarn leaving a tail for sewing.
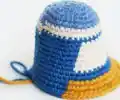
β€” Hat :

Info :

In Berry Red. Leave a 10 cm long tail at the beginning. Crochet in turning rows, make ch 1 and turn at the end of each row. The first and the last st of each row are worked in both loops, the rest are crocheted in BLO.

Row 1 :

Ch 13, start from the 2nd ch from hook. 3 sl st, 4 sc, 5 hdc, ch 1, turn (12)

Row 2 :

hdc, BLO 4 hdc, BLO 4 sc, BLO 2 sl st, sl st, ch 1, turn (12)

Row 3 :

sl st, BLO 2 sl st, BLO 4 sc, BLO 4 hdc, hdc, ch 1, turn (12)

Row 4-13 :

Repeat rows 2 and 3 (12)

Info :

Finish off, cut the yarn leaving another tail for sewing the top of the hat. Fold your work in half and, using the starting tail, sew the sides of the hat (rows 1 and 13) together. Pull another yarn tail through the stitches at the top of the hat using a tapestry needle and pull tight to close the hole. Decorate the hat with a pompom.

β€” Scarf :

Info :

In Berry Red. Crochet in turning rows, make ch 1 and turn at the end of each row. Crochet loosely to make your work easier. Adjust the length to your liking.

Row 1-6 :

Ch 91, start from the 2nd ch from hook. 90 sl st, ch 1, turn (90)

Info :

Fasten off, cut the yarn, weave the end in between the stitches.

Assembly Instructions

  • Sew the beak to the centre of the face (the white section) between rounds 10 and 13 of the head.
  • Attach or embroider the eyes to Round 10 of the head, on either side of the beak, 3-4 stitches apart from it. Use 4x3 mm plastic eyes with hot glue for best results.
  • Sew the fuchsia cheeks on either side of the face β€” a glue gun works great here since the cheek pieces are flat and small.
  • Sew the tail to the back of the body, centered, approximately between rounds 34 and 36. Try it on with the wings first to make sure placement looks balanced.
  • Sew the legs to the bottom of the belly, approximately between rounds 29 and 34 of the body, about 8 stitches apart from each other. Make sure the toes of the boots are pointing upwards.
  • Decorate the wings to your taste using scraps of yarn, embroidery floss, beads, sequins, or small buttons, then sew the wings to the sides of the body at approximately a 45-degree angle.
  • Sew the berry red hat to the top of the chickadee's head and wrap the scarf snugly around its neck.

Important Notes

  • πŸ’‘Stuff the head and body very firmly β€” it should feel as stiff as a tennis ball for the best round shape.
  • πŸ’‘Use a bamboo skewer to push extra stuffing into tight or hard-to-reach areas, especially near the closing rounds.
  • πŸ’‘When working color changes, follow the pattern exactly on whether to cut or carry the yarn β€” carrying it keeps it hidden inside while cutting requires weaving in ends.
  • πŸ’‘Pin all parts in place before sewing to make sure you are happy with the positioning before committing.
  • πŸ’‘Use stitch markers to keep track of your rounds, especially during the multi-color sections of the head and body.
  • πŸ’‘For the wings, do not stuff them β€” they should lay flat against the body for a natural look.
  • πŸ’‘If using safety eyes, wait until after the beak is sewn on before placing them so you can adjust their position relative to the beak.

This little chickadee is one of those projects that just melts your heart every time you look at it. From the cozy berry red hat with its pompom to the tiny rosy cheeks and booted feet, every single detail adds so much character. Whether you make it as a gift, a holiday decoration, or a sweet companion for your shelf β€” this chickadee is pure handmade magic. 🧢 Grab your yarn and let's bring this little winter bird to life! 🐦✨

You ask,

we answer.

FAQs

What yarn weight and type should I use for this chickadee pattern?

The pattern was tested with cotton and cotton-blend yarns like ALIZE Bella (100% cotton), ALIZE Cotton Gold, Gazzal Baby Cotton, and YarnArt Jeans. Sticking to a worsted or sport weight cotton yarn in the same brand will help keep your proportions consistent and your stitches tight so the stuffing doesn't show through.

Can I use safety eyes or should I embroider the eyes instead?

Both options work perfectly! The pattern recommends 4x3 mm plastic safety eyes secured with hot glue. However, if you're making this for a young child, embroidering the eyes is a safer alternative since there are no small parts that could detach.

How do I keep the stuffing from showing through the stitches?

Crochet tightly throughout the pattern and add stuffing in small portions so it distributes evenly. Using a cotton yarn also helps since it has a tighter weave than acrylic blends. If stuffing still peeks through, you can add a thin layer of felt or fleece lining inside the body before closing it up.

Is the hat supposed to fit snugly or sit loosely on the head?

The hat is designed to hug the head nicely. The pattern suggests trying it on as you go and adjusting the number of rows β€” the sample.

Is the hat supposed to fit snugly or sit loosely on the head?

The hat is designed to hug the head nicely. The pattern suggests trying it on as you go and adjusting the number of rows β€” the sample has 74 rows total, but you may need a few more or fewer depending on how tightly you crochet. It should wrap around without gaps but not stretch too tight.

How do I join the two wing parts together?

At Round 9 of Part 2, you work one sc on Part 2, then join Part 1 by working a sc into it, continue across all remaining stitches of Part 1, then finish the round along Part 2. After joining, crochet 5 extra sc to reposition the start of the round to the side of the wing before continuing.

Can I make this chickadee smaller to use as a Christmas ornament?

Absolutely! The pattern even includes a tip at the end suggesting that if you use a thinner yarn like ALIZE Bella, the birds make great Christmas ornaments. Just make sure to adjust your hook size accordingly and stuff a little lighter so the ornament stays balanced on the tree.

What does the spike stitch look like and how do I do it?

A single crochet spike stitch is worked exactly like a regular single crochet, except instead of inserting your hook into the current round, you drop down and work it into the corresponding stitch one round below. This creates a raised textured effect on the surface, which is used on the chickadee's body and wings to mimic feather layers.