🧢 Beautiful ✨ Detailed πŸ’ Adorable

Starfish Crochet Pattern

Starfish Crochet Pattern
4.3β˜… Rating
30-45 Minutes Time Needed
1.9K Made This
βœ‚οΈ

Beginner Friendly Level

Perfect for those just starting their sewing journey, with clear instructions and simple techniques

⏱️

Bite-Sized Project

Complete in under 2 hoursβ€”quick, fun, and perfect for a little creative escape.

🏑

Cozy Accent

A warm touch for your space that transforms ordinary corners into inviting nooks filled with handmade charm.

About This Starfish Crochet Pattern

This starfish pattern offers two delightful variations - a thin version and a larger, fuller starfish - both worked in easy rounds from the center outward. The pattern uses basic stitches including single crochet, half double crochet, and double crochet to create five beautifully shaped arms. What makes this pattern truly special is the shaping technique using a glue-water mixture that gives your finished starfish a stiff, realistic appearance perfect for display or craft embellishments.

Starfish Crochet Pattern crochet pattern - detailed view of completed project

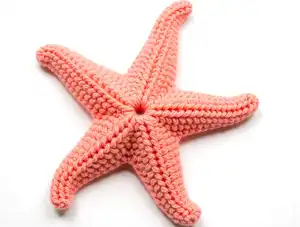
The pattern includes comprehensive tips for yarn selection, hook size recommendations, and detailed shaping instructions with photos to guide you through the stiffening process. Both versions work up quickly and are perfect for using up cotton yarn scraps.

Why You'll Love This Starfish Crochet Pattern

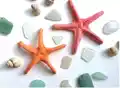
I absolutely love this pattern because it transforms simple yarn into something that looks like it came straight from the ocean! The shaping technique is a game-changer - it's so satisfying to see your soft crochet piece transform into a stiff, displayable decoration. I love that you can make it in any color you want, from natural sandy tones to vibrant ocean blues or even whimsical rainbow colors. The fact that it works up so quickly means you can make a whole collection for gifts or seasonal decor without investing days of work. Plus, the tips about adding watercolors or glitter give you endless creative possibilities to make each starfish uniquely yours!

Starfish Crochet Pattern step 1 - construction progress Starfish Crochet Pattern step 2 - assembly progress Starfish Crochet Pattern step 3 - details and accessories Starfish Crochet Pattern step 4 - final assembly and finishing

Switch Things Up

I love experimenting with different variations of this starfish pattern to create unique ocean-inspired pieces! One of my favorite modifications is working with variegated yarn that shifts from light to dark shades - it creates a beautiful ombre effect on each arm that looks incredibly realistic. You could also try making a whole family of starfish in graduated sizes by adjusting your yarn weight and hook size.

For a more whimsical approach, I sometimes add seed beads before the shaping process, stitching them along the arms to mimic the texture of real starfish. Another fun variation is using metallic thread held together with your main yarn for a subtle sparkle that catches the light beautifully. If you're feeling adventurous, try the two-color technique by switching colors between rounds for striped arms.

I've also experimented with the stiffening mixture itself - adding a tiny bit of fabric stiffener along with the glue creates an even more durable finish that's perfect for outdoor decorations. For a softer, plushie version, skip the stiffening entirely and add fiberfill stuffing instead, making it perfect as a toy or comfort item. The possibilities are truly endless with this versatile pattern!

Common Mistakes & How to Fix Them

βœ— Using a hook that's too large for the yarn weight will create loose stitches and gaps in your starfish that look unprofessional βœ— Not counting stitches carefully in each round leads to uneven arms and a lopsided starfish shape that won't lay flat βœ— Skipping the shaping step with glue mixture results in a floppy starfish that won't hold its decorative shape properly βœ— Pulling the glue-water mixture too tightly when squeezing can distort the starfish shape and make arms look twisted or unnatural

Starfish Crochet Pattern

Create beautiful decorative starfish with this beginner-friendly crochet pattern that includes both thin and large versions. This pattern uses simple stitches and a unique shaping technique with glue and water to give your starfish a realistic, stiffened look. Perfect for home decor, beach-themed projects, or embellishing various crafts, these starfish work up quickly and make charming additions to any nautical collection. The pattern includes detailed instructions for shaping and finishing techniques to achieve professional-looking results every time.

Beginner Friendly 30-45 Minutes

Materials Needed for Starfish Crochet Pattern

β€” Main Fabric

  • 01
    100% cotton yarn (125m per 50g weight recommended)
  • 02
    Madame Tricote Camilla, Kartopu Organica, Anchor Creativa Fino, or Schachenmayr Catania yarns work well

β€” Tools Required

  • 01
    Crochet hook (1.5mm recommended, or 1.75mm-2.00mm for comfort)
  • 02
    Scissors
  • 03
    Yarn needle for weaving in ends
  • 04
    White glue for shaping
  • 05
    Water for glue mixture
  • 06
    Rubber gloves (optional for shaping)
  • 07
    Cup or container for mixing glue solution
  • 08
    Towel for drying
  • 09
    Stitch marker (optional but helpful)

Progress Tracker

0% Complete

β€” Thin Starfish :

Rnd 1 :

5 sc in a magic ring (5)

Rnd 2 :

2 sc in each st (10)

Rnd 3 :

* ch 15, sl st in 2nd ch from hook, sl st in next, sc in next 3 sts, hdc in next 4 sts, dc in last 5 sts; skip next sc of rnd 2 and sl st in next; repeat from * 4 more times

Rnd 4 :

sc in each st all around skipping only last and first sts of each arm

Rnd 5 :

sl st in each st all around

Finishing :

Fasten off and weave in yarn ends

β€” Large Starfish :

Rnd 1 :

5 sc in a magic ring (5)

Rnd 2 :

2 sc in each st (10)

Rnd 3 :

* ch 15, sl st in 2nd ch from hook, sl st in next, sc in next 3 sts, hdc in next 4 sts, dc in last 5 sts; skip next sc of rnd 2 and sl st in next; repeat from * 4 more times

Rnd 4 :

sc in each st all around skipping only last and first sts of each arm

Rnd 5 :

sc in each st all around

Rnd 6 :

sl st in each st all around

Finishing :

Fasten off and weave in yarn ends

β€” Shaping Instructions :

Step 1 :

In a cup mix 2 parts of water with 1 part of glue

Step 2 :

Immerse the crocheted starfish into the glue and water mixture (wear rubber gloves if necessary) until it's fully wet

Step 3 :

Carefully squeeze out excess glue-water mix

Step 4 :

Start shaping it by gently pulling at legs of the starfish and pinching them slightly together and giving it a desired shape

Info :

For thin starfish use the wrong side of crochet as an outside of the fish. For large starfish use right side

Step 5 :

Continue until you are satisfied with the shape

Step 6 :

Leave it to dry on a towel

Assembly Instructions

  • After completing all rounds, fasten off yarn leaving a tail for weaving
  • Weave in all yarn ends securely before beginning the shaping process
  • Mix the glue solution in proper proportions (2 parts water to 1 part glue for standard stiffness)
  • Fully immerse the starfish in the glue mixture and ensure even saturation throughout
  • Gently squeeze out excess mixture without distorting the basic shape of the starfish
  • Shape each arm individually by pulling gently and pinching to create dimension
  • Lay flat on a towel to dry completely (may take 24 hours depending on humidity)

Important Notes

  • πŸ’‘Use a crochet hook couple of sizes smaller than indicated on yarn label for nice tight stitches
  • πŸ’‘Place a stitch marker in the first stitch of each round to mark the beginning
  • πŸ’‘For stiffer results, mix glue and water in equal parts (1:1 ratio) instead of 2:1
  • πŸ’‘If you prefer no stiffness, simply wet the starfish in water, shape, and let dry
  • πŸ’‘Cotton yarn works best for this pattern as it holds the glue mixture better than acrylic
  • πŸ’‘You can add color with watercolors or diluted acrylic paint after shaping and drying
  • πŸ’‘For extra sparkle, add glitter before the glue mixture dries and seal with varnish

This charming starfish pattern brings the beauty of the ocean into your home with two versatile sizes to choose from. The unique shaping technique transforms soft yarn into display-worthy decorative pieces that hold their form beautifully. Whether you're creating beach-themed decor, embellishing summer projects, or making nautical gifts, these quick-to-make starfish deliver impressive results. The pattern's simplicity makes it perfect for beginners while offering endless creative possibilities through color choices and embellishment options. Dive in and create your own ocean treasures today! 🌊✨

You ask,

we answer.

FAQs

Can I use acrylic yarn instead of cotton?

While you can use acrylic yarn, 100% cotton yarn is highly recommended for this pattern. Cotton absorbs the glue-water mixture better and holds its shape more effectively when stiffened. Acrylic may not achieve the same rigid, display-quality finish.

What if I don't want to use the glue shaping method?

You can simply wet your starfish with plain water, shape it as desired, and let it dry. This will give it some structure without the stiffness. However, it won't be as rigid and may not hold its shape as well for display purposes.

How long does the starfish take to dry after shaping?

Drying time varies based on humidity and room temperature, but typically takes 12-24 hours for the starfish to fully dry and harden. Make sure to place it on a towel in a well-ventilated area.

Can I make the starfish bigger or smaller?

Yes! To make a larger starfish, use a thicker yarn and larger hook. For a smaller version, use thinner thread and a smaller hook. You can also add more rounds to the center before starting the arms for extra size.

What's the best way to add color to my finished starfish?

After your starfish is completely dry and stiffened, you can use watercolors or diluted acrylic paint to add highlights and dimension. Apply the paint lightly and let it dry completely before handling.