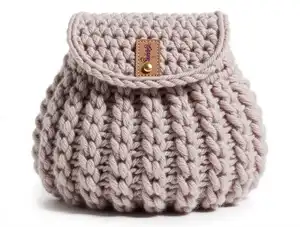
Craft these practical and adorable Nano and Mini pouches that are perfect for storing small essentials like keys, coins, cards, or jewelry! This versatile pattern includes two sizes to suit your needs—the compact Nano pouch for quick projects and the slightly larger Mini pouch for more storage. Both designs feature a charming flap closure with button or magnetic snap options, creating functional accessories that make wonderful gifts or personal keepsakes. The textured stitch pattern creates beautiful bumps along the sides, adding visual interest and a professional handmade touch.
Progress Tracker
0% Complete
— Nano Pouch :
Info :
Use 4mm crochet hook. Start with CH 10
Row 1 :
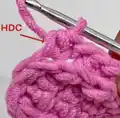
SLST into 2nd CH from hook, 2 SLST, (HDC, SLST) x 3 times. Working on the opposite side of the chain, (HDC, SLST) x 3 times, 3 SLST, CH 1, turn.
Info :
Row 2 to 21, work on BL only
Row 2 :
3 SLST, (HDC, SLST) x 6 times, 3 SLST. CH 1, turn.
Row 3 :
3 SLST, (HDC, SLST) x 2 times, to increase the STS, (HDC & SLST into the same ST) x 4 times, (HDC, SLST) x 2 times, 3 SLST. CH 1, turn.
Row 4 :
3 SLST, (HDC, SLST) x 8 times, 3 SLST. CH 1, turn.
Row 5 :
3 SLST, (HDC, SLST) x 3 times, to increase the STS, (HDC & SLST into the same ST) x 4 times, (HDC, SLST) x 3 times, 3 SLST. CH 1, turn.
Row 6-17 :
3 SLST, (HDC, SLST) x 10 times, 3 SLST. CH 1, turn.
Row 18 :
3 SLST, (HDC, SLST) x 3 times, to decrease the STS, (skip 2 STS, HDC, SLST) x 2 times, (HDC, SLST) x 3 times, 3 SLST. CH 1, turn.
Row 19 :
3 SLST, (HDC, SLST) x 8 times, 3 SLST. CH 1, turn.
Row 20 :
3 SLST, (HDC, SLST) x 2 times, to decrease the STS, (skip 2 STS, HDC, SLST) x 2 times, (HDC, SLST) x 2 times, 3 SLST. CH 1, turn.
Row 21 :
3 SLST, (HDC, SLST) x 6 times, 3 SLST. CH 1, turn.
Info :
Cut the yarn and leave yarn tails approximately 20cm to sew the side of the pouch. Thread the yarn tail onto a tapestry needle, insert the needle into BL of the piece closest to you and FL of the piece farthest from you, continue until you reach the end. Cut the yarn, fasten off and hide the yarn tails. Flip the pouch to the right side. The pouch will have 11 bumps.
Info :
Use 3.5mm crochet hook. Begin from the corner of the piece and weave the yarn into the top of the bag.
Top Edging :
CH1, 40 SLST on the top of the bag. Cut the yarn and fasten off, and use invisible join technique.
— Nano Flap :
Info :
Use 4mm crochet hook. Start with CH 13
Row 1 :
SC into 2nd CH from hook, 11 SC. (12) CH 1, turn.
Row 2-8 :
12 SC, (12). CH1, turn
Row 9 :
Skip 1 ST, 11 SC. (11) CH 1, turn.
Row 10 :
Skip 1 ST, 10 SC (10). Cut the yarn and fasten off.
— Crochet Along Edge - Button Closure :
Info :
Join new yarn at the bottom of the piece.
Edging :
CH1, 10 SC, 5 SC, CH 6, 5 SC, 10SC.
Info :
Cut the yarn and leave yarn tails approximately 20cm to sew it to the pouch.
— Mini Pouch :
Info :
Use 4mm crochet hook. Start with CH 18
Row 1 :
SLST into 2nd CH from hook, 4 SLST, (HDC, SLST) x 6 times. Working on the opposite side of the chain, (HDC, SLST) x 6 times, 5 SLST, CH 1, turn.
Info :
Row 2 to 25, work on BL only.
Row 2 :
5 SLST, (HDC, SLST) x 12 times, 5 SLST. CH 1, turn.
Row 3 :
5 SLST, (HDC, SLST) x 4 times, to increase the STS, (HDC & SLST into the same ST) x 8 times, (HDC, SLST) x 4 times, 5 SLST. CH 1, turn.
Row 4 :
5 SLST, (HDC, SLST) x 16 times, 5 SLST. CH 1, turn.
Row 5 :
5 SLST, (HDC, SLST) x 6 times, to increase the STS, (HDC & SLST into the same ST) x 8 times, (HDC, SLST) x 6 times, 5 SLST. CH 1, turn.
Row 6-21 :
5 SLST, (HDC, SLST) x 20 times, 5 SLST. CH 1, turn.
Row 22 :
5 SLST, (HDC, SLST) x 6 times, to decrease the STS, (skip 2 STS, HDC, SLST) x 4 times, (HDC, SLST) x 6 times, 5 SLST. CH 1, turn.
Row 23 :
5 SLST, (HDC, SLST) x 16 times, 5 SLST. CH 1, turn.
Row 24 :
5 SLST, (HDC, SLST) x 4 times, to decrease the STS, (skip 2 STS, HDC, SLST) x 4 times, (HDC, SLST) x 4 times, 5 SLST. CH 1, turn.
Row 25 :
5 SLST, (HDC, SLST) x 12 times, 5 SLST. CH 1, turn.
Info :
Cut the yarn, fasten off and leave yarn tails approximately 25cm to sew the side of the pouch. Thread the yarn tail onto a tapestry needle, insert the needle into BL of the piece closest to you and FL of the piece farthest from you, stitch through the front to back for a strong seam, continue until you reach the end. Cut the yarn, fasten off and hide the yarn tails. Flip the pouch to the right side. Mini pouch will have 13 bumps.
Info :
Use 3.5mm crochet hook. Begin from the corner of the piece and weave the yarn into the top of the bag.
Top Edging :
CH1, 50 SLST on the top of the bag. Fasten off and use invisible join technique.
— Mini Flap :
Info :
Use 4mm crochet hook. Start with CH 15
Row 1 :
SC into 2nd CH from hook, 13 SC. (14) CH 1, turn.
Row 2-12 :
14 SC, (14). CH1, turn
Row 13 :
Skip 1 ST, 13 SC. (13) CH 1, turn.
Row 14 :
Skip 1 ST, 12 SC (12). Fasten off and cut the yarn.
— Crochet Along Edge - Magnetic Button Closure :
Info :
Join new yarn at the bottom of the piece.
Edging :
CH1, 40 SC (14 SC, 14 SC, 14 SC)
Info :
Cut the yarn and leave yarn tails approximately 25 cm to sew it to the pouch.
These charming Nano and Mini pouches are designed to be quick, practical, and endlessly versatile! Perfect for organizing small essentials or giving as thoughtful handmade gifts, each pouch features a unique textured surface created through back loop stitching. The pattern includes detailed instructions for both sizes and offers closure options to suit your style—classic buttons for a vintage feel or magnetic snaps for modern convenience. With clear step-by-step guidance and helpful photos, you'll create professional-looking pouches that are as functional as they are adorable. 🧶✨ Happy crocheting!