🧢 Beautiful ✨ Detailed πŸ’ Adorable

Crochet Biscuits Collection Pattern

Crochet Biscuits Collection Pattern
4.6β˜… Rating
2-3 Hours Time Needed
3.7K Made This
βœ‚οΈ

Beginner Friendly Level

Perfect for those just starting their sewing journey, with clear instructions and simple techniques

⏱️

Bite-Sized Project

Complete in under 2 hoursβ€”quick, fun, and perfect for a little creative escape.

🎁

Tiny Treasure

Small, sweet, and gift-worthy creations that fit perfectly in the palm of your hand with detailed charm.

About This Crochet Biscuits Collection Pattern

This charming Biscuits pattern collection brings three iconic treats to life through crochet. You'll create a realistic Choc Chip Cookie complete with scattered chocolate chips, a traditional Jammie Dodger with its signature heart-shaped jam window, and a classic Oreo Cookie with cream filling. Each pattern uses simple circular crocheting techniques with strategic color changes to achieve authentic-looking results. The patterns are worked in rounds using magic circles and basic increases, making them accessible for beginners while still producing impressive, professional-looking finished pieces.

Crochet Biscuits Collection Pattern crochet pattern - detailed view of completed project

These mini biscuits range from 5cm to 9cm in diameter, making them perfect for display, play food sets, or as quirky decorative items. The use of acrylic yarn ensures durability and easy care, while the specific color choices create realistic-looking treats that will delight both children and adults.

Why You'll Love This Crochet Biscuits Collection Pattern

I absolutely love this pattern because it combines two of my favorite things: crochet and adorable food replicas! There's something incredibly satisfying about creating realistic-looking treats that won't spoil or add calories. I find the process of adding those tiny chocolate chips and shaping the jammie center so meditative and fun. These biscuits work up quickly, which means you can make an entire collection in an afternoon and still have time for tea. I love how versatile they are tooβ€”you can use them as coasters, fridge magnets, play food, or even as unique gift toppers. The reactions I get when people realize they're crocheted and not real biscuits never gets old!

Crochet Biscuits Collection Pattern step 1 - construction progress Crochet Biscuits Collection Pattern step 2 - assembly progress Crochet Biscuits Collection Pattern step 3 - details and accessories Crochet Biscuits Collection Pattern step 4 - final assembly and finishing

Switch Things Up

I love experimenting with these biscuit patterns to create my own variations! For the Choc Chip Cookie, I sometimes swap the chocolate chips for white chocolate by using cream-colored yarn, or I'll add extra chips for a double-chocolate version that looks even more indulgent. You could also try making them in different sizes by adding or removing rounds to create a whole cookie jar full of variety.

For the Jammie Dodger, I've experimented with different jam colorsβ€”using purple for blackberry jam or orange for marmalade creates fun twists on the classic. You could even make a star or flower cutout instead of the heart by adjusting how you shape the center opening. I've also tried adding tiny French knots in a lighter red around the jam center to create a sugary sparkle effect.

The Oreo Cookie is perfect for customization too! I love making birthday cake Oreos by using pastel colors for the cream filling and adding tiny colorful French knots to represent sprinkles. You could create mint Oreos with green filling, strawberry with pink, or even golden Oreos by using tan yarn for the cookies instead of dark brown. The possibilities are endless, and each variation makes the collection even more fun and personalized!

Common Mistakes & How to Fix Them

βœ— Not maintaining consistent tension between the top and base pieces can result in mismatched sizes that don't align properly when joined together βœ— Forgetting to add chocolate chips to the outer rounds of the Choc Chip Cookie makes them concentrate too much in the center instead of being evenly distributed βœ— Pulling the jam-colored center too tight when sewing the Jammie Dodger top can distort the heart shape and make it look uneven βœ— Sewing too close to the edges when assembling the Oreo Cookie will flatten the cream filling and make it less visible from the sides

Crochet Biscuits Collection Pattern

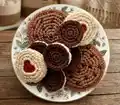
Create your own adorable trio of crocheted biscuits with this delightful pattern collection featuring three beloved treats: a Choc Chip Cookie, Jammie Dodger, and Oreo Cookie. Each biscuit is crafted with attention to detail, from the chocolate chips scattered across the cookie surface to the heart-shaped jam center of the Jammie Dodger and the iconic cream filling of the Oreo. These charming miniature biscuits make perfect decorative pieces, play food for children, or unique handmade gifts for food lovers and crochet enthusiasts alike. Using simple double crochet techniques and basic color changes, you'll bring these tasty-looking treats to life in no time.

Beginner Friendly 2-3 Hours

Materials Needed for Crochet Biscuits Collection Pattern

β€” Main Fabric

  • 01
    Paintbox Yarns Simply DK (100% Acrylic; 276m/302yds per 100g ball)
  • 02
    Soft Fudge color (A), 10g
  • 03
    Coffee Bean color (B), 10g
  • 04
    Vanilla Cream color (C), 10g
  • 05
    Red Wine color (D), 5g
  • 06
    Champagne White color (E), 5g

β€” Tools Required

  • 01
    Crochet hook size 4mm (G/6)
  • 02
    Tapestry needle for sewing in ends
  • 03
    Scissors

Progress Tracker

0% Complete

β€” CHOC CHIP COOKIE

Top and base (make two):

Round 1:

with A dc7 into magic circle, join with ss to 1st dc (7)

Round 2:

ch1, 2dc into same st, 2dc into each st around, join with ss to 1st dc (14)

Round 3:

ch1, dc into same st, 2dc in next st, *dc, 2dc in next st* repeat from * to * 6 times, join with ss to 1st dc (21)

Round 4:

ch1, dc into same st, dc, 2dc in next st, *dc2, 2dc in next st* repeat from * to * 6 times, join with ss to 1st dc (28)

Round 5:

ch1, dc into same st, dc2, 2dc in next st, *dc3, 2dc in next st* repeat from * to * 6 times, join with ss to 1st dc (35)

Round 6:

ch1, dc into same st, dc3, 2dc in next st, *dc4, 2dc in next st* repeat from * to * 6 times, join with ss to 1st dc (42)

Round 7:

ch1, dc into same st, dc4, 2dc in next st, *dc5, 2dc in next st* repeat from * to * 6 times, join with ss to 1st dc (49). Fasten off and sew in ends.

Add choc chips:

Info:

On right side of top piece, use B to stitch your choc chips randomly over the top. Make sure you put a couple in round 7 so that they are not concentrated in the centre of your cookie!

Join together:

Info:

With wrong sides together join A through both sides and ch1, dc the two pieces together making sure you hook through both sides as you go around, join with ss to 1st dc, fasten off and sew in ends.

β€” JAMMIE DODGER

Base:

Round 1:

with C dc7 into magic circle, join with ss to 1st dc (7)

Round 2:

ch1, 2dc into same st, 2dc into each st around, join with ss to 1st dc (14)

Round 3:

ch1, dc into same st, 2dc in next st, *dc, 2dc in next st* repeat from * to * 6 times, join with ss to 1st dc (21)

Round 4:

ch1, dc into same st, dc, 2dc in next st, *dc2, 2dc in next st* repeat from * to * 6 times, join with ss to 1st dc (28)

Round 5:

ch1, dc into same st, dc2, 2dc in next st, *dc3, 2dc in next st* repeat from * to * 6 times, join with ss to 1st dc (35). Fasten off and sew in ends.

Centre:

Round 1:

with D dc7 into magic circle, join with ss to 1st dc (7)

Round 2:

ch1, 2dc into same st, 2dc into each st around, join with ss to 1st dc (14)

Round 3:

ch1, dc into same st, 2dc in next st, *dc, 2dc in next st* repeat from * to * 6 times, join with ss to 1st dc (21)

Round 4:

ch1, dc into same st, dc, 2dc in next st, *dc2, 2dc in next st* repeat from * to * 6 times, join with ss to 1st dc (28). Fasten off and sew in ends.

Top:

Round 1:

with C ch14, join ends with ss, ch1 and dc21 into the circle, join with ss to 1st dc (21)

Top tip:

leave a long cast on tail so that you can use it later to secure the centre heart shape in place when sewing together.

Round 2:

ch1, dc into same st, dc, 2dc in next st, *dc2, 2dc in next st* repeat from * to * 6 times, join with ss to 1st dc (28)

Round 3:

ch1, dc into same st, dc2, 2dc in next st, *dc3, 2dc in next st* repeat from * to * 6 times, join with ss to 1st dc (35). Fasten off and sew in end.

Join together:

Info:

Using the long cast on tail from your top piece, join the top and centre together by stitching around the central hole, shaping it into a heart as you sew around. Add a couple of stitches into the centre, to make the v-shape at the top of the heart. With wrong sides together, using A, sew through top and base to join around the edge.
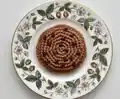
β€” OREO COOKIE

Top and base (make two):

Round 1:

with B dc7 into magic circle, join with ss to 1st dc (7)

Round 2:

ch1, 2dc into same st, 2dc into each st around, join with ss to 1st dc (14)

Round 3:

ch1, dc into same st, 2dc in next st, *dc, 2dc in next st* repeat from * to * 6 times, join with ss to 1st dc (21)

Round 4:

ch1, dc into same st, dc, 2dc in next st, *dc2, 2dc in next st* repeat from * to * 6 times, join with ss to 1st dc (28). Fasten off and sew in ends.

Centre:

Round 1:

with E dc7 into magic circle, join with ss to 1st dc (7)

Round 2:

ch1, 2dc into same st, 2dc into each st around, join with ss to 1st dc (14)

Round 3:

ch1, dc into same st, 2dc in next st, *dc, 2dc in next st* repeat from * to * 6 times, join with ss to 1st dc (21)

Round 4:

ch1, dc into same st, dc, 2dc in next st, *dc2, 2dc in next st* repeat from * to * 6 times, join with ss to 1st dc (28). Fasten off and sew in ends.

Join together:

Info:

Stack pieces with base upside down, centre and top right side up. Using B sew the layers together, being careful not to sew too close to the edge or you'll squash the cream centre of your biscuit!

Assembly Instructions

  • For the Choc Chip Cookie: After completing both circular pieces, use yarn B to embroider chocolate chips randomly on the right side of the top piece, ensuring some chips are placed in the outer round 7 area for realistic distribution.
  • Join the Choc Chip Cookie pieces with wrong sides together using yarn A, working double crochet through both layers around the entire circumference to create a neat edge.
  • For the Jammie Dodger: Attach the red wine colored center to the top piece by stitching around the central hole using the long tail left from casting on, shaping it into a heart as you sew.
  • Add a few extra stitches at the center top of the heart cutout to create the distinctive v-shape of a heart, then sew the base to the assembled top using yarn A around the outer edge.
  • For the Oreo Cookie: Stack all three pieces with the base upside down, cream center right side up, and top right side up to create the classic sandwich cookie appearance.
  • Using yarn B, carefully sew through all three layers, working about 2-3 stitches in from the edge to avoid flattening the cream filling and maintain the dimensional layered look.
  • Weave in all yarn ends securely on the wrong side of each biscuit and trim excess yarn close to the work for a professional finish.

Important Notes

  • πŸ’‘Maintain consistent tension throughout each piece to ensure the top and base circles match perfectly in size when assembled
  • πŸ’‘Leave long tails when fastening off, as these can be used for sewing pieces together and save you from weaving in extra ends
  • πŸ’‘For the Jammie Dodger, practice shaping the heart on paper first if needed to visualize how the stitches will create the iconic shape
  • πŸ’‘When adding chocolate chips, use French knots or small stitches in contrasting color to create dimension rather than flat embroidery
  • πŸ’‘If using different yarn brands, make a gauge swatch first to ensure your finished biscuits will be approximately the same size as specified
  • πŸ’‘Consider making multiple sets in different colorways to create a full play food collection or party favor set

This delightful Biscuits pattern collection was designed to capture the charm of everyone's favorite teatime treats in crocheted form! Using simple circular techniques and clever color placement, you'll create three iconic biscuits that look good enough to eat. The pattern is perfect for beginners looking to practice working in the round while creating something adorable and practical. Whether you're making play food for little ones, quirky kitchen decorations, or unique gifts for foodie friends, these crocheted biscuits are sure to bring smiles all around. πŸͺ Happy crocheting! 🧢✨

You ask,

we answer.

FAQs

Can I use different yarn weights for this pattern?

Yes, you can use different yarn weights, but be aware that your finished biscuits will be larger or smaller than the specified sizes. If using a different weight, adjust your hook size accordingly and make sure your top and base pieces match in size.

How do I make the chocolate chips look realistic on the Choc Chip Cookie?

Use French knots or small raised stitches with your contrasting brown yarn to create dimension. Place them randomly across the surface, making sure to include some in the outer rounds so they don't all cluster in the center.

What's the best way to shape the heart cutout on the Jammie Dodger?

Use the long tail from your cast-on edge and take your time stitching around the center circle. Gently pull and shape the fabric into a heart as you sew, and add extra stitches at the top center to create the distinctive v-shape indent.

Can these biscuits be washed?

Yes! Since they're made with acrylic yarn, they're quite durable. Hand wash gently in cool water and lay flat to dry. Avoid machine washing as it may distort the shape and flatten the dimensional elements.

How can I prevent the Oreo cream filling from getting squashed when sewing?

Sew approximately 2-3 stitches in from the outer edge rather than right at the edge. This allows the cream center to puff out slightly and remain visible from the sides, creating that authentic layered cookie look.

What can I do with these crocheted biscuits once they're finished?

They make excellent play food for children's kitchens, can be used as coasters, turned into fridge magnets, used as quirky gift toppers, displayed as shelf decorations, or given as unique handmade gifts to tea and biscuit lovers.