🧢 Beautiful ✨ Detailed πŸ’ Adorable

4 Dogs Bundle Amigurumi Pattern

4 Dogs Bundle Amigurumi Pattern
4.2β˜… Rating
5-6 Hours Time Needed
3.8K Made This
βœ‚οΈ

Advanced Beginner Level

Ideal for those with basic knitting experience, featuring slightly more advanced stitches and techniques to expand your skills.

⏱️

Weekend Treat

Takes 5-7 hours, making it an enjoyable project to finish over a couple of days.

🐾

Charming Critter

Delightful animal designs with sweet details that capture the essence of your favorite woodland and farmyard friends.

About This 4 Dogs Bundle Amigurumi Pattern

This incredible 4 Dogs Bundle brings together four distinct dog breeds in miniature amigurumi form, each with authentic markings and breed-specific features. The Beagle sports classic tricolor patches, the Dalmatian features adorable spots, the Pug showcases wrinkled charm, and the Shiba Inu displays beautiful two-tone coloring. Each pattern includes detailed instructions for creating unique ear shapes, muzzles, and tails that perfectly capture the personality of these beloved breeds. The innovative reversible option allows you to combine two dogs back-to-back for a fun surprise toy.

4 Dogs Bundle Amigurumi Pattern crochet pattern - detailed view of completed project

Working with fine 4-ply cotton blend yarn and a small 2mm hook creates delightfully detailed miniatures perfect for keychains, ornaments, or collectible displays. The patterns build upon each other with shared basic construction techniques while introducing breed-specific customization details that make each dog truly unique.

Why You'll Love This 4 Dogs Bundle Amigurumi Pattern

I absolutely love how this pattern bundle teaches you to create four completely different dog personalities using similar foundational techniques. The small scale makes these projects incredibly satisfying quick makes that you can complete in an evening or two, yet they're detailed enough to showcase your growing skills. I'm especially fond of the reversible option that transforms two dogs into one magical flip toy, and the clever use of surface slip stitches to create collars adds such a professional touch. These miniature pups are perfect for gift-giving, and I find myself wanting to make multiples in different color combinations to create my own little dog park collection.

4 Dogs Bundle Amigurumi Pattern step 1 - construction progress 4 Dogs Bundle Amigurumi Pattern step 2 - assembly progress 4 Dogs Bundle Amigurumi Pattern step 3 - details and accessories 4 Dogs Bundle Amigurumi Pattern step 4 - final assembly and finishing

Switch Things Up

I absolutely love experimenting with these patterns to create my own unique pack of miniature dogs! One of my favorite modifications is making seasonal versions - imagine a Christmas Beagle with a tiny red bow collar or a Halloween Dalmatian with orange spots instead of black. I've also tried working these in sparkly metallic yarns for a glamorous touch, and the results are absolutely stunning as ornaments or bag charms.

For a personalized gift, I match the colors to real-life dogs by mixing custom yarn shades. I've created a golden Retriever-inspired version by modifying the Shiba Inu with all golden-tan colors, and a chocolate Lab by adapting the Beagle pattern in solid brown. The possibilities are truly endless!

I also enjoy making these dogs poseable by inserting thin wire into the legs and tail during assembly. This takes a bit more time but creates interactive toys that children absolutely adore. Another fun variation I've tried is enlarging the pattern by using chunky yarn and a 5mm hook - the resulting dogs are perfect cuddle-buddy size at about 15cm tall.

Don't be afraid to get creative with embroidery details too - I've added tiny collars with embroidered name tags, little bandanas, and even miniature accessories like bones or food bowls made from leftover yarn scraps.

Common Mistakes & How to Fix Them

βœ— Working stitches too tightly when changing colors in the Beagle and Shiba Inu patterns creates puckering - maintain consistent tension throughout all color work sections βœ— Forgetting to leave long yarn tails at the beginning for reversible amigurumi assembly makes joining impossible - always check the pattern notes before starting each piece βœ— Skipping the invisible decrease technique results in visible gaps between stitches - take time to master this finish for professional-looking results on all decreases βœ— Overstuffing the small pieces causes distortion and makes assembly difficult - stuff firmly but gently, leaving space for shaping and sewing without bulging βœ— Missing stitch counts at the end of rounds leads to incorrect shaping - use stitch markers religiously and count every round to maintain proper structure βœ— Not reading through the entire pattern before starting causes confusion with special techniques like bobble stitches - review all instructions and practice new stitches before beginning

4 Dogs Bundle Amigurumi Pattern

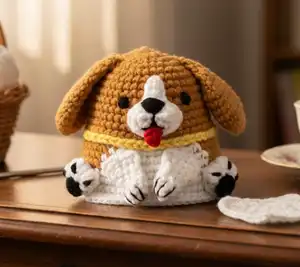
Create an adorable collection of four charming dog amigurumi with this comprehensive crochet bundle featuring Beagle, Dalmatian, Pug, and Shiba Inu patterns. Each miniature canine companion stands approximately 6cm tall and showcases unique breed characteristics through clever color work and detailed features. Perfect for dog lovers and collectors, these patterns can be made individually or joined together to create reversible two-sided toys. With clear instructions for multiple skill-building techniques including color changes, surface slip stitches, and bobble stitches, you'll master the art of creating lifelike miniature dogs that capture the personality of each beloved breed.

Advanced Beginner 5-6 Hours

Materials Needed for 4 Dogs Bundle Amigurumi Pattern

β€” Main Fabric

  • 01
    4-ply cotton blend yarn in brown, white, peach, black, yellow, and red (for Beagle)
  • 02
    4-ply cotton blend yarn in white, black, blue, peach, and red (for Dalmatian)
  • 03
    4-ply cotton blend yarn in light beige, dark brown, orange, peach, and black (for Pug)
  • 04
    4-ply cotton blend yarn in light brown, light beige, peach, red, and black (for Shiba Inu)
  • 05
    Fiberfill stuffing for all dogs
  • 06
    Cardboard or rigid plastic circles for bases (if making single non-reversible dogs)

β€” Tools Required

  • 01
    2.0mm crochet hook or size suitable for yarn weight
  • 02
    Tapestry needle for sewing and assembly
  • 03
    Embroidery needle for detail work
  • 04
    Stitch markers or contrasting yarn for marking rounds
  • 05
    Scissors for cutting yarn
  • 06
    Pins for positioning pieces before sewing

Progress Tracker

0% Complete

β€” BEAGLE HEAD AND BODY :

R1 :

6sc in MR (6)

R2 :

6inc (12)

R3 :

[sc, inc]x6 (18)

R4 :

[sc, inc, sc]x6 (24)

R5 :

[3sc, inc]x6 (30)

R6 :

[2sc, inc, 2sc]x6 (36)

R7 :

[5sc, inc]x6 (42)

R8 :

42sc (42)

R9 :

[3sc, inc, 3sc]x6 (48)

R10-13 (4 rounds) :

48sc (48)

R14 :

[7sc, inc]x6 (54)

Info :

Starting from R15, crochet using black, brown, and white yarn alternately. Cut and start with new yarn for each color change.

R15 :

BLO 5sc (black), 17sc (brown), 10sc (white), 17sc (brown), 5sc (black) (54)

R16 :

6sc (black), 15sc (brown), 12sc (white), 15sc (brown), 6sc (black) (54)

R17-18 (2 rounds) :

7sc (black), 13sc (brown), 14sc (white), 13sc (brown), 7sc (black) (54)

R19 :

8sc (black), 11sc (brown), 16sc (white), 11sc (brown), 8sc (black) (54)

R20 :

4sc, inc, 3sc (black), 5sc, inc, 5sc, 3sc, inc (brown), 8sc, inc, 3sc (white), 5sc, inc, 5sc, 3sc, inc (brown), 4sc (black) (60)

R21-22 (2 rounds) :

10sc (black), 11sc (brown), 18sc (white), 11sc (brown), 10sc (black) (60)

Info :

Fasten off, cut yarn and do invisible finish. Hold body upside down, with yellow yarn make surface slip stitches around between R14-15.

β€” BEAGLE EARS (make 2) :

R1 :

6sc in MR (6)

R2 :

6inc (12)

R3 :

[sc, inc]x6 (18)

R4 :

[8sc, inc]x2 (20)

R5-8 (4 rounds) :

20sc (20)

R9 :

[3sc, 2dec, 3sc]x2 (16)

R10 :

3sc, dec, 6sc, dec, 3sc (14)

R11 :

2sc, dec, 5sc, dec, 3sc (12)

R12 :

2sc, dec, 4sc, dec, 2sc (10)

R13 :

sc, dec, 3sc, dec, 2sc (8)

R14 :

2sc, then flatten and work through both stitches: 3sc (3)

Info :

Fasten off, leave a long tail for sewing.

β€” BEAGLE FRONT LEGS (make 2) :

R1 :

8sc in MR (8)

R2-3 (2 rounds) :

8sc (8)

R4 :

3sc, inc, 4sc (9)

R5 :

4sc, inc, 4sc (10)

Info :

No need to stuff. Flatten and work through both stitches 5sc (5). Fasten off, leave a long tail for sewing.

β€” BEAGLE MUZZLE :

Info :

Make an oval by crocheting around foundation chain. Start with white. Make 5ch.

R1 :

From second ch from hook: 3sc, then inc3 in last st. Continue on other side of foundation ch: 2sc, inc (10)

R2 :

inc, 2sc, 3inc, 2sc, 2inc (16)

R3 :

16sc (16)

R4 :

3sl st, 4ch, sc, 2hdc, sl st

Info :

Leave remaining st unworked. Fasten off, leave long tail for sewing. Do invisible finish.

β€” BEAGLE PAWS (make 2) :

R1 :

Black: 6sc in MR (6), join to first sc with sl st

R2 :

Change to white. BLO, loosely 6sl st (6), join to first st with sl st. Make 1ch

R3 :

3inc, loosely 3sl st (9), join to first sc with sl st

R4 :

[bobble st, sl st]x3 (6)

Info :

Fasten off, leave long tail for sewing. Do invisible finish. Using black tail, embroider paws on every bobble st.

β€” BEAGLE TAIL :

R1 :

White: 6sc in MR (6)

R2 :

6sc (6)

R3 :

5sc, inc (7)

R4-5 (2 rounds) :

Change to black. 7sc (7)

R6 :

2sc, 2dec, 2sc (6)

R7-8 (2 rounds) :

6sc (6)

Info :

No need to stuff. Fasten off, leave long tail for sewing. Do invisible finish.

β€” BEAGLE TONGUE :

Info :

Start with red yarn. Make 3ch, then from second loop from hook, work 2sc. Fasten off, leave long tail for sewing.
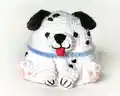
β€” DALMATIAN HEAD AND BODY :

R1 :

6sc in MR (6)

R2 :

6inc (12)

R3 :

[sc, inc]x6 (18)

R4 :

[sc, inc, sc]x6 (24)

R5 :

[3sc, inc]x6 (30)

R6 :

[2sc, inc, 2sc]x6 (36)

R7 :

[5sc, inc]x6 (42)

R8 :

42sc (42)

R9 :

[3sc, inc, 3sc]x6 (48)

R10-13 (4 rounds) :

48sc (48)

R14 :

[7sc, inc]x6 (54)

R15 :

BLO 54sc (54)

R16-19 (4 rounds) :

54sc (54)

R20 :

[4sc, inc, 4sc]x6 (60)

R21-22 (2 rounds) :

60sc (60)

Info :

Fasten off, cut yarn and do invisible finish. Hold body upside down, with blue yarn make surface slip stitches around between R14-15.

β€” DALMATIAN EARS (make 2) :

Info :

Ears are worked in rows. Start with black yarn. Leave long starting tail (about 50cm), then make 6ch. Start from second loop from hook:

R1 :

5sc (5), 1ch

R2 :

turn, 5sc (5), 1ch

R3 :

turn, dec, sc, dec (3), 1ch

R4 :

turn, 3sc (3), 1ch

R5 :

turn, dec, sc (2), 1ch

R6 :

turn, dec (1)

Info :

Fasten off. Continue using starting yarn tail. Make 1ch, 6sc until almost reaching top of ear. Make inc3 at top st (R6), then 6sc again until reaching bottom. Fasten off, leave long tail for sewing.

β€” DALMATIAN FRONT LEGS (make 2) :

R1 :

8sc in MR (8)

R2-3 (2 rounds) :

8sc (8)

R4 :

3sc, inc, 4sc (9)

R5 :

4sc, inc, 4sc (10)

Info :

No need to stuff. Flatten and work through both stitches 5sc (5). Fasten off, leave long tail for sewing.

β€” DALMATIAN MUZZLE :

Info :

Make an oval by crocheting around foundation chain. Start with white. Make 5ch.

R1 :

From second ch from hook: 3sc, then inc3 in last st. Continue on other side of foundation ch: 2sc, inc (10)

R2 :

inc, 2sc, 3inc, 2sc, 2inc (16)

R3 :

16sc (16)

Info :

Fasten off, leave long tail for sewing. Do invisible finish.

β€” DALMATIAN PAWS (make 2) :

R1 :

Peach: 6sc in MR (6), join to first sc with sl st

R2 :

Change to white. BLO, loosely 6sl st (6), join to first st with sl st. Make 1ch

R3 :

3inc, loosely 3sl st (9), join to first sc with sl st

R4 :

[bobble st, sl st]x3 (6)

Info :

Fasten off, leave long tail for sewing. Do invisible finish. Using peach tail, embroider paws on every bobble st.

β€” DALMATIAN TAIL :

R1 :

6sc in MR (6)

R2 :

5sc, inc (7)

R3 :

7sc (7)

R4 :

6sc, inc (8)

R5 :

8sc (8)

R6 :

2sc, 2dec, 2sc (6)

R7-8 (2 rounds) :

6sc (6)

Info :

No need to stuff. Fasten off, leave long tail for sewing. Do invisible finish.

β€” DALMATIAN TONGUE :

Info :

Start with red yarn. Make 3ch, then from second loop from hook, work 2sc. Fasten off, leave long tail (about 10cm) for sewing.

β€” PUG HEAD AND BODY :

R1 :

6sc in MR (6)

R2 :

6inc (12)

R3 :

[sc, inc]x6 (18)

R4 :

[sc, inc, sc]x6 (24)

R5 :

[3sc, inc]x6 (30)

R6 :

[2sc, inc, 2sc]x6 (36)

R7 :

[5sc, inc]x6 (42)

R8 :

42sc (42)

R9 :

[3sc, inc, 3sc]x6 (48)

R10-13 (4 rounds) :

48sc (48)

R14 :

[7sc, inc]x6 (54)

R15 :

BLO 54sc (54)

R16-19 (4 rounds) :

54sc (54)

R20 :

[4sc, inc, 4sc]x6 (60)

R21-22 (2 rounds) :

60sc (60)

Info :

Hold body upside down. With orange yarn, make surface slip stitches around between R14-15.

β€” PUG EARS (make 2) :

Info :

Ears are worked in rows. Start with dark brown yarn. Leave long starting tail (about 50cm), then make 5ch. Start from second loop from hook:

R1 :

4sc (4), 1ch

R2 :

turn, 4sc (4), 1ch

R3 :

turn, 2dec (2), 1ch

R4 :

turn, 2sc (2), 1ch

R5 :

turn, dec (1)

Info :

Fasten off. Flip work and continue using starting yarn tail. Make 1ch, 4sc until almost reaching top of ear. Make inc3 at top st (R5), then 4sc again until reaching bottom. Fasten off.

β€” PUG MUZZLE :

Info :

Make an oval by crocheting around foundation chain. Start with dark brown. Make 5ch.

R1 :

From second ch from hook: 3sc, then inc3 in last st. Continue on other side of foundation ch: 2sc, inc (10)

R2 :

inc, 2sc, 3inc, 2sc, 2inc (16)

R3 :

16sc (16)

Info :

Fasten off, leave long tail for sewing. Do invisible finish.

β€” PUG FRONT LEGS (make 2) :

R1 :

8sc in MR (8)

R2-3 (2 rounds) :

8sc (8)

R4 :

3sc, inc, 4sc (9)

R5 :

4sc, inc, 4sc (10)

Info :

No need to stuff. Flatten and work through both stitches 5sc (5). Fasten off, leave long tail for sewing.

β€” PUG PAWS (make 2) :

R1 :

Peach: 6sc in MR (6), join to first sc with sl st

R2 :

Change to light beige. BLO, loosely 6sl st (6), join to first st with sl st. Make 1ch

R3 :

3inc, loosely 3sl st (9), join to first sc with sl st

R4 :

[bobble st, sl st]x3 (6)

Info :

Fasten off, leave long tail for sewing. Do invisible finish. Using peach tail, embroider paws on every bobble st.

β€” PUG TAIL :

Info :

Start with light beige. Make 10ch. From second loop from hook, make 9sc. Fasten off, leave long tail for sewing.

β€” SHIBA INU HEAD AND BODY :

R1 :

6sc in MR (6)

R2 :

6inc (12)

R3 :

[sc, inc]x6 (18)

R4 :

[sc, inc, sc]x6 (24)

R5 :

[3sc, inc]x6 (30)

R6 :

[2sc, inc, 2sc]x6 (36)

R7 :

[5sc, inc]x6 (42)

R8 :

42sc (42)

R9 :

[3sc, inc, 3sc]x6 (48)

R10-11 (2 rounds) :

48sc (48)

Info :

Starting from R12, crochet using light beige and light brown yarn alternately. Cut and start with new yarn for each color change.

R12 :

13sc (light brown), 22sc (light beige), 13sc (light brown) (48)

R13 :

12sc (light brown), 24sc (light beige), 12sc (light brown) (48)

R14 :

7sc, inc, 5sc (light brown), 2sc, inc, [7sc, inc]x2, 3sc (light beige), 4sc, inc, 7sc, inc (light brown) (54)

R15 :

BLO 22sc (light brown), 10sc (light beige), 22sc (light brown) (54)

R16 :

21sc (light brown), 12sc (light beige), 21sc (light brown) (54)

R17-18 (2 rounds) :

20sc (light brown), 14sc (light beige), 20sc (light brown) (54)

R19 :

19sc (light brown), 16sc (light beige), 19sc (light brown) (54)

R20 :

[4sc, inc, 4sc]x2, sc (light brown), 3sc, inc, 8sc, inc, 3sc (light beige), 5sc, inc, 8sc, inc, 4sc (light brown) (60)

R21-22 (2 rounds) :

21sc (light brown), 18sc (light beige), 21sc (light brown) (60)

Info :

Fasten off, cut yarn and do invisible finish. Hold body upside down, with red yarn make surface slip stitches around between R14-15.

β€” SHIBA INU EARS (make 2) :

Info :

Crochet ears using light brown and light beige color alternately.

R1 :

Light brown: 6sc in MR (6)

R2 :

sc, inc, sc (light brown), inc, sc, inc (light beige) (9)

R3 :

2sc, inc, sc (light brown), sc, inc, 2sc, inc (light beige) (12)

R4 :

3sc, inc, sc (light brown), 2sc, inc, 3sc, inc (light beige) (15)

R5 :

4sc, inc, sc (light brown), 3sc, inc, 4sc (light beige) (16). Leave remaining st undone

Info :

Fasten off. Leave long tail for sewing. Do invisible finish.

β€” SHIBA INU MUZZLE :

Info :

Make an oval by crocheting around foundation chain. Start with light beige. Make 4ch.

R1 :

From second ch from hook: 2sc, then inc3 in last st. Continue on other side of foundation ch: sc, inc (8)

R2 :

inc, sc, 3inc, sc, 2inc (14)

R3 :

14sc (14)

Info :

Fasten off, leave long tail for sewing. Do invisible finish.

β€” SHIBA INU FRONT LEGS (make 2) :

R1 :

Light beige: 8sc in MR (8)

R2 :

8sc (8)

R3 :

Change to light brown. BLO 8sc (8)

R4 :

3sc, inc, 4sc (9)

R5 :

4sc, inc, 4sc (10)

Info :

No need to stuff. Flatten and work through both stitches 5sc (5). Fasten off, leave long tail for sewing.

β€” SHIBA INU PAWS (make 2) :

R1 :

Peach: 6sc in MR (6), join to first sc with sl st

R2 :

Change to light beige. BLO, loosely 6sl st (6), join to first st with sl st. Make 1ch

R3 :

3inc, loosely 3sl st (9), join to first sc with sl st

R4 :

[bobble st, sl st]x3 (6)

Info :

Fasten off, leave long tail for sewing. Do invisible finish. Using peach tail, embroider paws on every bobble st.

β€” SHIBA INU TAIL :

R1 :

Light beige: 6sc in MR (6)

R2 :

3sc, 3inc (9)

R3 :

4sc, 3inc, 2sc (12)

R4-5 (2 rounds) :

Change to light brown. 12sc (12)

R6 :

sc, dec, 9sc (11)

R7 :

sc, dec, 8sc (10)

R8 :

2dec, 6sc (8)

R9 :

Stuff slightly with fiberfill. 2dec, 4sc (6)

Info :

Fasten off, leave long tail for sewing. Do invisible finish.

β€” BASE FOR SINGLE DOG (if not making reversible) :

Info :

Use main color yarn matching your dog. Make the following rounds:

R1 :

6sc in MR (6)

R2 :

6inc (12)

R3 :

[sc, inc]x6 (18)

R4 :

[sc, inc, sc]x6 (24)

R5 :

[3sc, inc]x6 (30)

R6 :

[2sc, inc, 2sc]x6 (36)

R7 :

[5sc, inc]x6 (42)

R8 :

[3sc, inc, 3sc]x6 (48)

R9 :

[7sc, inc]x6 (54)

R10 :

[4sc, inc, 4sc]x6 (60)

Info :

Fasten off. Leave long tail for sewing. Stuff body with fiberfill. Place cardboard or rigid plastic circle inside bottom. Sew base to BL of last round of body.

Assembly Instructions

  • For Beagle: Attach bowl-shaped muzzle between R11-13, with flap portion between R8-10, stuffing lightly with fiberfill before securing completely
  • Position ears with top part between R4-5 for all breeds, adjusting forward-bending position for Dalmatian and Pug
  • Attach front legs between R16-22 with slightly tilted position for natural standing pose, ensuring even placement on both sides
  • Embroider toe lines on front legs using black yarn (1 ply only) or dark brown (2 ply for Pug) before attaching to body
  • Secure paws between R18-22 right beside front legs, making sure bobble stitches face forward for paw pad details
  • Attach tail at back of body at specified rounds, ensuring proper curl and positioning for breed characteristics
  • Embroider eyes at R10, spacing 1 stitch apart from muzzle widest point, then add nose and mouth details on muzzle using black yarn (2 ply for mouth)
  • For Shiba Inu: Add white spots above eyes at R8 using light beige yarn. For Pug: Embroider eye ridge at R7 (4 ply) and wrinkles between R5-6 (1 ply). For Dalmatian: Add black spots randomly on body using 1 stitch embroidery

Important Notes

  • πŸ’‘Work with consistent stitch tension throughout all pieces to ensure uniform size when combining multiple dogs or creating reversible toys
  • πŸ’‘When doing color changes for Beagle and Shiba Inu, avoid tapestry technique as it tightens color-changing rounds; cut and restart with new yarn instead
  • πŸ’‘Leave appropriate yarn tail lengths: 10cm at start for single dogs, 50cm for reversible amigurumi assembly to ensure sufficient working length
  • πŸ’‘Use invisible finish technique at end of each piece for professional appearance without visible yarn tails or gaps
  • πŸ’‘Stuff pieces firmly but maintain stretchability so the plushie remains soft and huggable rather than overly rigid
  • πŸ’‘For reversible amigurumi: tie magic ring tails together leaving 1-2cm space, then turn one dog right-side-out while leaving other inside-out before joining
  • πŸ’‘When making single (non-reversible) dogs, insert cardboard or rigid plastic circle in base before sewing to help toy stand properly on flat surfaces

This charming 4 Dogs Bundle pattern was lovingly designed to bring four distinct canine personalities to life in miniature form, each capturing the unique essence of beloved dog breeds. Whether you choose the loyal Beagle with tricolor patches, the playful spotted Dalmatian, the wrinkly-faced Pug, or the elegant Shiba Inu, each pattern offers delightful detail work and innovative reversible toy options. The patterns skillfully combine beginner-friendly techniques with advanced touches like multi-color work and surface embellishments, making them perfect for crocheters ready to expand their amigurumi skills. πŸ• Happy stitching and enjoy building your own miniature dog park! 🧢✨

You ask,

we answer.

FAQs

Can I make these dogs in different sizes?

Yes! Simply use thicker yarn with a larger hook for bigger dogs, or thinner yarn with smaller hook for micro versions. Keep proportions consistent by maintaining the same stitch counts with your chosen materials.

What's the best way to create clean color changes on the Beagle and Shiba Inu?

Cut the yarn and start fresh with each new color rather than carrying yarn along. This prevents tightening of the color-change rounds and creates cleaner lines between different colored sections.

How do I make the reversible amigurumi option work?

Create two different dogs, turn one right-side-out and leave the other inside-out, then push the inside-out dog into the right-side-out dog. Sew the last rounds together through back loops only. The tied magic ring tails create the space needed between the two dogs.

Do I need to know bobble stitches before starting?

The pattern includes detailed bobble stitch instructions with step-by-step images. Practice on a swatch first if you're new to this technique - it's easier than it looks and creates adorable textured paw pads!

Can I substitute the embroidered features with safety eyes?

Yes, you can use 4-5mm safety eyes placed between R13-14, but embroidered eyes are recommended for these small-scale dogs as they allow more control over expression and are safer for young children.

Why won't my dog stand up properly?

Make sure to insert a cardboard or rigid plastic circle in the base before sewing it closed. Also check that you've stuffed firmly enough - too little stuffing causes sagging while too much causes distortion.