🧢 Beautiful ✨ Detailed πŸ’ Adorable

Cornflower Sweater Crochet Pattern

Cornflower Sweater Crochet Pattern
4.6β˜… Rating
15-20 Hours Time Needed
1.7K Made This
βœ‚οΈ

Intermediate Level

Ideal for those with basic knitting experience, featuring slightly more advanced stitches and techniques to expand your skills.

⏱️

Slow & Steady

A 10-12 hour projectβ€”great for savoring the process over several sessions.

πŸ§₯

Layered Comfort

Perfect for cozy, stylish layering through changing seasons with versatile, mix-and-match potential.

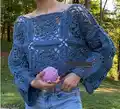
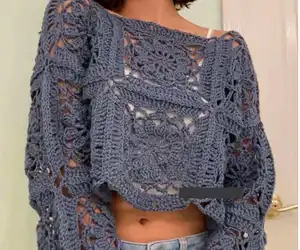
About This Cornflower Sweater Crochet Pattern

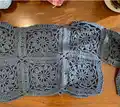
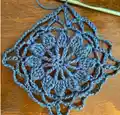
The Cornflower Sweater pattern is a delightful combination of traditional granny square technique and modern wearable design. Each square features a beautiful flower motif with twelve delicate petals, creating a stunning visual effect when multiple squares are joined together. The pattern uses triple crochet stitches and special petal techniques to build dimension and texture. With its oversized fit and graceful draping quality, this sweater is designed to be both comfortable and elegant, making it a perfect addition to any handmade wardrobe.

Cornflower Sweater Crochet Pattern crochet pattern - detailed view of completed project

This pattern requires blocking each square before assembly to ensure even shapes and professional-looking results. The unique sewing method creates a beautiful double braided texture at each seam, adding an extra decorative element to the finished garment.

Why You'll Love This Cornflower Sweater Crochet Pattern

I absolutely love this pattern because it combines the meditative rhythm of making granny squares with the excitement of creating wearable fashion. There's something incredibly satisfying about watching those delicate flower petals take shape round by round, and seeing individual squares transform into an elegant sweater is pure magic. The oversized, draping fit means you don't have to stress about exact measurements, making it forgiving and flattering for all body types. Plus, the modular construction means you can work on it anywhere, pick it up and put it down as life happens, and still make steady progress toward a stunning finished piece.

Cornflower Sweater Crochet Pattern step 1 - construction progress Cornflower Sweater Crochet Pattern step 2 - assembly progress Cornflower Sweater Crochet Pattern step 3 - details and accessories Cornflower Sweater Crochet Pattern step 4 - final assembly and finishing

Switch Things Up

I love experimenting with this pattern because there are so many ways to make it uniquely yours. Try working each square in a different color for a vibrant patchwork effect, or use an ombre technique by gradually transitioning from light to dark shades. You could even work the flower centers in a contrasting color and keep the outer rounds neutral for a subtle pop of interest.

For a completely different aesthetic, consider using a lightweight cotton yarn for a breezy summer cardigan, or opt for a chunky wool blend for maximum coziness. I've also played with the sizing by making smaller 6-inch squares for a more fitted silhouette or larger 10-inch squares for an ultra-oversized bohemian vibe.

If you want to add extra detail, try working a border around the entire finished sweater using single crochet or shell stitches. You could also embellish with buttons down the front, add pockets made from extra squares, or incorporate fringe along the bottom hem. The modular nature of this design means you can truly customize every aspect to match your personal style and skill level.

Common Mistakes & How to Fix Them

βœ— Skipping the blocking step will result in uneven squares that don't align properly during assembly, creating gaps and puckering in your sweater βœ— Forgetting that the beginning chains count as stitches leads to incorrect stitch counts and misshapen petals in subsequent rounds βœ— Not maintaining consistent tension throughout each square causes some squares to be larger or smaller, making assembly difficult and the final garment uneven βœ— Sewing through both chain stitches at corners instead of just the first chain stitch creates bulky, stiff seams that disrupt the draping quality

Cornflower Sweater Crochet Pattern

Create your own stunning Cornflower Sweater with this beautiful granny square pattern. This oversized, draping design features delicate flower motifs that come together to form an elegant, wearable piece perfect for any season. Each square showcases intricate petal details and corner chains that create a gorgeous braided texture when sewn together. Whether you're looking to expand your wardrobe or craft a thoughtful handmade gift, this pattern guides you through every step from creating individual squares to final assembly.

Intermediate 15-20 Hours

Materials Needed for Cornflower Sweater Crochet Pattern

β€” Main Fabric

  • 01
    Weight 4 yarn (cotton/nylon blend recommended)
  • 02
    Approximately 1200-1500 yards total depending on desired size

β€” Tools Required

  • 01
    5mm-6mm crochet hook
  • 02
    Yarn needle for sewing
  • 03
    Blocking materials (blocking mats and pins)
  • 04
    Stitch markers
  • 05
    Scissors

Progress Tracker

0% Complete

β€” Making the Square :

Round 1 :

Slip knot. Ch 6 and sl st to the first stitch.

Round 2 :

Ch 4, tc in the same st where you placed the sl st, ch 1. [All in the same stitch: tc, ch1, tc, ch1] x5. You should now count 12 tc st total, including the ch 4. Find the ch 4 you started this round with and sl st to the 3rd ch st.

Info :

Note that chains at the beginnings of rounds count as stitches. Think of this ch 4 as a tc, ch 1.

Tc Instructions :

Yo twice, insert hook into stitch and pull up a loop. Yo and pull through the first 2 loops. You should have 3 loops. Yo and pull through the next 2 loops. You should have 2 loops now. Yo and pull through the remaining 2 loops.

Round 3 :

Each of the flower petals is essentially a tc 4 together, placed in the same stitch. The first petal will be a bit different from the others. Ch 2. Yo 2 times. Insert the hook under the next ch st of the round below. Pull up a loop. Yo and pull through the first 2 loops. You will have 3 loops left on your hook. Yo and pull through the next 2 loops. You should have 2 loops left on your hook.

Round 3 Continued :

[Yo 2 times and insert the hook under the same ch st. Pull up a loop. Yo and pull through the first 2 loops. Yo and pull through the next 2 loops.] x2. You should now have 4 loops on your hook. Yo and pull through all 4 loops. Ch 4.

Round 3 Petal Stitch :

[Yo 2 times and insert the hook under the next ch st of the row below. Pull up a loop. Yo and pull through the first 2 loops. Yo and pull through the next 2 loops.] x4. You should have 5 loops on your hook. Yo and pull through all 5 loops. Ch 4. Repeat the above petal stitch for every ch st you made in round 2. You should have 12 petals total. Sl st to the stitch at the top of the first petal.

Round 4 :

[Ch 7 sk 4 sl st] x12. Place your last sl st right before the first st of the round.

Round 5 :

Ch 7, sk 3, sl st (the sl st should be in the peak of that first chain loop). [Ch 7, sk 7, sl st] x2. Ch 4, sk 3, tc, ch 4, sk 3, sl st. Repeat this whole line a total of 3 times. [Ch 7, sk 7, sl st] x2. Ch 4. Find the first chain of this round and sl st to the 4th ch st.

Round 6 :

For this round, you will be placing one tc in each ch st. Ch 3, tc 3, ch1, sk1. [Tc 3, ch 1, sk1] x4. Tc 4, ch3, sk1. Tc 4, ch1, sk1. [Tc 3 ch 1 sk1] x4. Tc 4, ch3, sk1. Repeat this line a total of 3 times. Find the chain that started this round and sl st to the 3rd ch st. Tie off.

Info :

For best results, you will need to block your squares to even out the shape before assembly. Repeat from the beginning to create several squares before moving on to assembly. Each square should measure about 8 inches wide.

β€” Sewing Squares Together :

Sewing Method :

After blocking, put 2 squares together with the wrong sides facing each other. Use a running stitch along the edge, threading the yarn back and forth through each stitch. When you get to the ch 3 corners, sew the first ch st. When you unfold the squares, you should see a double braided texture at the seam.

Assembly Instructions

  • Block all completed squares to 8 inches wide using blocking mats and pins, ensuring they dry completely before assembly.
  • Determine your desired dimensions based on arm span, chest width, and desired length, calculating how many squares you'll need.
  • Create two identical panels following the diagram provided, one for the front and one for the back of the sweater.
  • Sew squares together using the running stitch method with wrong sides facing each other, creating the decorative braided seam.
  • Line up your front and back panels and sew them together at the shoulders and sides, leaving openings for arms and head.
  • If you need more arm room, add an additional row of squares as indicated in the pattern diagram.
  • Weave in all stray yarn ends using your yarn needle, ensuring they're secure and invisible on the right side.

Important Notes

  • πŸ’‘Blocking is essential for this pattern and cannot be skipped if you want professional-looking results with even squares.
  • πŸ’‘The sweater is designed to be oversized, so don't worry about achieving exact measurements as listed.
  • πŸ’‘Always remember that beginning chains count as stitches throughout the pattern to maintain correct stitch counts.
  • πŸ’‘Use stitch markers liberally, especially when working Round 5 with its multiple repeats and directional changes.
  • πŸ’‘Keep consistent tension throughout all squares to ensure they're uniform in size for easier assembly.
  • πŸ’‘Consider making a few extra squares in case you want to adjust the final size or replace any imperfect ones.

This elegant Cornflower Sweater pattern combines the timeless beauty of granny squares with modern wearable fashion. Each delicate flower motif comes together to create a stunning oversized garment that drapes beautifully and flatters every body type. The pattern's modular construction makes it perfect for on-the-go crafting, while the blocking and assembly process adds that professional finishing touch. Whether you're looking to expand your handmade wardrobe or create a meaningful gift, this sweater will become a treasured piece for years to come. 🧢 Happy crocheting! 🌸✨

You ask,

we answer.

FAQs

How many squares do I need to make for the sweater?

The number of squares depends on your desired size. Measure your arm span, chest width, and desired length, then calculate based on 8-inch squares. Most sizes will need between 20-35 squares total for both front and back panels.

Can I use a different yarn weight?

Yes, but your squares will turn out different sizes. If you use a lighter weight yarn with a smaller hook, make more squares. Heavier yarn will create larger squares, so you'll need fewer. Always make a test square first to determine final measurements.

Do I really need to block every square?

Blocking is essential for this pattern to ensure all squares are uniform in size and shape. Unblocked squares will be uneven and won't align properly during assembly, creating gaps and an unprofessional finish.

What does it mean that beginning chains count as stitches?

When the pattern says ch 4 at the beginning of a round, that chain-4 functions as your first triple crochet stitch. You don't work another tc in that same space. This is important for maintaining correct stitch counts throughout.

How do I adjust the size for a more fitted look?

Simply use fewer squares to reduce the overall dimensions. The pattern is designed to be oversized, but you can customize it by reducing the width or length. Make your panels smaller based on your body measurements plus desired ease.

Can I make this sweater in multiple colors?

Absolutely! This pattern works beautifully with different colored squares or even variegated yarn. You can create an ombre effect, use contrasting colors, or alternate colors for a patchwork look. The possibilities are endless!