🧢 Beautiful ✨ Detailed πŸ’ Adorable

Hungry Hamsters Amigurumi Pattern

Hungry Hamsters Amigurumi Pattern
4.4β˜… Rating
2-3 Hours Time Needed
1.2K Made This
βœ‚οΈ

Beginner Friendly Level

Perfect for those just starting their sewing journey, with clear instructions and simple techniques

⏱️

Bite-Sized Project

Complete in under 2 hoursβ€”quick, fun, and perfect for a little creative escape.

🧸

Cute Companion

An adorable friend to cherish, handcrafted with love to bring comfort and joy for years to come.

About This Hungry Hamsters Amigurumi Pattern

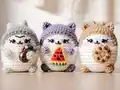
The Hungry Hamsters pattern is designed to create irresistibly cute amigurumi companions that fit right in the palm of your hand. These little critters come with interchangeable snacks, allowing you to customize each hamster with their favorite treat. Whether you choose to make a palm-sized version at 6cm tall or a tiny mini version at 3cm, each hamster features sweet embroidered details, safety eyes, and adorable little paws positioned as if they're holding their precious snacks. The pattern uses simple stitches worked in continuous rounds, making it accessible for beginners while still being enjoyable for experienced crocheters.

Hungry Hamsters Amigurumi Pattern crochet pattern - detailed view of completed project

This versatile pattern includes instructions for five different miniature treats: cookies, watermelon slices, pizza, strawberries, and acorns. You can mix and match to create a whole collection of hungry hamster friends, each with their own personality and favorite snack!

Why You'll Love This Hungry Hamsters Amigurumi Pattern

I absolutely love this pattern because it's incredibly rewarding to see these tiny characters come to life! The hamsters are quick to make, which means you can create an entire family in just one weekend. What really makes this pattern special is the variety of adorable snacks you can craft - watching each little hamster hold their treat brings such joy! The instructions are clear and easy to follow, with helpful notes about eye placement and assembly tips. I also appreciate how the pattern offers two size options, so you can make keychain-sized minis or slightly larger palm-sized versions. The embroidered facial features give each hamster so much personality, and you'll find yourself smiling as you stitch on those tiny whiskers and sweet little smiles!

Hungry Hamsters Amigurumi Pattern step 1 - construction progress Hungry Hamsters Amigurumi Pattern step 2 - assembly progress Hungry Hamsters Amigurumi Pattern step 3 - details and accessories Hungry Hamsters Amigurumi Pattern step 4 - final assembly and finishing

Switch Things Up

I absolutely love experimenting with this pattern to create unique hamster personalities! One of my favorite modifications is changing up the color combinations - imagine a grey and white Syrian hamster or an all-white winter hamster with a tiny red strawberry. You could even go wild with fantasy colors like pastel pink or lavender for a kawaii aesthetic.

For the snacks, I enjoy mixing materials to create different textures. Try using sparkly yarn for the cookie to give it a 'sugary' appearance, or use fuzzy yarn for the strawberry to mimic real fruit texture. You can also scale up the snack sizes slightly if you want your hamster to look extra hungry!

Another fun variation is creating seasonal versions - add a tiny Santa hat for Christmas hamsters, or make autumn-themed ones with the acorn accessory and fall-colored fur. I've also experimented with different facial expressions by adjusting the mouth embroidery - try a surprised 'o' shape or sleepy closed eyes.

For those who want to take it further, consider adding wire armature to the arms to make them poseable, or create tiny accessories like miniature plates or napkins. You could even make a whole hamster family with baby versions by reducing the hook size throughout!

Common Mistakes & How to Fix Them
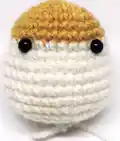
βœ— Placing safety eyes too low or too far apart - insert them between rounds 8 and 9 with approximately 6 stitches apart for proper placement βœ— Using a hook that's too large for the snacks resulting in visible stuffing - always use a hook 3-4 sizes smaller than body hook βœ— Not stuffing the body firmly enough causing it to lose shape - fill until semi-firm in round 16 then add more before closing
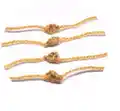
 βœ— Forgetting to leave long tails for sewing appendages making assembly difficult - always leave adequate yarn length for secure attachment
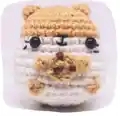
 βœ— Sewing legs at wrong angle facing outward instead of toward belly - legs should align horizontally with eyes facing the center βœ— Rushing through color changes without securing yarn properly causing loose stitches - always fasten off and weave in ends securely

Hungry Hamsters Amigurumi Pattern

Create your own adorable pocket-sized hamster friends with this delightful amigurumi pattern! This charming design features cute hamsters holding tiny treats like cookies, watermelon slices, pizza, strawberries, and acorns. Perfect for beginners and experienced crocheters alike, this pattern includes instructions for both palm-sized (6cm) and mini (3cm) versions. With detailed step-by-step guidance and multiple snack options, you'll bring these hungry little critters to life in no time. Each hamster comes complete with safety eyes, embroidered features, and the sweetest little paws holding their favorite treats!

Beginner Friendly 2-3 Hours

Materials Needed for Hungry Hamsters Amigurumi Pattern

β€” Main Fabric

  • 01
    Monaco Mercerized Cotton Thread (for mini hamster body)
  • 02
    Monaco Acrylic Yarn 3-ply in beige and white (for palm-sized hamster body)
  • 03
    Monaco Mercerized Cotton Thread (for all snacks)
  • 04
    DMC Embroidery threads in various colors (for micro snacks - 3 strands of 6-strand thread)
  • 05
    Brown, dark brown, green, red, white, and tan colored yarn/thread (for snack details)

β€” Tools Required

  • 01
    1.10mm crochet hook (for mini hamster)
  • 02
    2.25mm crochet hook (for palm-sized hamster)
  • 03
    0.75mm crochet hook (for micro snacks - optional)
  • 04
    Safety eyes 3mm (for mini hamster)
  • 05
    Safety eyes 6mm (for palm-sized hamster)
  • 06
    Stitch markers
  • 07
    Tapestry/sewing needle
  • 08
    Black embroidery/sewing threads
  • 09
    Toy stuffing/polyfill
  • 10
    Scissors
  • 11
    Sewing pins (for assembly positioning)

Progress Tracker

0% Complete

β€” Head/Body :

Info :

Use 2.25mm hook and start in beige

Round 1 :

6sc in MR (6)

Round 2 :

inc x6 (12)

Round 3 :

(inc, sc) x6 (18)

Round 4 :

(inc, 2sc) x6 (24)

Round 5 :

(inc, 3sc) x6 (30)

Round 6-7 :

sc around [2 rounds] (30)

Round 8-9 :

s2white sc around [2 rounds] (30)

Info :

Insert eyes between Rounds 8 & 9 (about 6 stitches apart). The top of the safety eyes should slightly touch the colored portion. If there are white gaps between the eyes, use larger sized eyes or insert them higher up between rounds 7 & 8 instead.

Round 10 :

(inc, 4sc) x6 (36)

Round 11-12 :

sc around [2 rounds] (36)

Round 13 :

(inc, 5sc) x6 (42)

Round 14 :

(dec, 5sc) x6 (36)

Round 15 :

(dec, 4sc) x6 (30)

Round 16 :

(dec, 3sc) x6 (24)

Info :

Start filling with polyfill until semi-firm

Round 17 :

(dec, 2sc) x6 (18)

Round 18 :

(dec, sc) x6 (12)

Round 19 :

dec x6 (6)

Info :

Finish off and add more stuffing until body is well-shaped. Sew close.

β€” Legs :

Info :

Make 4 in beige using 2.25mm hook. Leave some allowance before you start your chain.

Step :

Ch 2 and hdc in 2nd ch from hook

Info :

Finish off and leave long tail for sewing

β€” Tail :

Info :

Make in beige

Round 1 :

Ch2, 4sc in 2nd ch from hook (4)

Info :

Cut thread and leave long tail for sewing

β€” Ears :

Info :

Make 2 in beige

Round 1 :

Ch2, 4sc in 2nd ch from hook (4)

Round 2 :

(inc, sc) x2 (6)

Info :

Cut thread and leave long tail for sewing

β€” Cookie A :

Info :

Using 2.25mm hook

Round 1 :

In MR, ch2 then 8 hdc around (8)

Round 2 :

Sl st in each st around (8)

Info :

Leave long yarn tail for sewing. With brown yarn, sew on small chocolate chips

β€” Cookie 2 :

Info :

Using smaller hook and yarn than hamster

Round 1 :

6sc in MR (6)

Round 2 :

inc x6 (12)

Round 3 :

(inc, sc) x6 (18)

Round 4 :

sc around BLO (18)

Round 5 :

(dec, sc) x6 (12)

Round 6 :

dec x6 (6)

Info :

Finish off and leave long tail for sewing. With dark brown thread/yarn, sew small triangles to make choco chips. Sew close.

β€” Mini Watermelon/Pizza :

Info :

For micro crocheting with a 0.75mm hook, use only 3 strands of DMC embroidery thread. Circle colors indicate color change of round for Watermelon (W) or Pizza (P)

Round 1 :

4sc in MR (4)

Round 2 :

(inc, sc) x2 (6)

Round 3 :

(inc, 2sc) x2 (8)

Round 4 :

(inc, 3sc) x2 (10)

Round 5 :

(inc, 4sc) x2 (12)

Round 6 :

(inc, 5sc) x2 (14)

Info :

Finish off and leave long tail for sewing. Flatten triangle, making sure that the yarn tail is situated on the side. For the watermelon slice, sew on some black thread to put watermelon seeds (optional). For the pizza slice, embroider 3-4 pepperoni slices with red thread. Sew 4-5 times over the same stitch (careful not to make them overlap). Embroider peppers by sewing green thread 2-3 times diagonally randomly on the pizza. Sew close the pizza/watermelon slice by threading the yarn tail through the back loops of the last round.

β€” Mini Strawberry :

Info :

Using 1.10mm hook

Round 1 :

6sc in MR (6)

Round 2 :

sc around (6)

Round 3 :

inc x6 (12)

Round 4 :

(inc, 2sc) x4 (16)

Round 5 :

sc around (16)

Round 6 :

(dec, sc) x4 (12)

Round 7 :

dec x6 (6)

Info :

Stuff lightly and finish off with long tail for sewing. Embroider strawberry seeds with white yarn and sew close. Do not cut off yarn tail so you can use it to sew on to the hamster.

β€” Strawberry Leaf :

Info :

Make in green

Step :

In a magic ring, *ch 2 then sl st in the 2nd ch from hook. Sl st again into the magic ring*. Repeat ** 4 more times.

Info :

Leave long tail for sewing and sew on top of strawberry

β€” Mini Acorn :

Info :

Using 1.10mm hook

Round 1 :

6sc in MR (6)

Round 2 :

(inc, sc) x3 (9)

Round 3 :

(inc, 2sc) x3 (12)

Round 4 :

sc around (12)

Round 5 :

(inc, 3sc) x3 (15)

Round 6 :

sc around BLO (15)

Info :

Finish off. Do not sew close.

β€” Acorn Cap :

Info :

Make in dark brown

Round 1 :

6sc in MR (6)

Round 2 :

inc x6 (12)

Round 3 :

(inc, sc) x6 (18)

Round 4 :

sl st around (18)

Info :

Finish off with long thread for sewing and sew the front loops of the acorn cap to the edge of the acorn. Embroider a French knot to the top as the nub.

Assembly Instructions

  • Using black sewing thread or yarn, embroider the mouth by sewing a small horizontal dash between the eyes between rounds 7 & 8, then add a vertical line down from the center and two diagonal lines to create a tiny smile.
  • Sew two diagonal lines beside the eyes to create whiskers on each side of the face.
  • Attach the ears to the top of the head approximately 6 stitches apart, using the long tails left from crocheting.
  • Position and sew your chosen snack (cookie, watermelon, pizza, strawberry, or acorn) to the center of the belly.
  • Sew the front legs/hands on either side of the snack as if the hamster is holding it, using sewing thread in a matching shade for invisible stitching.
  • Count 2 rounds down from the hands and sew the back legs horizontally facing toward the belly, ensuring they align with the eyes.
  • Attach the tail to the back of the hamster around round 15. Use sewing pins to position all parts before final sewing to ensure proper placement.

Important Notes

  • πŸ’‘Use a hook that is 3-4 sizes smaller than your body hook when crocheting the snacks to prevent stuffing from showing through
  • πŸ’‘Safety eyes should be inserted so the top slightly touches the colored portion with no white gaps visible between eyes and body
  • πŸ’‘Leave adequate yarn tails on all appendages for secure sewing - rushing this step makes assembly much more difficult
  • πŸ’‘Use sewing pins to position all parts before final assembly to ensure you're happy with the placement
  • πŸ’‘For micro snacks using 0.75mm hook, split DMC embroidery thread to use only 3 strands of the 6-strand thread
  • πŸ’‘Stuff the body until semi-firm in round 16, then add more stuffing before closing to achieve the best rounded shape
  • πŸ’‘When working in continuous rounds, use a stitch marker to track the beginning of each round to avoid confusion

This absolutely adorable Hungry Hamsters pattern brings the cutest little critters to life, complete with their favorite tiny snacks! The versatility of this pattern is incredible - choose between palm-sized or mini versions, and customize each hamster with cookies, watermelon, pizza, strawberries, or acorns. The simple construction using continuous rounds makes this project perfect for beginners, while the charming details and variety of accessories keep it interesting for experienced makers. These sweet little friends work up quickly and make perfect gifts, keychains, or desk companions! 🐹πŸͺ🧢✨

You ask,

we answer.

FAQs

Can I make these hamsters in different colors?

Absolutely! While the pattern uses beige and white for a natural hamster look, you can experiment with any colors you like. Try grey, brown, golden, or even fantasy colors like pink or blue to create your own unique hamster friends.

What's the difference between the palm-sized and mini versions?

The palm-sized hamsters are approximately 6cm tall and use 2.25mm hook with acrylic yarn, while the mini hamsters are about 3cm tall and use 1.10mm hook with mercerized cotton thread. The mini version is perfect for keychains, while the palm-sized is great for display or play.

Do I need to make all the snacks or can I just pick one?

You only need to make one snack per hamster! Choose whichever treat you find cutest or make multiple hamsters with different snacks to create a whole collection. The pattern includes five snack options: two cookie styles, watermelon, pizza, strawberry, and acorn.

Why do I need a much smaller hook for the snacks?

Using a hook 3-4 sizes smaller than your body hook creates tighter stitches for the snacks, which prevents the stuffing from showing through the gaps. This is especially important for the tiny treats to maintain their detailed appearance.

Can I sell hamsters made from this pattern?

This depends on the designer's terms of use included with your purchase. Generally, many designers allow selling finished items in small quantities with proper credit, but please check the copyright information that came with your pattern purchase.

My safety eyes have white gaps showing - what should I do?

The pattern notes that the top of the safety eyes should slightly touch the colored portion. If you see white gaps, try using larger eyes (7mm or 8mm instead of 6mm) or insert them higher up between rounds 7 & 8 instead of 8 & 9.