🧢 Beautiful ✨ Detailed πŸ’ Adorable

Reversible Flower Bouquet & Bride Amigurumi Pattern

Reversible Flower Bouquet & Bride Amigurumi Pattern
4.9β˜… Rating
4-5 Hours Time Needed
3.5K Made This
βœ‚οΈ

Intermediate Level

Ideal for those with basic knitting experience, featuring slightly more advanced stitches and techniques to expand your skills.

⏱️

Weekend Treat

Takes 5-7 hours, making it an enjoyable project to finish over a couple of days.

🎁

Tiny Treasure

Small, sweet, and gift-worthy creations that fit perfectly in the palm of your hand with detailed charm.

About This Reversible Flower Bouquet & Bride Amigurumi Pattern

Reversible Flower Bouquet & Bride Amigurumi Pattern crochet pattern - detailed view of completed project

The pattern uses multiple yarn colors to create realistic details and includes special techniques like working in front and back loops only, creating dimensional flowers, and joining two pieces seamlessly. It's a wonderful project for those looking to challenge themselves while creating something truly special and unique.

Why You'll Love This Reversible Flower Bouquet & Bride Amigurumi Pattern

I absolutely love this pattern because it's unlike anything else I've crocheted before! The reversible design is so clever and creative - you're essentially getting two beautiful pieces in one. I love how you can display it as a bride one day and flip it to show a gorgeous bouquet the next, making it perfect for wedding decor that transforms after the big day. The attention to detail is incredible, from the delicate hair strands to the tiny embroidered facial features and the variety of flower shapes. What I especially enjoy is how satisfying it feels to work through the joining process and see both sides come together perfectly. It's a conversation starter that never fails to impress, and the joy on someone's face when they discover it flips is absolutely priceless!

Reversible Flower Bouquet & Bride Amigurumi Pattern step 1 - construction progress Reversible Flower Bouquet & Bride Amigurumi Pattern step 2 - assembly progress Reversible Flower Bouquet & Bride Amigurumi Pattern step 3 - details and accessories Reversible Flower Bouquet & Bride Amigurumi Pattern step 4 - final assembly and finishing

Switch Things Up

I love experimenting with this reversible pattern to make each one unique! For the bride's hair, I sometimes use different shades of brown or even try blonde or black yarn to match real brides I know. You could also add tiny pearl beads to her dress for extra elegance, or embroider a small heart on the bodice.

For the flower bouquet side, I enjoy mixing up the color palette completely - imagine a spring bouquet with pastels, a autumn arrangement with burnt oranges and deep reds, or even an all-white elegant bouquet. You can also experiment with the number and types of flowers, adding more Flower 3 for a fuller look or focusing on larger Flower 1 roses for a classic appearance.

I've also tried adding tiny accessories like a miniature veil made from tulle, or a small crochet bouquet charm attached to the bride's hands. For the ribbon on the bouquet, different colors can completely change the look - try gold metallic yarn for luxury, or match it to wedding colors for a personalized gift. Some crafters even add small beads or buttons to the flower centers for extra detail. The beauty of this pattern is that every variation tells a different love story!

Common Mistakes & How to Fix Them

βœ— Working stitches too loose during the reversible joining section causing gaps to show between the bride and bouquet sides when flipped βœ— Forgetting to leave the long starting yarn tails from the magic rings which are essential for joining both pieces together properly βœ— Stuffing the bride's body too firmly before attaching it to the skirt making it difficult to fit inside the bouquet wrapper smoothly βœ— Not using stitch markers to track front loop only and back loop only rounds leading to confusion when attaching decorative edges βœ— Sewing hair strands too tightly all the way to the tips instead of stopping five stitches above causing the hair to stick out instead of curling naturally

Reversible Flower Bouquet & Bride Amigurumi Pattern

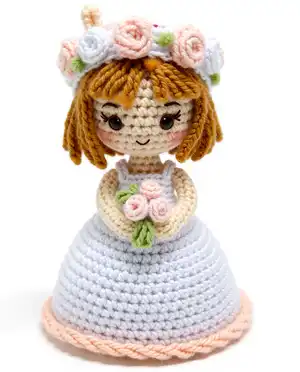
Create a magical two-in-one amigurumi that transforms from a beautiful bride to an elegant flower bouquet! This unique reversible design features a charming bride character on one side with delicate hair, embroidered details, and a flowing white dress, while the other side reveals a stunning bouquet wrapped in cream with colorful roses and greenery. Perfect for weddings, bridal showers, or as a special keepsake gift that celebrates love and creativity in the most adorable way possible.

Intermediate 4-5 Hours

Materials Needed for Reversible Flower Bouquet & Bride Amigurumi Pattern

β€” Main Fabric

  • 01
    4 ply cotton blend yarn in white color
  • 02
    4 ply cotton blend yarn in cream color
  • 03
    4 ply cotton blend yarn in skin color or cream as alternative
  • 04
    4 ply cotton blend yarn in light pink color
  • 05
    4 ply cotton blend yarn in pink color
  • 06
    4 ply cotton blend yarn in light peach color
  • 07
    4 ply cotton blend yarn in peach color
  • 08
    4 ply cotton blend yarn in green color
  • 09
    4 ply cotton blend yarn in light brown or dark brown for hair

β€” Tools Required

  • 01
    2.0 mm crochet hook or size suitable for yarn used
  • 02
    Tapestry needle
  • 03
    Embroidery needle
  • 04
    Pin needle
  • 05
    Fiberfill for stuffing
  • 06
    Scissors
  • 07
    Multipurpose glue (optional)
  • 08
    Stitch markers

Progress Tracker

0% Complete

β€” BRIDE'S HEAD AND BODY :

Info :

Start with skin color yarn

R1 :

6sc in MR (6)

R2 :

6inc (12)

R3 :

[sc, inc]x6 (18)

R4 :

[sc, inc, sc]x6 (24)

R5 :

[5sc, inc]x4 (28)

R6-12 :

28sc (28)

R13 :

[5sc, dec]x4 (24)

R14 :

[sc, dec, sc]x6 (18)

Info :

Start stuffing with fiberfill

R15 :

[sc, dec]x6 (12)

R16 :

FLO [sc, inc]x6 (18)

Info :

Change to white yarn

R17-18 :

18sc (18)

Info :

Fasten off, leave a long tail for sewing. Do an invisible finish

β€” BRIDE'S ARMS (make 2) :

Info :

Start with skin color yarn. Make 12ch. Start from the second loop from the hook, make 11sc. Fasten off, leave a long tail for sewing. Attach the arm to the body with the wrong/ugly side faces outside, between R16-17

β€” BRIDE'S HAIR :

Info :

Start with light brown yarn

R1 :

8sc in MR (8)

R2 :

8inc (16)

Info :

Sl st to the first st of R2. Then continue to make the hair strands

Strand 1 :

14ch. Start from the second loop from the hook: sl st, 12sc. Sl st to the next st

Strand 2-5 :

8ch. Start from the second loop from the hook: sl st, 6sc. Sl st to the next st

Strand 6 :

Do the same as strand 1

Strand 7-16 :

16ch. Start from the second loop from the hook: sl st, sc, 13hdc. Sl st to the next st

Info :

Fasten off, leave a long tail for sewing. Attach the hair to the head with the wrong side facing outwards

Infos :

Use the dark brown yarn to embroider the eyes at R10. With dark brown yarn (use only 1 ply), embroider the eyebrows at R8. Embroider the blush on the cheeks using pink yarn, between R11-12

β€” BRIDE'S SKIRT :

Info :

Start with white yarn. Leave a long starting yarn tail, approximately 10 cm (4"). This tail will be used to join both bouquet and bride at the end of this pattern

R1 :

6sc in MR (6)

R2 :

6inc (12)

R3 :

[sc, inc]x6 (18)

R4 :

[sc, inc, sc]x6 (24)

R5 :

[3sc, inc]x6 (30)

R6 :

[2sc, inc, 2sc]x6 (36)

R7 :

[5sc, inc]x6 (42)

R8 :

42sc (42)

R9 :

[3sc, inc, 3sc]x6 (48)

R10-13 :

48sc (48)

R14 :

[7sc, inc]x6 (54)

R15-16 :

54sc (54)

R17 :

BLO 54sc (54)

R18 :

54sc (54)

Info :

Stop for a while but do not cut the yarn, because it will be use for the step on page 9

Infos :

Hold the skirt with its bottom facing you. Attach the light peach yarn at the FL of R16 (you worked R17 BLO). Work: [sl st, sc, hdc inc, sc]x13, 2sl st. Fasten off, secure and hide the tail

β€” BOUQUET WRAPPER :

Info :

Start with cream yarn. Leave a long starting yarn tail, approximately 10 cm (4"). This tail will be used to join both bouquet and bride at the end of this pattern

R1 :

6sc in MR (6)

R2 :

6inc (12)

R3 :

[sc, inc]x6 (18)

R4 :

BLO [sc, inc, sc]x6 (24)

R5 :

[3sc, inc]x6 (30)

R6 :

[2sc, inc, 2sc]x6 (36)

R7 :

[5sc, inc]x6 (42)

R8 :

42sc (42)

R9 :

[3sc, inc, 3sc]x6 (48)

R10-13 :

48sc (48)

R14 :

[7sc, inc]x6 (54)

R15-18 :

54sc (54)

Info :

Fasten off. Leave a long tail for sewing, about 50 cm long

Infos :

Hold the bouquet with its opening part facing you. Attach the cream yarn at the FL left of R3 (you worked R4 BLO). Make 1ch

R1 :

[hdc, hdc inc]x9 (27)

R2 :

[2hdc, hdc inc]x9 (36)

R3-4 :

36hdc (36)

Info :

Fasten off. Do an invisible finish and secure and hide the tails

β€” RIBBON :

Info :

Work in rows. Start with peach yarn. Make 25ch. Then, start from the second loop from the hook

R1 :

[2sc, 2hdc, 4dc, 2hdc, 2sc]x2 (24), 1ch

R2 :

Turn, BLO [2sc, 2hdc, 4dc, 2hdc, 2sc]x2 (24)

Infos :

Fasten off, leave a long tail. Fold the bow so that both ends meet in the middle. Make a knot using both yarn tails to fix the position of the folded ribbon. Then, make a bow's tail using the same color yarn. Make a MR, Then work: [10ch, start from the third loop from the hook: 5dc, 2hdc, sc. Sl st to the MR]x2. Pull tight the MR and fasten off. Using the yarn tail, attach the bow's tail to the center back of the bow. Let its wrong/ugly side faces outside. Using white yarn, make some turns to create the central part of the bow. Secure the ends. Leave a long tail for sewing. And then, sew the ribbon to the bouquet, near to its bottom

β€” FLOWER 1 (make 6) :

Info :

Make 1 in pink and white. Make 2 in light pink and light peach. Make 6ch. Start from the second loop from the hook: hdc, hdc inc, hdc, 2ch, hdc inc in the same st, 2ch, hdc inc in the next st, 2ch, hdc in the same st, hdc, 2ch, hdc inc in the same st. Fasten off, leave a long tail for sewing. Roll up the flower and sew it together so that it won't roll open

β€” FLOWER 2 (make 10) :

Info :

Make 6 in light peach, 3 in light pink, and 1 in pink. Make 6ch. Start from the second loop from the hook: sc, inc, 3inc3. Fasten off, leave a long tail for sewing. Roll up the flower and sew it together so that it won't roll open

β€” FLOWER 3 (make 3) :

Info :

Use the white yarn. In a MR, make: [4ch, sl st to the MR]x5. Tighten the MR. Fasten off, leave a long tail for sewing

β€” LEAVES 1 (make 3) :

Info :

Start with green yarn. Make 5ch, start from the second loop from the hook, make sl st, sc, hdc, sl st. Don't cut the yarn and make again 4ch, start from the second loop from the hook, make sl st, sc, sl st. Fasten off. Leave a long tail for sewing

β€” LEAVES 2 (make 3) :

Info :

Start with green yarn. Make 4ch, start from the second loop from the hook, make sl st, sc, sl st. Fasten off. Leave a long tail for sewing

Assembly Instructions

  • Attach the flowers and leaves on top of the bride's head using the long yarn tails left from each piece
  • Attach the bride's body to the skirt between R3-4. No need to stuff the body with fiberfill, or just stuff it slightly
  • Attach the ends of the arms, leaves 1 and 3 pieces of flower 2 (in light pink and light peach) at the skirt
  • Turn the bouquet wrapper and the bride's skirt inside out with the wrong/ugly sides facing you. Tie a knot with the yarn tails from the magic rings of both pieces, leaving a space between them
  • Turn the bouquet wrapper back with the right/good side facing you, and leave the skirt intact at the wrong/ugly side. Push the skirt inside the bouquet wrapper
  • Join the last rounds of the bouquet wrapper and the bride by sewing them together with light pink tail through the BL of each piece
  • Hold the bouquet with its flowers facing you. Attach the cream yarn to the FL of R18 and work: [sl st, sc, hdc inc, sc]x13, 2sl st. Then work the bride's side with white yarn at FL R18

Important Notes

  • πŸ’‘Try working tight stitches and use a smaller crochet hook for better results, but don't work too tight so the plushie remains stretchable
  • πŸ’‘Work every part using the same stitch tension for consistency throughout the reversible design
  • πŸ’‘Use stitch markers or pieces of yarn to mark the ending or beginning of rounds, especially when working BLO and FLO
  • πŸ’‘Each round is worked in a continuous spiral. Do not join rounds with slip stitch or turn unless stated otherwise
  • πŸ’‘Leave the long starting yarn tails (approximately 10 cm) from the magic rings as they are essential for joining the bouquet and bride
  • πŸ’‘When sewing hair strands together, sew about 5 stitches above the slip stitch to give a nice curl and help the hair stay closer to the head
  • πŸ’‘You can use glue or sewing to attach the hair, but be aware that glued areas become stiffer and may make it difficult to sew flowers later

This enchanting Reversible Flower Bouquet and Bride pattern brings together two beautiful designs in one magical amigurumi! Perfect for weddings, bridal showers, or as a unique keepsake, this pattern challenges you to create something truly special with its innovative reversible construction. The detailed bride features embroidered facial features and flowing hair, while the bouquet side showcases an array of handcrafted roses and greenery wrapped elegantly in cream. It's a delightful project that combines creativity with meaningful symbolism, making it an unforgettable gift for any bride or wedding celebration. πŸ§ΆπŸ’βœ¨

You ask,

we answer.

FAQs

Can I use different yarn weights for this pattern?

While the pattern recommends 4 ply cotton blend yarn with a 2.0mm hook, you can use different yarn weights. Just remember that using thicker yarn will make a larger amigurumi, and thinner yarn will make a smaller one. Always adjust your hook size accordingly to maintain tight stitches.

How do I prevent gaps from showing when I flip the reversible design?

The key is maintaining consistent tension throughout both pieces and working tight stitches. When joining the bouquet wrapper and bride's skirt, make sure to sew through the back loops carefully and leave the appropriate space between them as instructed. Don't stuff either piece too firmly.

Do I need to make all the flowers mentioned in the pattern?

The flower quantities provided are recommendations, but you can adjust them based on your preference. You might want more or fewer flowers depending on how full you want the bouquet to look. Just make sure you have enough to cover the top of the bride's head and create a nice bouquet arrangement.

Is it better to sew or glue the hair onto the head?

Both methods work, but sewing is generally recommended. While glue is faster, it makes the area stiffer, which can make it difficult to sew flowers onto the head later. If you do use glue, apply it sparingly and avoid the areas where you plan to attach flowers.

What's the best way to embroider the facial features?

Use a single ply of dark brown yarn for the eyebrows at R8, and embroider the eyes at R10 with small horizontal stitches. For the blush, use pink yarn and make small diagonal stitches between R11-12 on each cheek. Practice on a scrap piece first if you're new to embroidery.